Accept Stripe Payments Using Contact Form 7
Overview
Description
Introducing ZealousWeb’s new way to get paid online: easily accept credit card payments on your website using Stripe and Contact Form 7. With our plugin ‘Accept Stripe Payments Using Contact Form 7’ anyone can receive payments from customers hassle-free. Just add the plugin to your website, and any Contact Form 7 becomes a safe payment spot. Customers fill out the form, and Stripe takes care of the rest, making sure it’s quick and secure.
No need for hard setups or extra tools. It’s all about keeping things easy and safe for businesses big and small. Give our plugin a try today and watch your revenue grow without any payment headaches for your customers.
Plugin's purpose and benefits
- Postal Code/Zip Code Field - Enable Postal Code / Zip Code Field on the Card: Add an option to include a postal code or zip code field in the payment card details.
- Dynamic Success Messages - Dynamic Payment Successful Message for Admin: Allow admins to customize and display a dynamic message upon successful payment.
- Enhanced Currency Support - The plugin will continue to support payments in 25 different currencies, ensuring flexibility for businesses with a global customer base.
- Advanced Form CreationYou'll be able to create diverse payment forms with Contact Form 7, handling various input types such as dropdowns, textboxes, and radio buttons.
- Data IntegrationThe plugin will seamlessly take values from your website, like item descriptions, prices, and customer info, to streamline the payment process.
- Payment TestingBefore going live, you'll be able to test payments to ensure everything works perfectly.
- Transaction ManagementWith the free version, you can view up to 10 payment transactions in the admin area. Easily export payment data to CSV, filter, search, view, or delete payment records.
- Shortcode for DetailsUse the [stripe-details] shortcode to display transaction details like ID, amount, and status.
- Email CustomizationBoth customers and admins receive email notifications after payment. You'll have the ability to customize the content and include Stripe payment tags for detailed responses.
- Redirect OptionsSet 'Success Return URL' and 'Cancel Return URL' pages to direct users after payment transactions.
- WordPress VIP CompatibilityThe plugin will maintain compatibility with WordPress VIP, ensuring it works seamlessly with high-performance WordPress sites.
Get Started
Quick setup instructions


How To Use & Features
You have to configure it from wp-admin > Contact > Add/Edit Contact Forms (Contact Form 7 needs to be activated before) to use this plugin.
You will find a new tab “Stripe” along with Form, Mail, Messages, and Additional Settings, where you can make all settings related to Stripe Extension.

Note : You need to add the “Stripe” tag in your form. You will find a tag “Stripe” along with text, email, URL, etc.
To add a Stripe payment form to your Contact Form 7, find the setting attributes given below:
For wp-admin > Contact > Contact Forms > Stripe
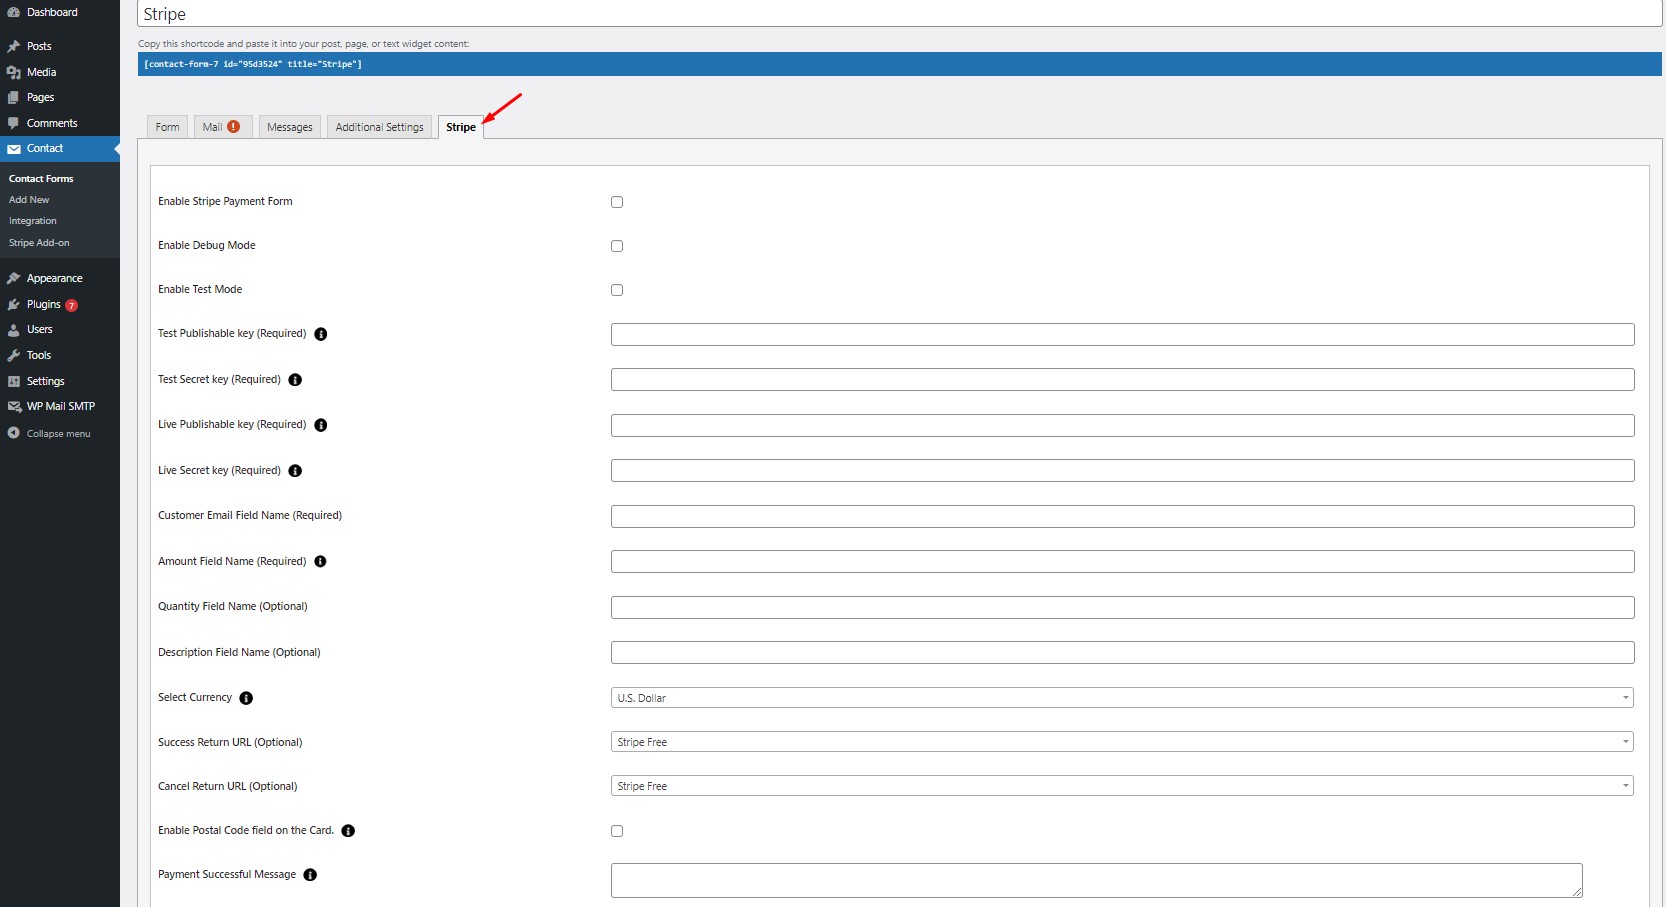
- Enable Stripe Payment Form Activate this option to allow Stripe payments on the form.
- Enable Debug Mode Check this to start tracking and debugging transactions.
- Enable Test API Mode: Use this to run Stripe in test mode, allowing you to test payments without real transactions.
- Test Publishable Key Required when using test mode. Get this from your Stripe account under Developers > API Keys.
- Test Secret Key - Also required for test mode. Get it from the same location as the Publishable Key.
- Live Publishable Key Required when using live mode. Get this key from your Stripe account under Developers > API Keys.
- Live Secret Key Required for live mode. Also found under Developers > API Keys in your Stripe account.
- Amount Field Name Set this to the name of a form field (like a hidden field) that contains the payment amount.
- Quantity Field Name Optionally, set this to the name of a form field that contains the quantity of the item.
- Customer Email Field Name Optionally, set this to the name of a form field that captures the customer’s email.
- Description Field Name Optionally, set this to the name of a form field that describes the item.
- Select Currency Choose your preferred currency. The default is AUD (Australian Dollar).
- Success Return URL Optionally, set the URL where customers are redirected after a successful payment.
- Cancel Return URL Optionally, set the URL where customers are redirected if the payment fails.
- Enable Postal Code Field Add a postal code field on the payment form.
- Payment Successful Message Customize the message shown after a successful payment.
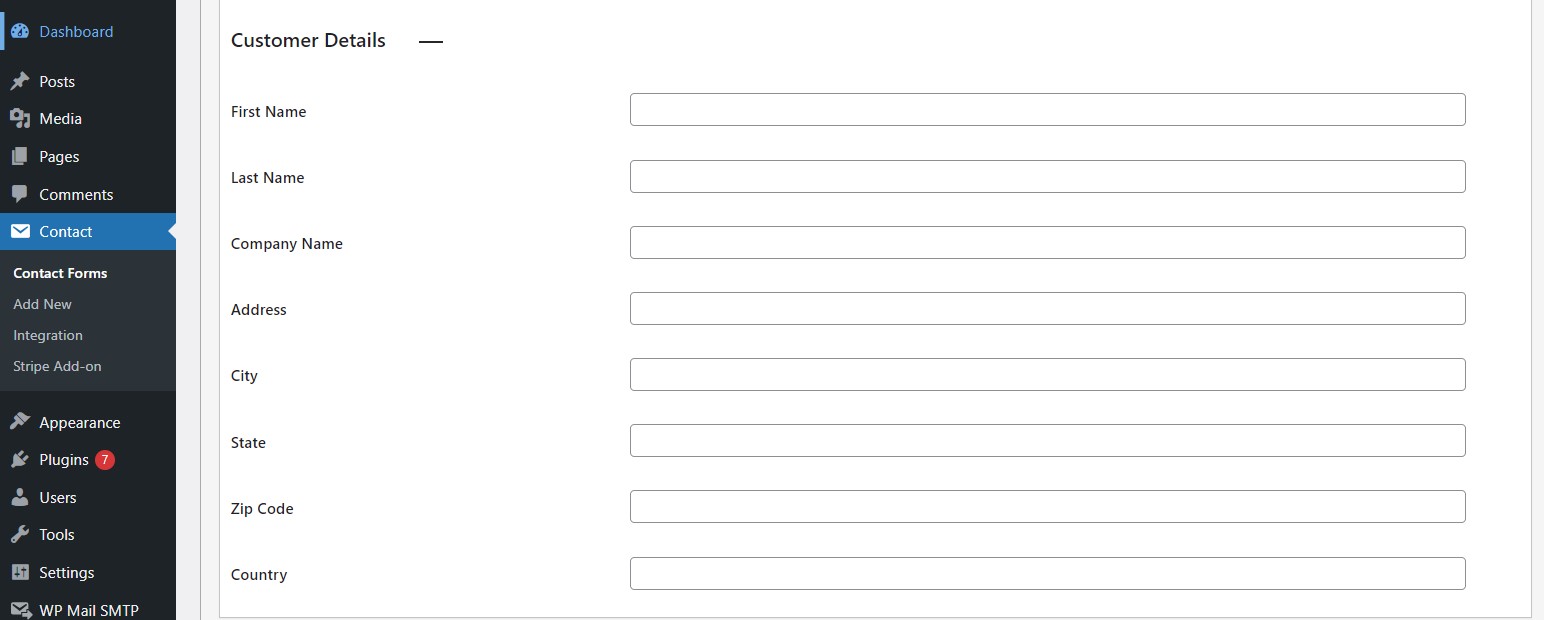
Customer Details
- First Name - You have to select a name attribute for the first name field of contact form 7.
- Last Name - You have to select a name attribute for the last name field of contact form 7.
- Company Name - You have to select a name attribute for the company name field of contact form 7.
- Address - You have to select a tag name for the address field of contact form 7.
- City - You have to select a tag name for the city name field of contact form 7.
- State - You have to select a tag name for the state name field of contact form 7.
- Zip Code - You have to select a tag name for the zip code field of contact form 7.
- Country - You have to select a tag name for the country field of contact form 7.
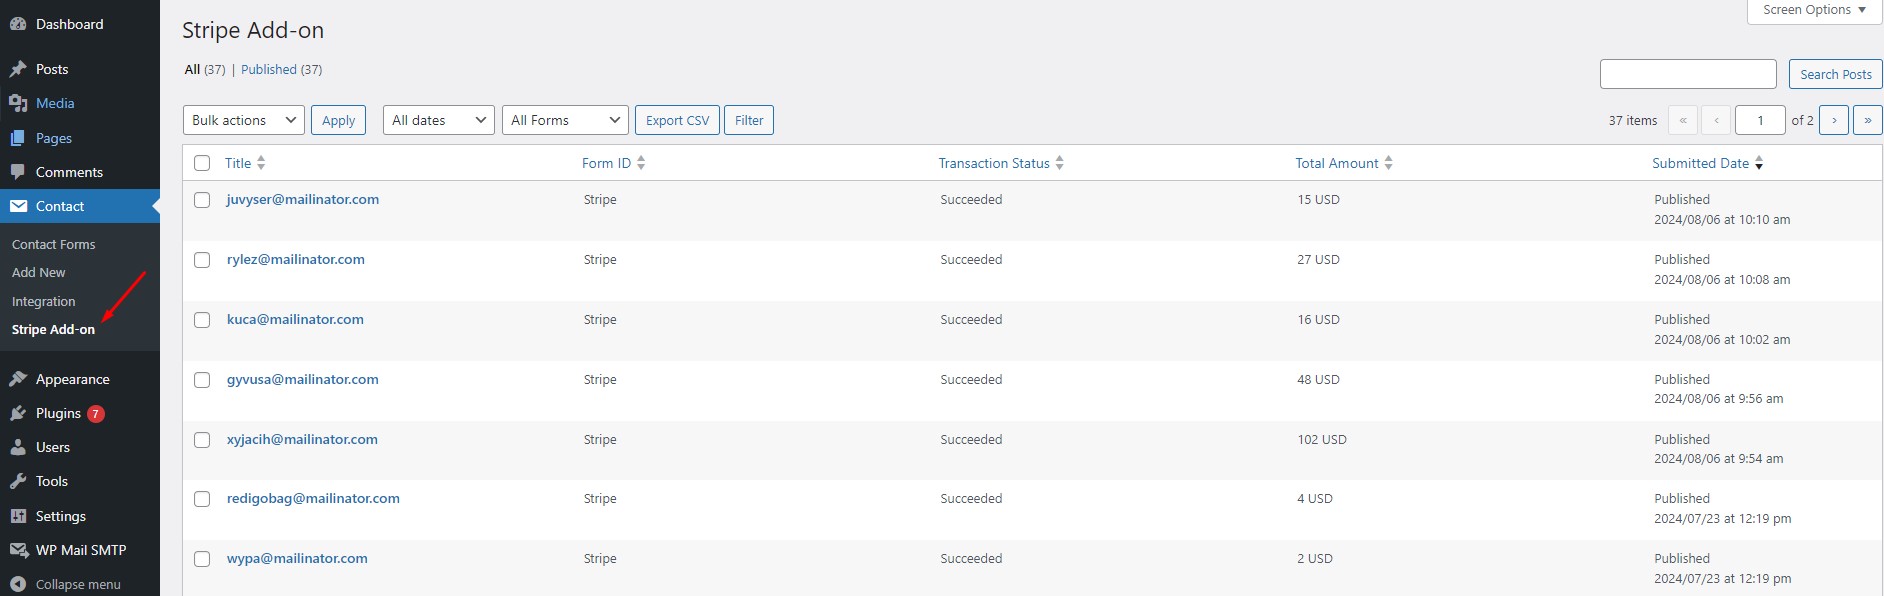
For Stripe Add-on
Customer Details
To manage transaction listings in Accept Stripe Payments Using Contact Form 7 , you can include the following features:
- Title - The payer's email address.
- Form ID - Identifier for the specific payment form used.
- Total Amount - The full amount charged for the transaction.
- Submitted Date - The date and time when the payment was made.
- Transaction Status - The current state of the payment:
- Approved - Payment successful.
- Pending - Payment is still processing.
- Declined - Payment failed.
For Stripe Form Details
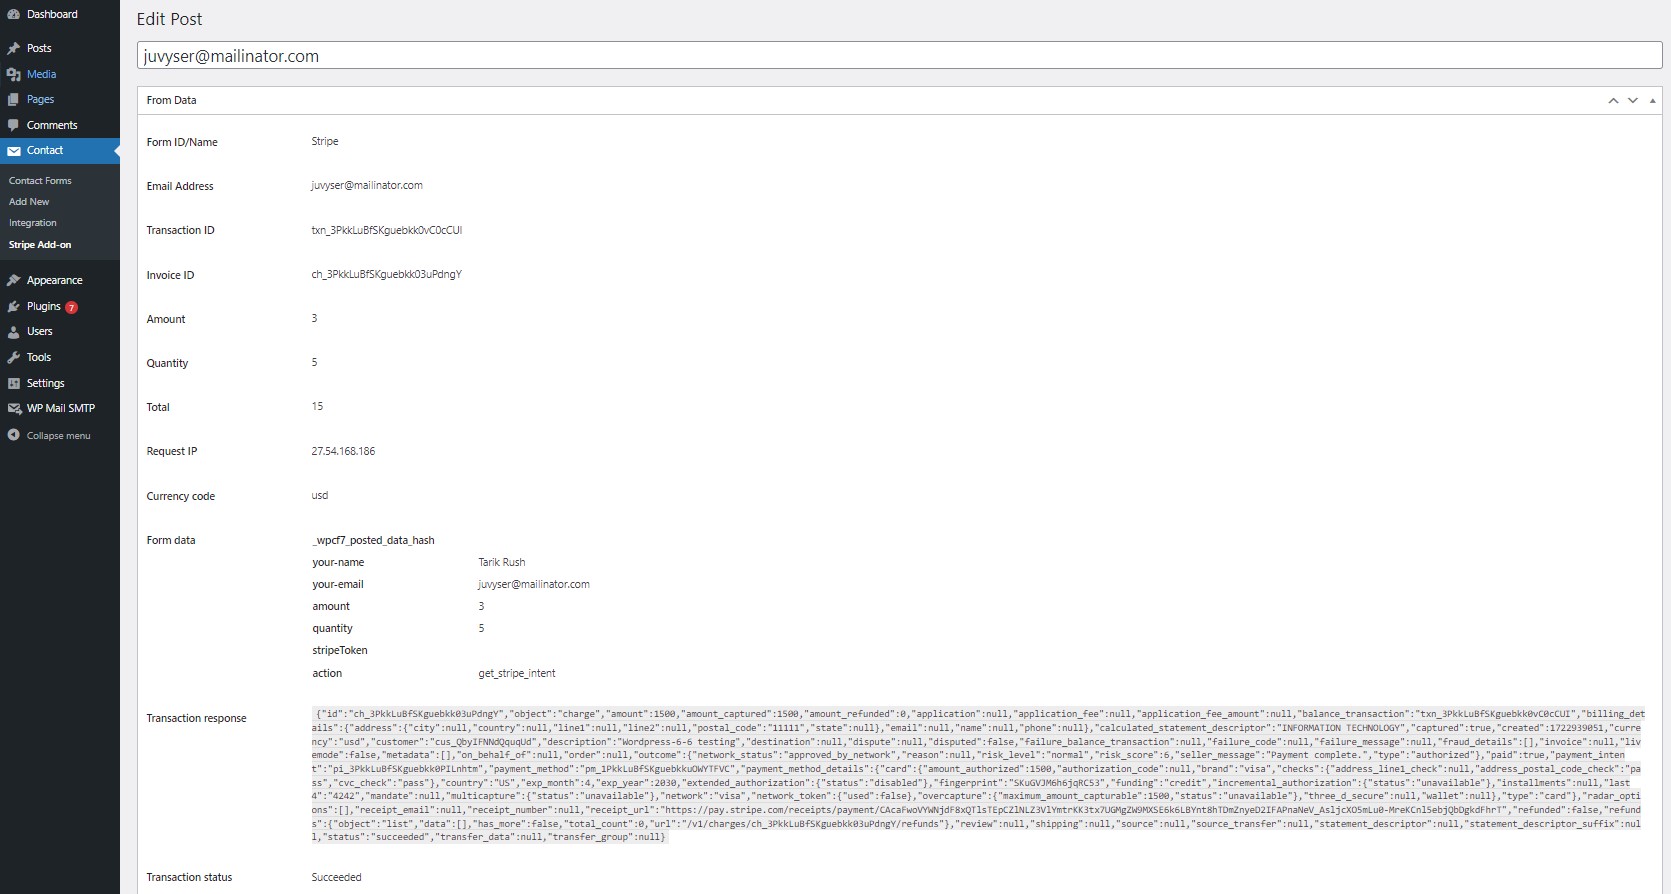
To manage transaction listings in Accept Stripe Payments Using Contact Form 7 you can include the following features:
- Form ID/Name - The unique identifier or name of the Contact Form 7 form used for the transaction.
- Email Address - The payer's email address used during the transaction.
- Transaction ID - A unique identifier for the specific payment transaction generated by Authorize.NET.
- Invoice ID - The unique invoice number associated with the transaction for tracking and reference.
- Amount - The total amount charged for the transaction.
- Quantity - The number of items or services purchased in the transaction.
- Total - The overall total amount charged, including any taxes or fees.
- Request IP - The IP address from which the payment request was made.
- Currency Code - The currency in which the payment was processed (e.g., USD, EUR).
- Form Data - The collected data from the Contact Form 7 form fields, including:
- First Name The payer's first name.
- Last Name The payer's last name.
- Your Email The payer's email address.
- Price The cost of the item or service being purchased.
- Quantity The number of items or services being bought.
- stripeToken A unique token generated by Stripe for processing the payment.
- Action The action being performed, usually related to submitting the form or processing the payment.
- Transaction Response - The detailed response from Stripe regarding the payment transaction.
Get Support
FAQs
Change log
Version 2.4
- Enable the Postal Code / Zip Code field on the Card
- Dynamic Payment Successful Message for Admin: Allow admins to customize and display a dynamic message upon successful payment.
Version 2.3
- Bug Resolved
Version 2.2
- Improved compatibility with WordPress VIP platform by refactoring code to adhere to VIP coding standards.
Version 2.1
- The problem with the log file on the frontend has been resolved.
Version 2.0
- Transactions failing bug fixed.
Version 1.9
- Uploaded missing API library files(fixed fatal error on activation), Updated Payment intent script.
Version 1.8
- Fixed fatal error of API Requestor library.
Version 1.7
- Updated API requestor library.
Version 1.6
- Fixed contact form 7 Form setting for saving sandbox value for stripe.
Version 1.5
- Updated the Stripe Library : Made use of the Payment Intents API that can handle complex payment flows.
Version 1.4
- Fix : solved issue of showing Message on Submit.
Version 1.3
- Fix : Testing with lates CF7 5.6 and WP 6.0.1 and fix issues.
Version 1.2
- Fix minor bugs and improve functionality.
Version 1.1
- Compatibility with latest cf7 version.
- Fix minor bugs and improve functionality.
Version 1.0
- Initial Release