Abandoned Contact Form 7 Pro
Overview
Description
Abandoned Contact Form 7 Pro plugin provides to track the Contact Form 7 form data even if the user does not submit the form. And, sends mail notification to each Abandoned user.
The plugin is designed to help you manage abandoned form submissions in Contact Form 7. This can be especially useful for reaching out to users who started filling out a form but did not complete it.
Plugin's purpose and benefits
- Compatibility with WordPress VIP - The plugin works seamlessly with WordPress VIP.
- Email ID Field Selection - You can select the email ID field for each form in the form settings.
- Enable/Disable Forms - You have the option to enable or disable multiple forms as needed in Contact Form 7.
- Admin Side Entries - View a list of abandoned form submissions in the admin panel.
- View User Data - In the list of abandoned forms, you can view IP addresses and other data filled out by the user.
- Export Entries - Export a list of all abandoned form submissions with unlimited entries.
- Schedule Emails - Set a schedule for sending reminder emails to users who abandoned their forms.
- Status Setting - Mark the status of users to ensure they don’t receive the same email multiple times.
- Email Frequency Management - Manage how many times emails should be sent to users.
- Customize Email Body- Customize the content of the reminder emails for abandoned forms.
- SMTP Settings - Configure SMTP settings directly within the plugin without needing an additional plugin.
- Multinetwork Support - The plugin supports use in a WordPress Multisite network.
- Field Tracking - Select specific fields to include in the tracking data.
- Send Individual Emails - Send an email to a single user who abandoned a form.
- Customize Email Body - An option to personalize the email content for abandoned form reminders.
- Field Selection for Tracking - Choose specific fields to track data.
- View User Data - View IP addresses and other data for abandoned form entries in the admin panel.
Get Started
Quick setup instructions


How To Use & Features
You have to configure it from wp-admin > Contact > Add/Edit Contact Forms (Contact Form 7 needs to be activated before) to use this plugin.
Click on ‘Contact” > “Edit Contact Form”, wherein you will find a new tab “Abandoned Form Settings” along with tabs of Form, Mail, Messages, Additional Settings. Here, you can adjust settings related to Abandoned Form and email fields.
For Abandoned Form Settings
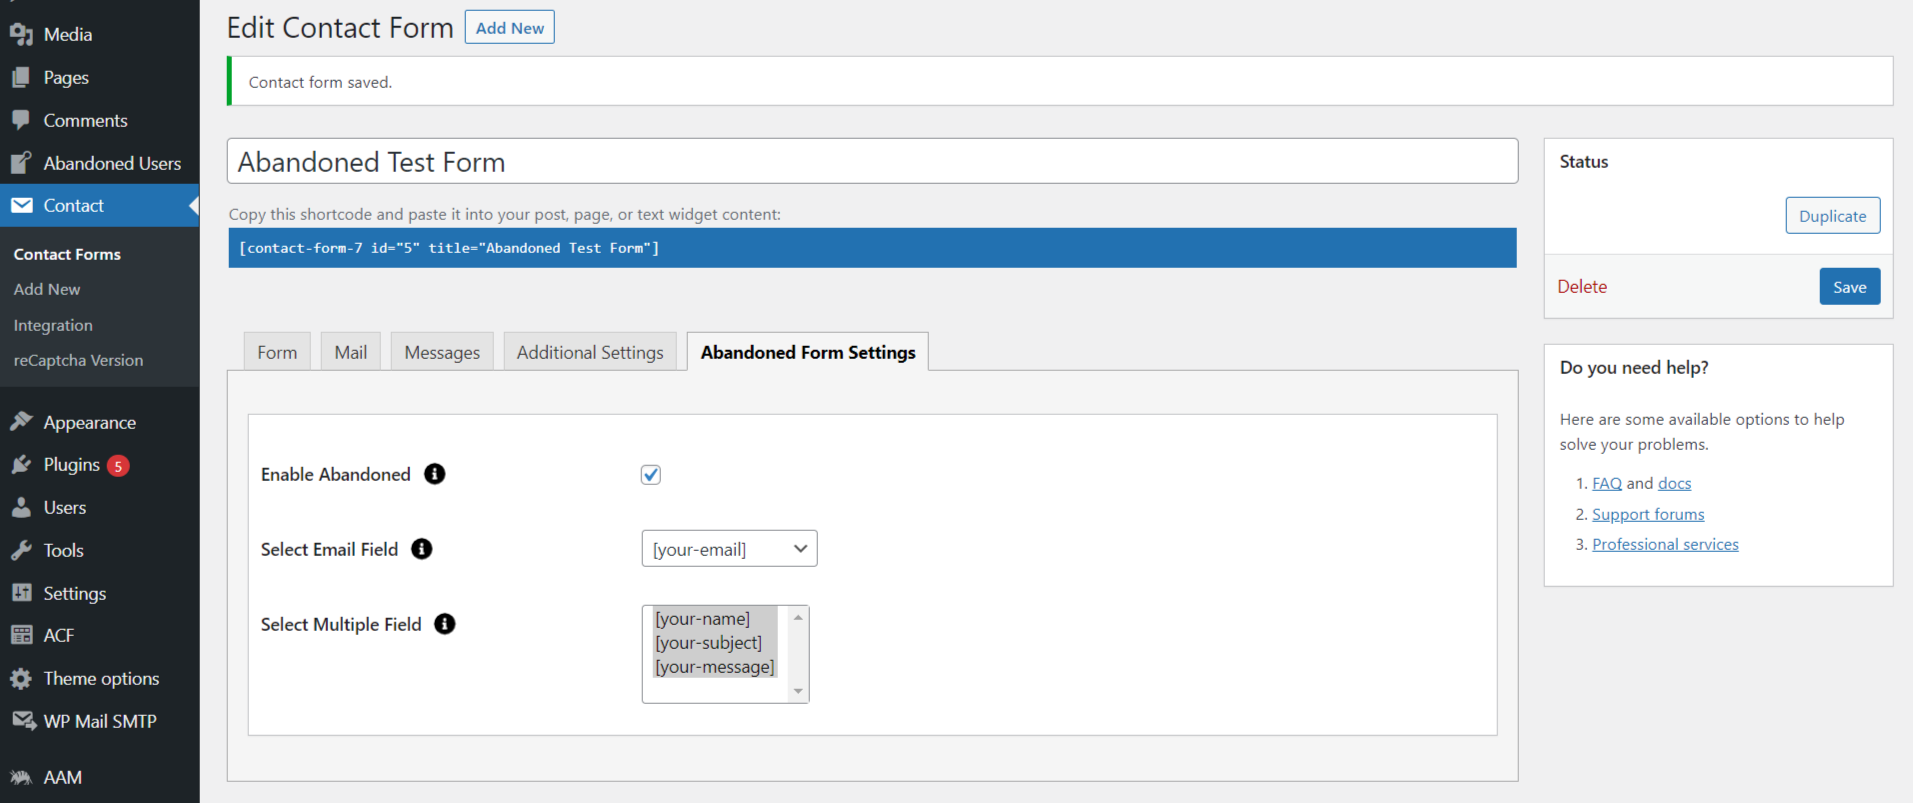
- Enable Abandoned- You can enable/disable Abandoned form functionality.
- Select Email Field- Select the email field for tracking an Abandoned user.
- Select Multiple Field- Enable/Disable Option for multiple forms where you need in Contact Form 7.
Plugin with separate Menu as “Abandoned Contact Form 7 Pro”
For Dashboard
Dashboard page with all abandoned entries details with GUI graph

- Total Abandoned Entries- Displays the total number of abandoned entries processed.
- Total Conversion Entries- Shows the total number of converted abandoned entries
- Successful Conversion Ratio- Indicates how many abandoned entries were successfully converted.
- Total Monthly Abandoned Entries- Displays total abandoned entries chart-wise on a monthly basis
- Total Yearly Abandoned Entries- Displays total abandoned entries in a pie chart format on a yearly basis.
On clicking “Abandoned Users”, you will see the list of abandoned user records who haven’t submitted the form.
For Abandoned Users

Click on any of the Abandoned Users entries to view a respective user’s form details and manage the mail notification settings.

Click on “Action” to send a manual email to that particular user. It will contain the email body with predefined body content and subject line (which you can edit).

In case you have enabled SMTP from “Mail Notification Settings,” you can manage the SMTP settings like username, password, and other details
Settings
For Mail Notification

Use Tags:
{email}
Inserts the email address into the mail body.
{contact_form}
Inserts the form name into the mail body.
{link}
Inserts the page contact link into the mail body.
{filled_date}
Inserts the date when the form was filled into the mail body.
{site_title}, {site_url}, {site_admin_email}, {site_description}
Other special tags to insert site-related information into the mail body.
Mailer Type:
- Default (PHP Mailer)
- SMTP (configurable SMTP settings for mail delivery)
Schedule Notification Time:
- Set the time when notifications should be sent out.
Number of Email Notifications:
- Configure how many notifications should be sent per form submission.
Subject:
- Specify the subject line for the notification emails.
Email Body:
- Design the content of the email body using the tags and site-specific information available.
Also, under the same settings, you can test the mail to check if the SMTP detail is correct or not.
For Admin Email Notification

- Admin Email Notification- You can enable/disable Admin Email Notification functionality.
- Admin Email- Add admin email — supports single or multiple emails.
- Admin Email Body- Design the content of the email body using the tags and site-specific information available.
For SMTP Settings

SMTP Settings:
- From Email Address:
- Enter the email address that will appear in the 'FROM' field of the email notifications.
- From Name:
- Enter the name that will appear in the 'FROM' field of the email notifications.
- SMTP Host:
- Enter the hostname or IP address of your SMTP server (e.g., smtp.yourdomain.com).
- Type of Encryption:
- None: No encryption is used (not recommended for secure email transmission).
- SSL/TLS: Secure Sockets Layer/Transport Layer Security, recommended for most servers to encrypt the connection.
- STARTTLS: Upgrades an existing insecure connection to a secure one (often used with SMTP servers that support it).
- Port:
- Specify the port number used by your SMTP server.
- SMTP Authentication:
- Ensure this option is checked 'Yes' to enable authentication with your SMTP server.
- SMTP Username:
- Enter the username required to authenticate with your SMTP server (often the email address itself).
- SMTP Password:
- Enter the password associated with your SMTP username.
For General

Disable IP Tracking:
- Enable: IP address tracking will be active, and the IP addresses of users who submit forms will be recorded.
- Disable: IP address tracking will be turned off, and the plugin will not record users' IP addresses.
Webhook API

Enable Webhook:
- Enable Webhook API: Enable or disable the Webhook API feature. When disabled, no webhooks will be triggered.
- Webhook Management Create multiple webhooks, enable/disable them individually, set event-based triggers, and test webhooks in real-time.
Help and Support

- Access helpful resources including documentation, FAQs, and support options in one place.
- Easily submit support tickets or explore guides to resolve issues quickly.
- Stay updated with the latest insights through blogs and newsletter subscriptions.
Get Support
FAQs
Can I abandon the data of the file type input field of the form?
No, you can’t abandon the data of the file type input field.
Can I send mail notifications to every abandoned user?
Yes, you can send mail notifications to either every abandoned user or a particular user.
Change log
version 2.0
- Access helpful resources including documentation, FAQs, and support options in one place.
- Easily submit support tickets or explore guides to resolve issues quickly.
- Stay updated with the latest insights through blogs and newsletter subscriptions.
version 1.9
- Added custom webhook URL support to send abandoned form data to external endpoints.
- Added JSON payload format support for modern API compatibility.
- Implemented real-time data sync for instant abandoned form data forwarding.
version 1.8
- Added New Analytics Dashboard.
- Add - Admin Email Notification Settings.
version 1.7
- Updated subscription API URL.
- Tested with WordPress 6.6.
version 1.6
- Compatibility of WordPress VIP.
version 1.5
- Add pre-populate tags value for email message body.
- Add widget for today's abandoned entry in dashboard.
- Add feature for disable/enable IP tracking.
- Add total no of. entry in drop-down list in abandoned list page & Display form name in abandoned list page.
- Display login user name in Abandoned detail.
version 1.4.1
- Fix issue of select specific field to include in tracking data.
version 1.4
- Here you can select specific field to include in tracking data.
- Tested with PHP version 8.x and it works fine.
version 1.3
- Update plugin for multinetwork support
- Fix issue regarding save form entry in admin
version 1.2
- Update plugin with small fixes
version 1.1
- Initial Release