Accept Authorize.NET Payments Using Contact Form 7 Pro
Overview
Description
ZealousWeb Technologies has launched a new plugin called 'Accept Authorize.NET payment gateway using Contact Form 7 Pro' This plugin integrates the Authorize.NET payment gateway with Contact Form 7, allowing users to receive credit card payments directly from customers. This solution is ideal for users facing fee-related issues, as it avoids the need to redirect customers to a third-party payment page.
Plugin's purpose and benefits
- Transaction Status Dashboard Widget - Quickly view transaction statuses directly from the WordPress Dashboard.
- GUI Graph Dashboard - A graphical interface to visualize transaction data.
- Email Templates - Pre-defined email templates for user and admin transaction notifications.
- Refund Functionality - Initiate refunds directly from the admin interface.
- Debug Log - Logs to debug and monitor payment processes and troubleshoot issues.
- Recurring Payments - Accept recurring payments via Authorize.NET with an option to cancel subscriptions from the admin panel.
- Test API Mode - Enable test mode to ensure payment transactions work properly before going live.
- Multiple Payment Forms - Create and manage multiple payment forms using Contact Form 7.
- Support for Various Input Formats - Accept values from dropdowns, textboxes, radio buttons, etc.
- Dynamic Parameters - Customize payment forms dynamically with item description, amount, email, quantity, and customer details.
- CSV Export -Export payment data from Contact Form 7 to CSV for analysis.
- Filters and Search - Admin-side filters and search options to manage and locate payment records easily.
- Data Management - View and delete payment data directly from the admin interface.
- Personalized Emails -Customize transaction notification emails for customers and administrators.
- Redirect Options - Define URLs to redirect users after completing or canceling a transaction.
- Shortcode Support - Use the [authorize-details] shortcode to display transaction details after a payment is made.
- Insert Tag Positioning - Ensures the Authorize.NET payment button appears above the submit button on forms.
- WordPress VIP Compatibility - Ensures compatibility with WordPress VIP for high security, performance, and scalability.
- Recurring Payments Management - Handle recurring payments via Authorize.NET and manage subscriptions and cancellations from the admin panel.
- Enhanced CSV Export - Easily export payment data to CSV format for business insights and integration with other systems.
Get Started
Quick setup instructions


How To Use & Features
You have to configure it from wp-admin Contact Add/Edit Contact Forms (Contact Form 7 needs to be activated before) to use this plugin.
You will find a new tab “Authorize.Net“ along with Form. Mail. Messages. Additional Settings from where you can make all settings related to Authorize.Net.


Remember to include the "Authorize.Net" tag within your form where you want the payment form to appear. This tag can be found alongside other standard tags like text, email, and URL.
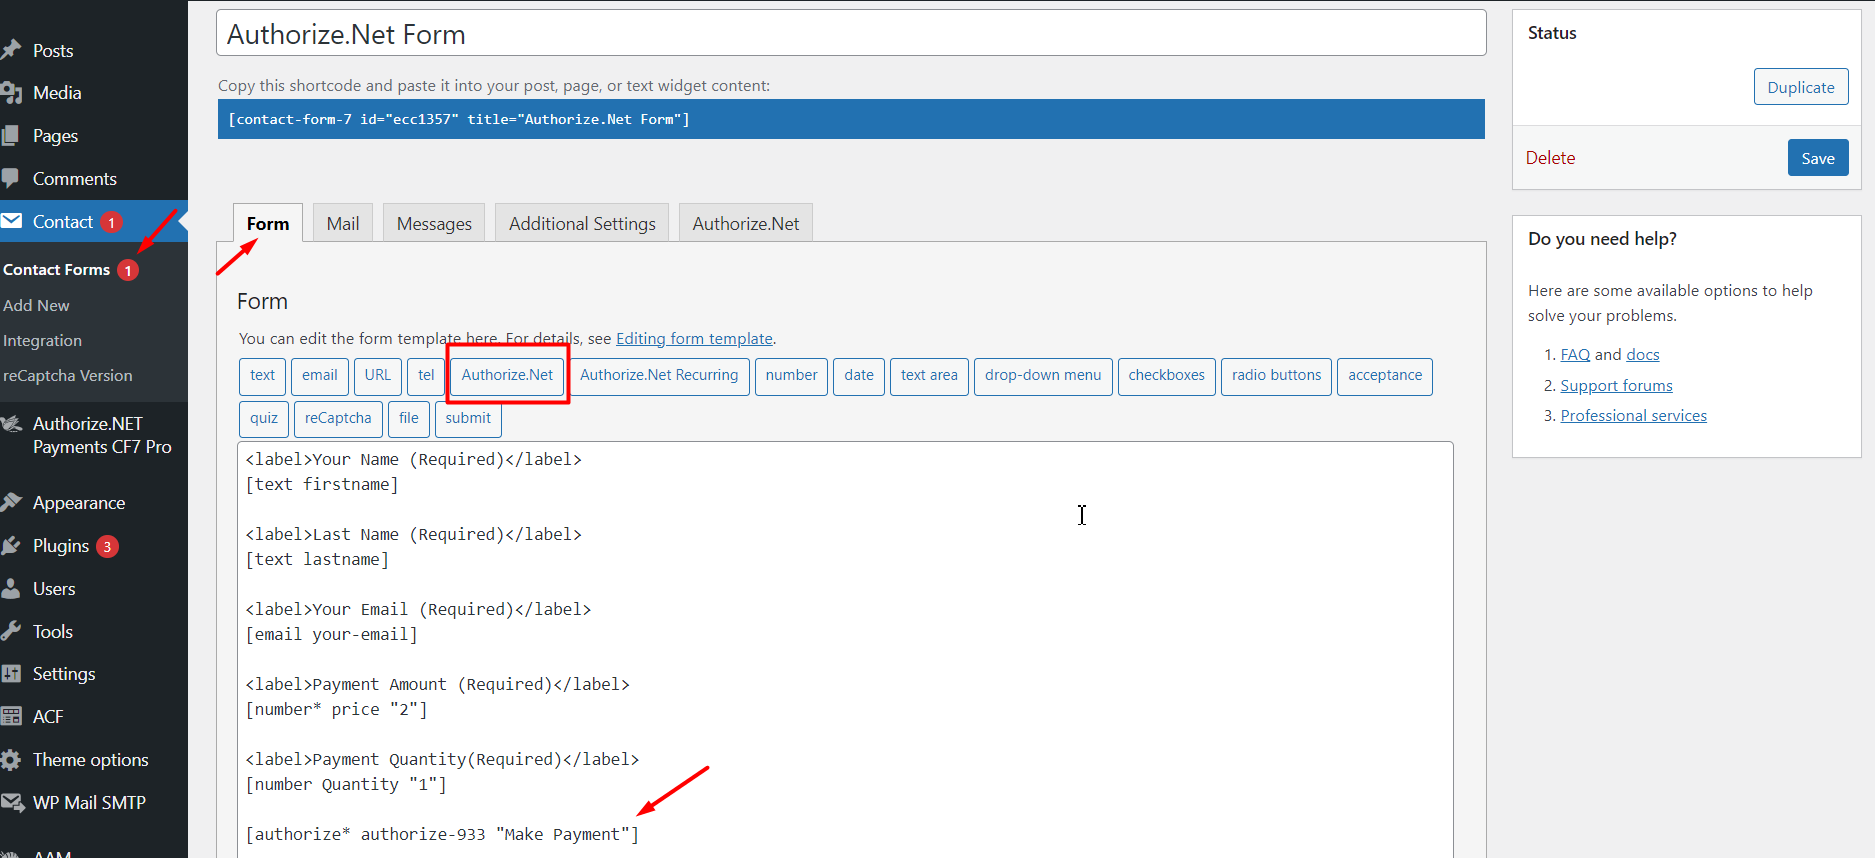
This setup enables you to seamlessly integrate Authorize.Net payment forms into your Contact Form 7 setup on WordPress.
For wp-admin > Contact > Contact Forms > Authorize.Net
- Enable Authorize.Net Payment Form - Check this option to activate the Authorize.Net submit button.
- Enable Test API Mode - Check this option to use the test API mode for transactions.
- Enable Debug Mode - Check this option to start transaction debugging.
- Sandbox Login ID (required) - Needed when using sandbox mode for testing. Get it from your Authorize.net account under Account Security Settings API Credentials Keys.
- Sandbox Transaction Key (required) - Needed when using sandbox mode for testing. Generate it in your Authorize.net account under Account Security Settings API Credentials Keys.
- Live Login ID (required) - Needed when using live mode for real transactions. Get it from your Authorize.net account under Account Security Settings API Credentials Keys.
- Live Transaction Key (required) - Needed when using live mode for real transactions. Generate it in your Authorize.net account under Account Security Settings API Credentials Keys.
- Amount Field Name (required) - Set a name attribute in your Contact Form 7 field to pass the amount value to Authorize.net. Example: [number amount "20"] (set "amount" in this field).
- Quantity Field Name (optional) - Set a name attribute in your Contact Form 7 field to pass the quantity to Authorize.net. Example: [number Quantity "1"] (set "quantity" in this field).
- Customer Email Field Name (optional) - Set a name attribute in your Contact Form 7 text field to pass the customer's email to Authorize.net.
- Description Field Name (optional) - Set a name attribute in your Contact Form 7 text field to pass the description to Authorize.net.
- Select Currency - Choose your currency. Default is AUD (Australian Dollar).
- Success Return URL (optional) - Enter the URL to redirect to after a successful transaction.
- Cancel Return URL (optional) - Enter the URL to redirect to if the transaction fails.
- Customer Details - Set name attributes in your Contact Form 7 text fields to pass customer details to Authorize.net:
- First Name
- Last Name
- Company Name
- Address
- City
- State
- Zip Code
- Country
Plugin with separate Menu as “Authorize.NET Payments CF7 Pro”
For Dashboard

- Total Transaction- Displays the total number of transactions processed.
- Total Amount- Displays the total amount of transactions processed.
- Success Transaction- Displays the number of transactions that were successfully processed.
- Failed Transaction- Displays the number of transactions that failed to process.
- Total Monthly Transactions- Displays transactions chart-wise on a monthly basis
- Total Yearly Transactions- Displays transactions in a pie chart format on a yearly basis.

- View Your Recent Transactions- Displays the 5 most recent transactions.
- Filter- Displays transactions based on selected date, form, and status (Approved, Canceled, Refunded).
For Transaction

To manage transaction listings in Accept Authorize.NET Payments Using Contact Form 7 Pro , you can include the following features:
- Form Name Display the name of the Contact Form 7 form associated with each transaction.
- Transaction Success- Indicate whether each transaction was successful or not.
- Total Amount- Show the total amount for each transaction.
- Submitted Date- Record the date each form was submitted.
- Ordering- Allow users to sort the listings in ascending or descending order based on the form name, transaction success, total amount, and submitted date.
- Search- Include a search function to quickly find specific transactions.
- Export CSV- Enable users to export the transaction data to a CSV file for easy record-keeping and analysis.
- Date-wise Listing- Filter transactions by specific dates to see all transactions that occurred within a particular time frame.
- Form-wise Listing- Filter transactions based on specific forms to view transactions related to a particular form.
- Pagination- Use pagination to manage long lists of transactions, making them easier to navigate and view.

- Payer Email Address- Email address of the payer initiating the transaction.
- Transaction ID- Unique identifier assigned to the transaction.
- Invoice ID- Reference number for the invoice associated with the payment.
- Request IP- IP address from which the payment request originated.
- Currency Code- Currency used for the transaction.
- CF7 Form Data- All data submitted through the Contact Form 7.
- Transaction API Data Response- Response data received from the transaction API.
- Transaction Status- Current status of the transaction (e.g., completed, pending, failed).
- Refund Payment - When you click the 'Refund Payment' button, the payment will be refunded."
For Subscription

- If you activate the subscription purchase plugin, you'll receive an email with your subscription key.
For Email Template

For Settings
Dashboard Widgets

- Dashboard Widgets- Enable or Disable the Widget on the Dashboard.

- Dashboard Currency Setting- Choose the Currency Symbol to Display Total Amount on the Dashboard.
Import / Export


- Import CSV- This feature allows you to bring in all PayPal transaction data and form data into your system.
- Export CSV- This feature enables you to extract and save all PayPal transaction data and form data from your system.
Log File

- Enable Debug Logging- Check this option to enable debug logging. View log | Clear log Error log cleared
- Error log duration- Select option to clear the log based on weekly, monthly or never.
Help and Support

- Access helpful resources including documentation, FAQs, and support options in one place.
- Easily submit support tickets or explore guides to resolve issues quickly.
- Stay updated with the latest insights through blogs and newsletter subscriptions.
Get Support
FAQs
When we take Accept Authorize.NET Payments Using Contact Form 7 Pro version. Then for a complete one year, we can do an unlimited transaction?
Yes, With Pro version you can use unlimited Transaction.
What credentials are required for Athorize.Net configuration?
You need to add Login ID and Transaction ID in contact form 7's Athorize.Net tab.
Does the plugin provide recurring payment?
No, it does not provide recurring payments.
How does currency option works?
You need to select currency as per your Athorize.Net account.
Change log
version 4.0.3
- Fixed payment amounts with comma separators (e.g. 1,500.00 was incorrectly sent as 1.00 to Authorize.Net).
- Fixed successful charges incorrectly showing "The field is invalid." when Authorize.Net returned a top-level API warning.
- Omit empty billing address from API requests to prevent E00013 invalid field responses.
- Improved card expiration date formatting (YYYY-MM) for Authorize.Net.
- Fixed Google Pay amount parsing when price fields contain commas or currency formatting.
version 4.0.2
- Access helpful resources including documentation, FAQs, and support options in one place.
- Easily submit support tickets or explore guides to resolve issues quickly.
- Stay updated with the latest insights through blogs and newsletter subscriptions.
version 4.0.1
- Added Recurring Type option with two choices:
- Specific – manually define the recurring settings.
- CF7 Tag – dynamically use a Contact Form 7 tag to set the recurring option.
- Collect more detailed customer information
version 4.0.0
- Fixed: Error log management issue resolved
version 3.3.9
- Compatibility Update: Fully tested and confirmed compatible with WordPress 6.8.2.
- Bug resolved.
version 3.3.8
- Integrated Google Pay (GPAY) support with Authorize.NET for Contact Form 7 Pro
version 3.3.7
- Bug fix implemented
version 3.3.6
- Brand-New, Redesigned Admin Dashboard for an Improved User Experience.
- Upgraded Bar & Pie Charts for Clearer Data Visualization.
- Optimized Plugin Performance for Seamless Functionality.
version 3.3.5
- Bug resolved.
version 3.3.4
- Updated subscription API URL.
- Tested with WordPress 6.6.
version 3.3.3
- Improved compatibility with WordPress VIP platform by refactoring code to adhere to VIP coding standards.
version 3.3.2
- Recurring Payment accept with Authorize.NET and also set the option to cancel recurring from admin.
version 3.3.1
- Bug fixes: Debug log
- Export CSV with submitted time
version 3.3
- Realsed Export Feature
- Fix - Solved Minor bugs and export issue form list
version 3.2
- Fix - Solved Minor bugs and export issue form list
version 3.1
- Fix - Solved Minor bugs and update activate and upgrade function
version 3.0
- Quickly view transaction status with the WordPress Dashboard widget
- Separate dashboard for all transaction using GUI Graph
- Offer email templates for the user and admin contact forms
- Refund functinality
- Debug Log functionality to check if any developer payments or processes if blocked
version 2.6
- Minor Bug Fix
- Compatibility with new cf7 version
- Fix - Solved Merchant Transaction Key notification.
- Update Library and compatibility with latest PHP version.
version 2.2
- Fix - Make compitiable with Latest Contact form 7
- Fix - Tooltip issue fixed in New WP 5.5
version 1.0
- Initial Release