Generate PDF Using Contact Form 7 Pro
Overview
Description
The ZealousWeb 'Generate PDF using Contact Form 7 Pro' plugin for WordPress simplifies creating and downloading PDFs from form submissions. After a user submits a form, the PDF can open in a new tab with a download option. Admins can manage settings to allow or restrict PDF downloads and email attachments. This plugin saves form data in the database and converts it to PDF, supports fillable PDF attachments, and integrates with Google Drive, Dropbox, and AWS S3 Bucket. This innovative functionality not only minimizes server load but also optimizes storage space. It processes PDFs locally, avoiding external APIs, and enhancing security and efficiency.
Plugin's purpose and benefits
- Improved compatibility with WordPress VIP platform by refactoring code to adhere to VIP coding standards.
- Attach PDFs to "Mail 1" and "Mail 2" and send them via default setting or designated email addresses. Also you can Enable or Disable pdf attachments in email.
- Enable or disable PDF attachments in emails.
- Dynamically generate PDFs or send predefined PDFs to users/admins.
- Add watermark text to PDFs.
- Change PDF content font from supported fonts.
- Apply custom CSS styles to PDFs using CSS Editor.
- Modify PDF header, footer, and page sizes (e.g., A4, A3, Letter).
- Customize PDF design with background wallpaper, background color, gradient, and text color options.
- Add RTL support for right-to-left content.
- Customize the PDF download button (open in a new tab, download, or disable download link).
- Add a signature field to forms and generate and attach signature as PNG or image in the PDF.
- Preview PDFs without form submission.
- Share and save generated PDFs to Dropbox, Google Drive, and Amazon S3.
- Save PDF form submitted data to the database and listed in admin.
- Store generated PDFs in designated server folders or third-party locations.
- Use different PDF templates.
- Support for special Mail Tags in PDFs as in Contact Form 7 emails.
- Display dates in different formats as per PHP Date function.
Get Started
Quick setup instructions


How To Use & Features
Generate PDF using Contact Form 7 Settings
You have to configure it from wp-admin > PDF with CF7 (Contact Form 7 needs to be activated first) to use this plugin.
For General Settings

- Enable PDF file Operation – This option allows you to enable/disable performing the operations for the selected form.
- Enable PDF Link with Form Success Message? – Yes/No – You can choose to enable or disable attaching a PDF link with the form’s success message. On selecting the yes option you will be able to set the below properties: Set PDF button Text and other Property
- Download file link text: - Yes -Option to enter the text for the downloadable file link button.
- Download link Open Target: -Yes- This option allows you to set the target for the Downloadable PDF link to open in a new window or same window or directly get downloaded.
- Remove PDF after mail is sent? – No – Option to remove or keep the PDF file after the mail is sent.
- Do you want to attach a PDF in mail? – Yes/No – This option allows you to enable/disable attaching your PDF files in default Contact form 7 emails and if selecting No then you can send it to a specific email address.
- Want to attach your own PDF in email? – Yes/No – Select this option if you want to attach your own PDF file with Contact Form 7 Mails. On selecting this option as the user will be attaching their own pdf the PDF Page Settings will be disabled.
- PDF Upload Custom Path -Yes- You can add your folder name with upload folder path.
- Attach PDF –Yes- Option to choose a PDF file that you want to attach.
- Want to add your own PDF upload custom path? - No - You can Enable / Disable PDF Upload Custom path.
- Want to make PDF Password Protected? –No – This option is enabled on selecting No for attaching your own PDF in the email. You can choose from yes or no options for making the PDF Password Protected.
- Password - You need to add Password here to make PDF generation with password protected.
- Select Permission Allowed - There is a different option for PDF protection permission that you have to select from the list.
- Want to attach a PDF in WP Media? - Yes/No - By selecting yes, your generated PDF will be the same in WP media library.
For PDF Page Setting

- Set PDF Margin of Header & Footer – Option to set the margin for the Header, Footer, Top, Bottom, Left, and Right of the PDF.
- PDF Page Format Type – Option to select the Page Format as landscape or portrait for the PDF.
- PDF Page Format Size – Option to select the PDF Page format size from the available options.
- PDF Text Font size – Option to set the text size of the PDF.
- PDF File Name Prefix – Option to add a prefix for the PDF file.
- Body Text Color – Option to change the text color.
For PDF Content

- Do you want to customize the header logo in PDF? – Option to upload a header logo image from the computer, from URL, or the media library.
- Width for logo – Option to set the Max and Min Width for the logo.
- PDF Top Right Header Texts – Option to add text on the top-right header of the PDF.
- Field tags – Option to view the tags created for the contact form.
- Enable Header & Footer - By this Option you can Enable/Disable Header & Footer from PDF content.
- PDF Message body – Option to add the content in the message body part of the PDF.
- Select PDF Background Options – Option to choose from the PDF watermark text and image options.
- PDF Watermark Text – On selecting this option you can add the text for the watermark and set the watermark text’s transparency.
- PDF Watermark Image – On selecting this option you can paste the Image URL for the watermark and set the watermark image’s transparency.
- Preview - You can preview the pdf style and content with dummy content.
- Add the content & set styling and save changes.
- To view the pdf, hit the preview button after saving changes.
- Set RTL State – Yes/No – Option to enable/disable RTL state for the PDF.
- PDF Custom Style – Option to add custom styling for the PDF.
- PDF Bottom Left Footer Texts – Option to add text on the bottom left footer of the PDF.
- Footer Pagination – Option to add the format and for previous and next page numbers on the PDF..
For Third-Party Integration

- Enable PDF Upload on Google Drive – Yes/No – Option to enable/disable uploading the pdf on Google Drive.
- Google Client ID
- Google Secret Key
- Google Drive Auth Key -Yes- Option to enter the Google Client ID, Google Secret Key for authentication.
- Google Drive Authenticate with this button -Yes– After entering the Google Drive Auth Key, an option to click on the provided authentication button to give the access permission for uploading the PDF on Google Drive.
- Redirect URI -Yes– Option to select the link and copy it while the app is created to provide a Redirect path.
- Enable PDF Upload on DropBox – Yes/No – Option to enable/disable uploading the pdf on Dropbox.
- Dropbox App Key
- Dropbox App Secret
- Dropbox Auth Key -Yes– Option to enter the Dropbox App ID, Dropbox App Secret for authentication.After entering the Dropbox Auth Key, option to click on the provided authentication button to give the access permission for uploading the PDF on Dropbox.
- Redirect URI -Yes– Option to select the link and copy it while the app is created to provide a Redirect path.
- Enable PDF upload on AWS S3? – Yes/No – Option to enable/disable uploading the pdf on Amazon S3 Bucket.
- AWS S3 Auth Keys -Yes– Below is the credential that needed to connect Amazon S3 bucket connection with our plugin.
- AWS S3 Access key ID
- AWS S3 Secret Access key
- AWS S3 Bucket Name
- AWS S3 Region
- AWS S3 Authentication with this Button -Yes– By Clicking this button connects all the added credentials to the AWS bucket link and returns a successful authentication response.
- AWS S3 Auth Keys -Yes– Below is the credential that needed to connect Amazon S3 bucket connection with our plugin.
For PDF Template

- PDF Template Feature: Enhance your PDF customization by selecting a template from our collection where we provide different types of Template category like Resume, Invoice & Certificate.
For Import/Export

- PDF Import/Export: Easily import and export all form fields
For Widgets

- Total PDFs Generated – Track the total number of PDFs created.
- Total PDF Downloads: – Monitor how often your PDFs are downloaded
- Total Emails Sent with PDF: – Count emails containing PDFs
- Failed PDF Generations: – Identify errors and troubleshoot issues quickly.

For PDF Signature

To add 'PDF Signature' in Contact Form 7

To add 'PDF Signature' in Contact Form 7 Email

To add 'PDF Signature' in PDF when user submit Contact form 7

Display 'PDF Signature' in Single Form Entry

PDF Analytics Dashboard:
Get a complete overview of your PDF activity with an intuitive, easy-to-navigate dashboard.
For Dashboard

- Total PDFs Generated – Track the total number of PDFs created.
- Total PDF Downloads: – Monitor how often your PDFs are downloaded
- Total Emails Sent with PDF: – Count emails containing PDFs
- Failed PDF Generations: – Identify errors and troubleshoot issues quickly.

- PDF Generation Chart – Visual representation of total PDFs generated over time
- Analyze data based on: – Days, Months, Years, Custom Date Range
- Recent PDF Activity: – Stay updated with real-time activity
Help and Support

- Access helpful resources including documentation, FAQs, and support options in one place.
- Easily submit support tickets or explore guides to resolve issues quickly.
- Stay updated with the latest insights through blogs and newsletter subscriptions.
In this guide, we have detailed the process of integrating third-party services.
Google Authentication:
Incorporating Google sign-in into your site allows your site visitors to log in through Google in a single click saving their time. To integrate Google sign-in into your website, it is mandatory to create a Google Client ID and Client Secret
To create a Google Client ID and Client Secret for accessing Google Drive (or any Google API), you need to set up a project in the Google Cloud Console and configure OAuth 2.0 credentials. Here's a step-by-step guide:
Step 1: Create a Project in the Google Cloud Console
- Go to Google Cloud Console:
- Visit Google Cloud Console
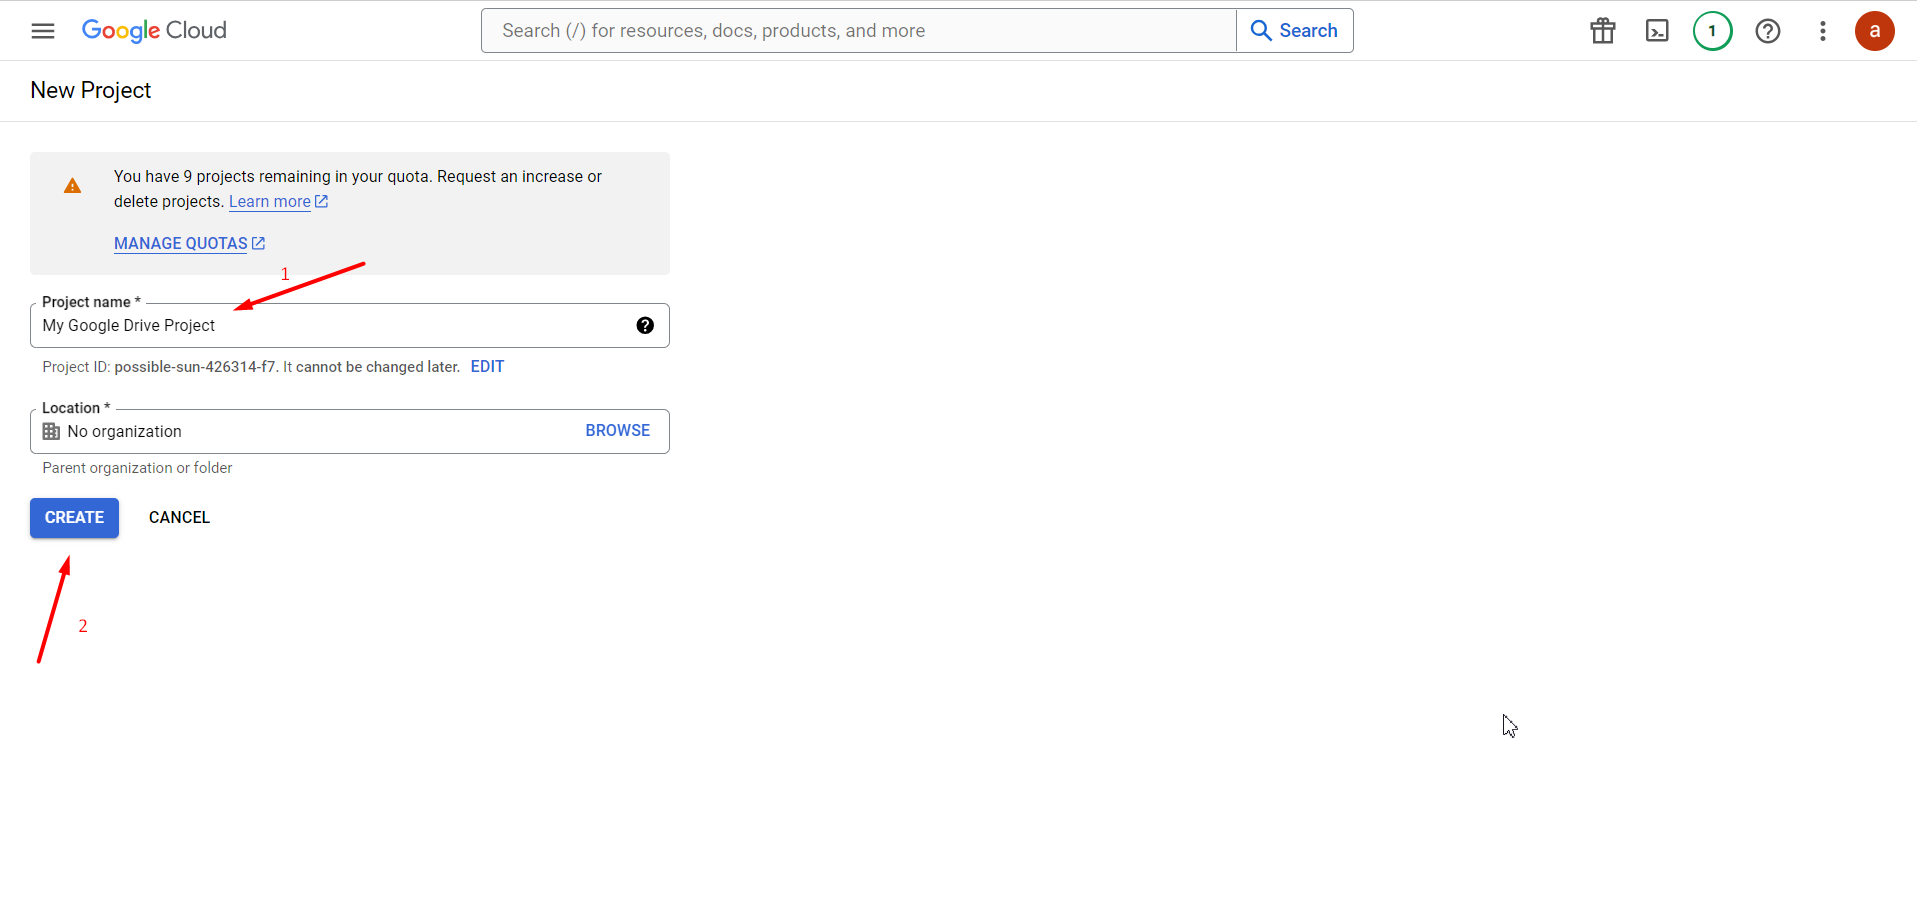
- Create a New Project:
- Click on the project dropdown at the top and select New Project.

- Enter a name for your project (e.g., "My Google Drive Project").

- Click Create.
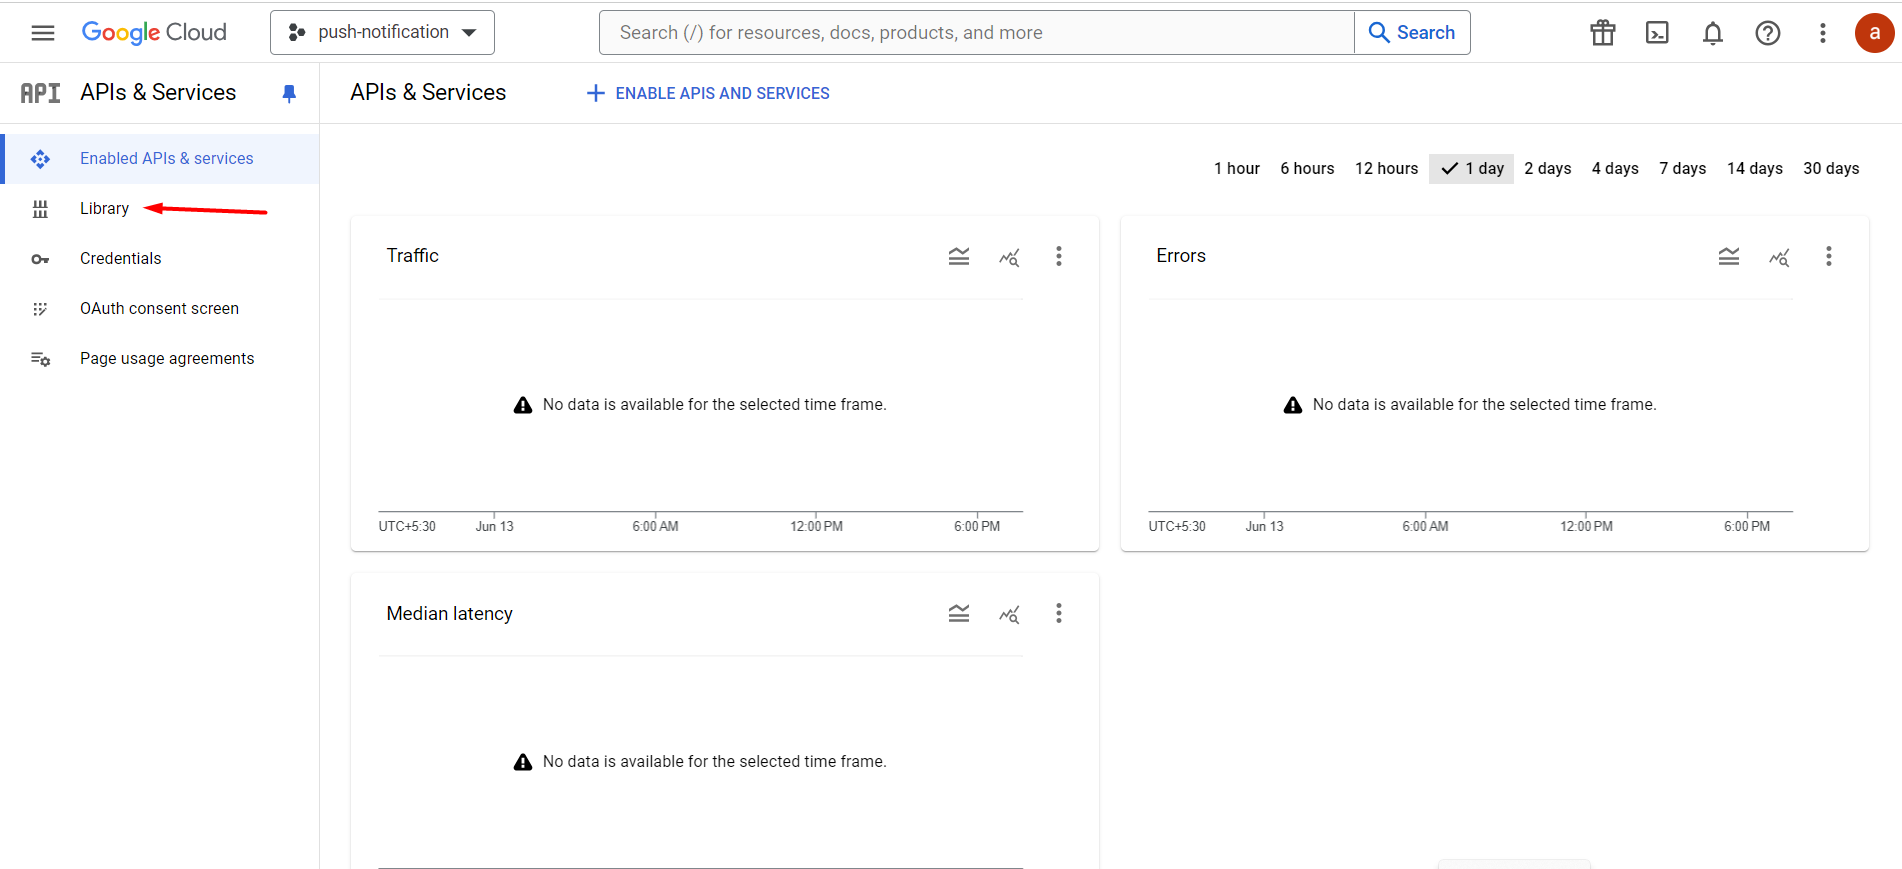
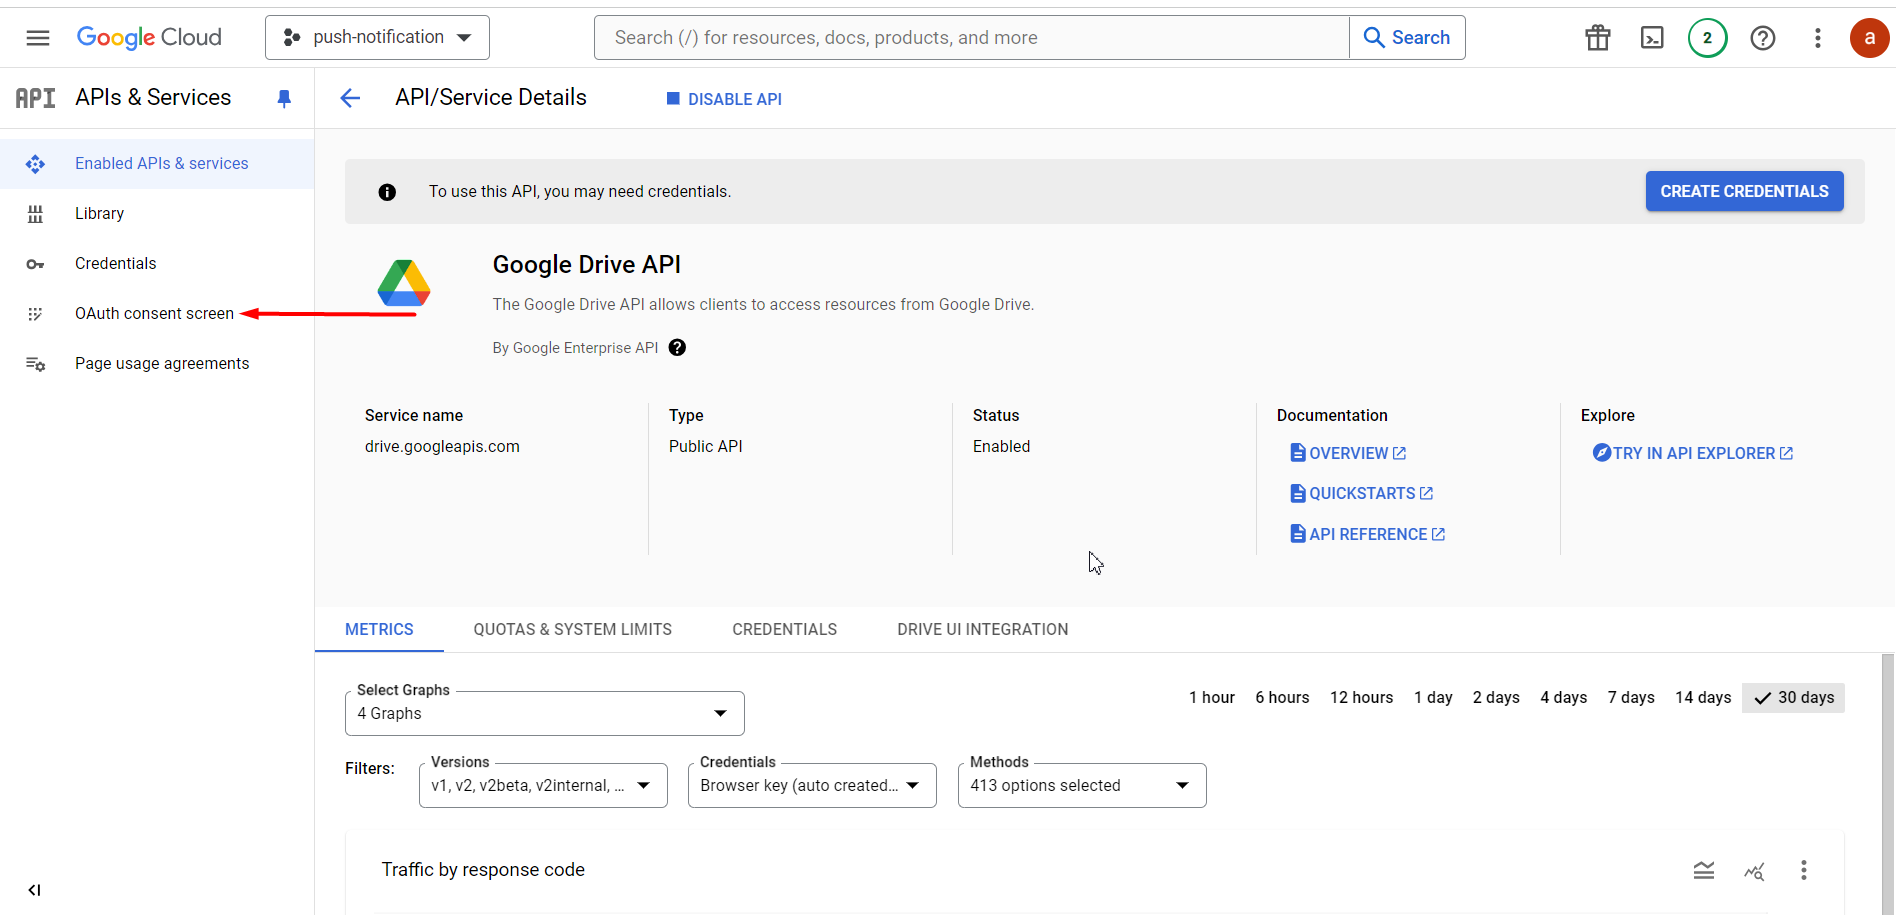
Step 2: Enable Google Drive API
- Go to the API Library:
- In the left sidebar, click on APIs & Services > Library.
- Enable Google Drive API:
- In the search bar, type Google Drive API.
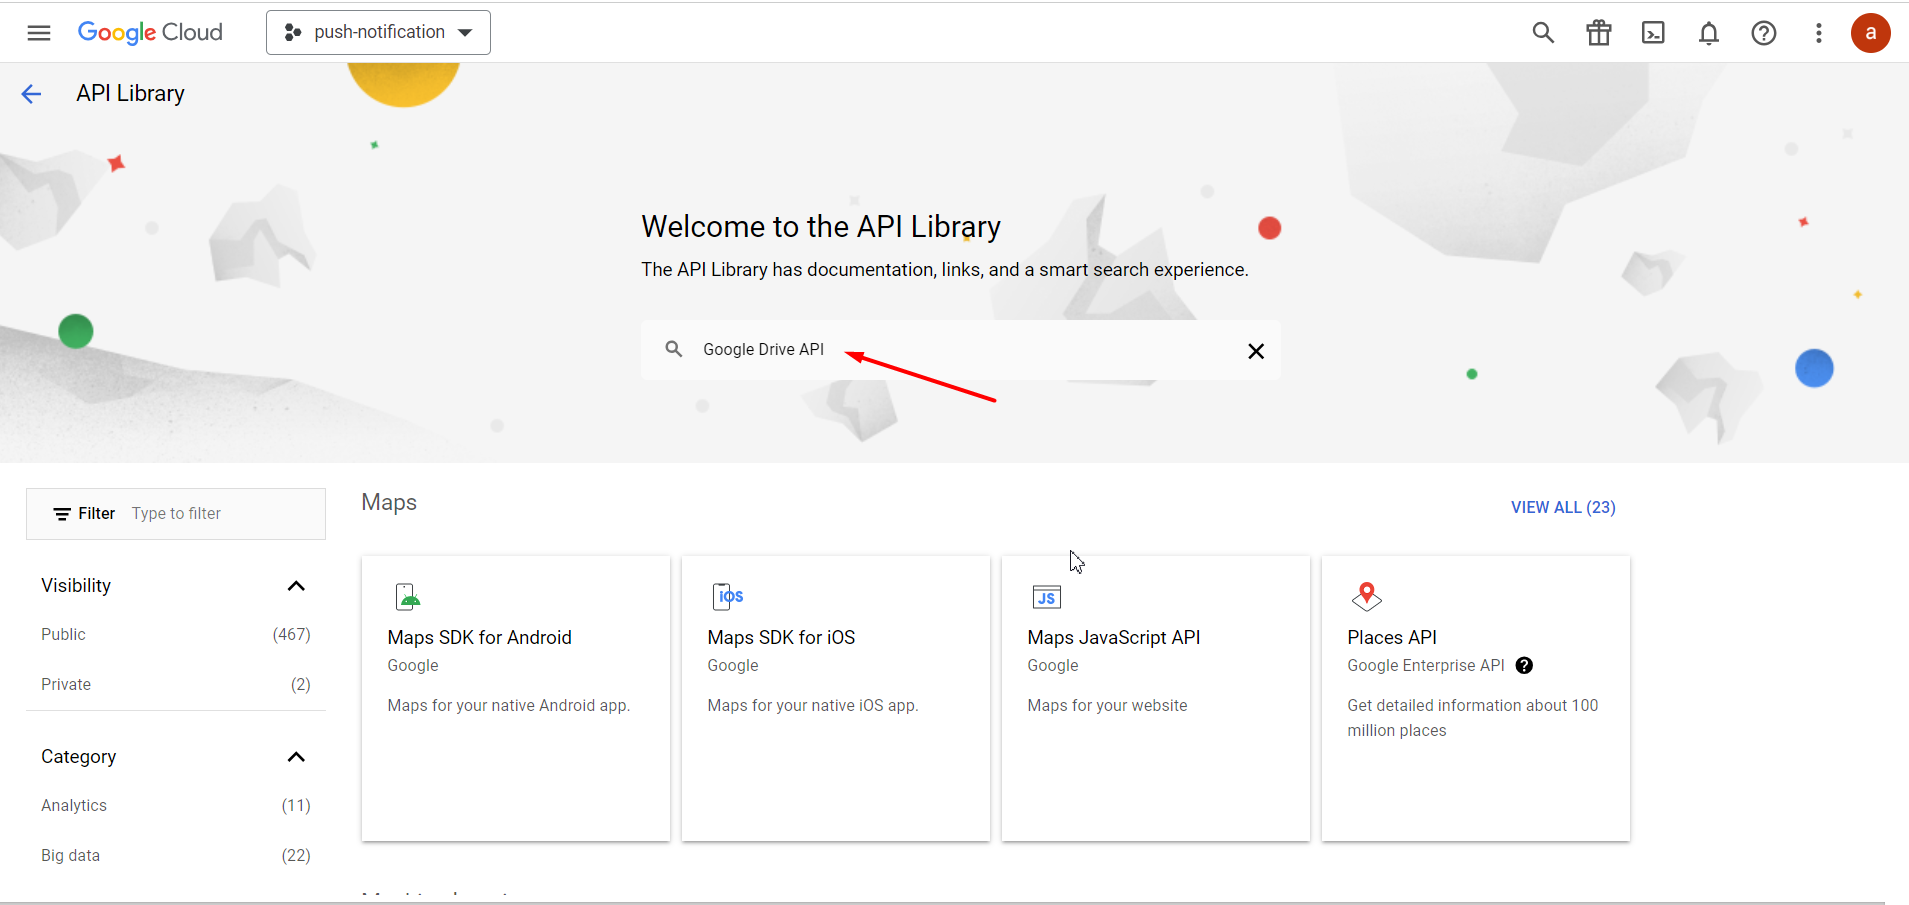
- Click on Google Drive API from the search results.
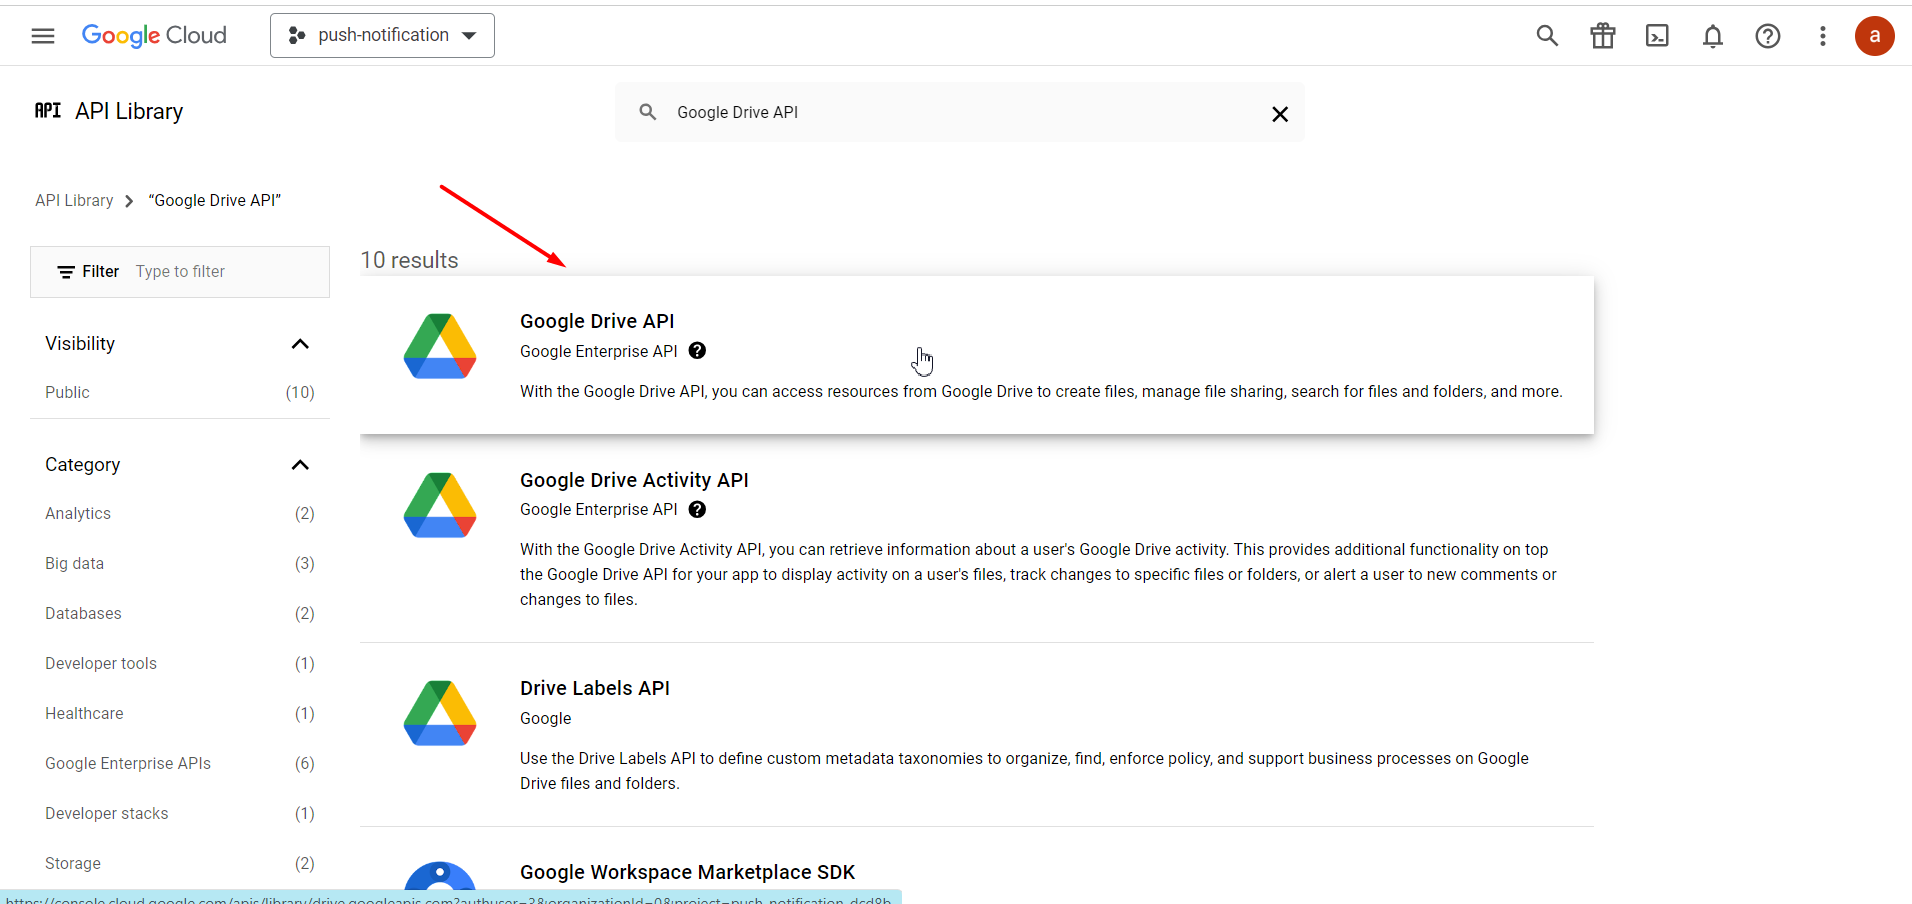
- Click Enable.
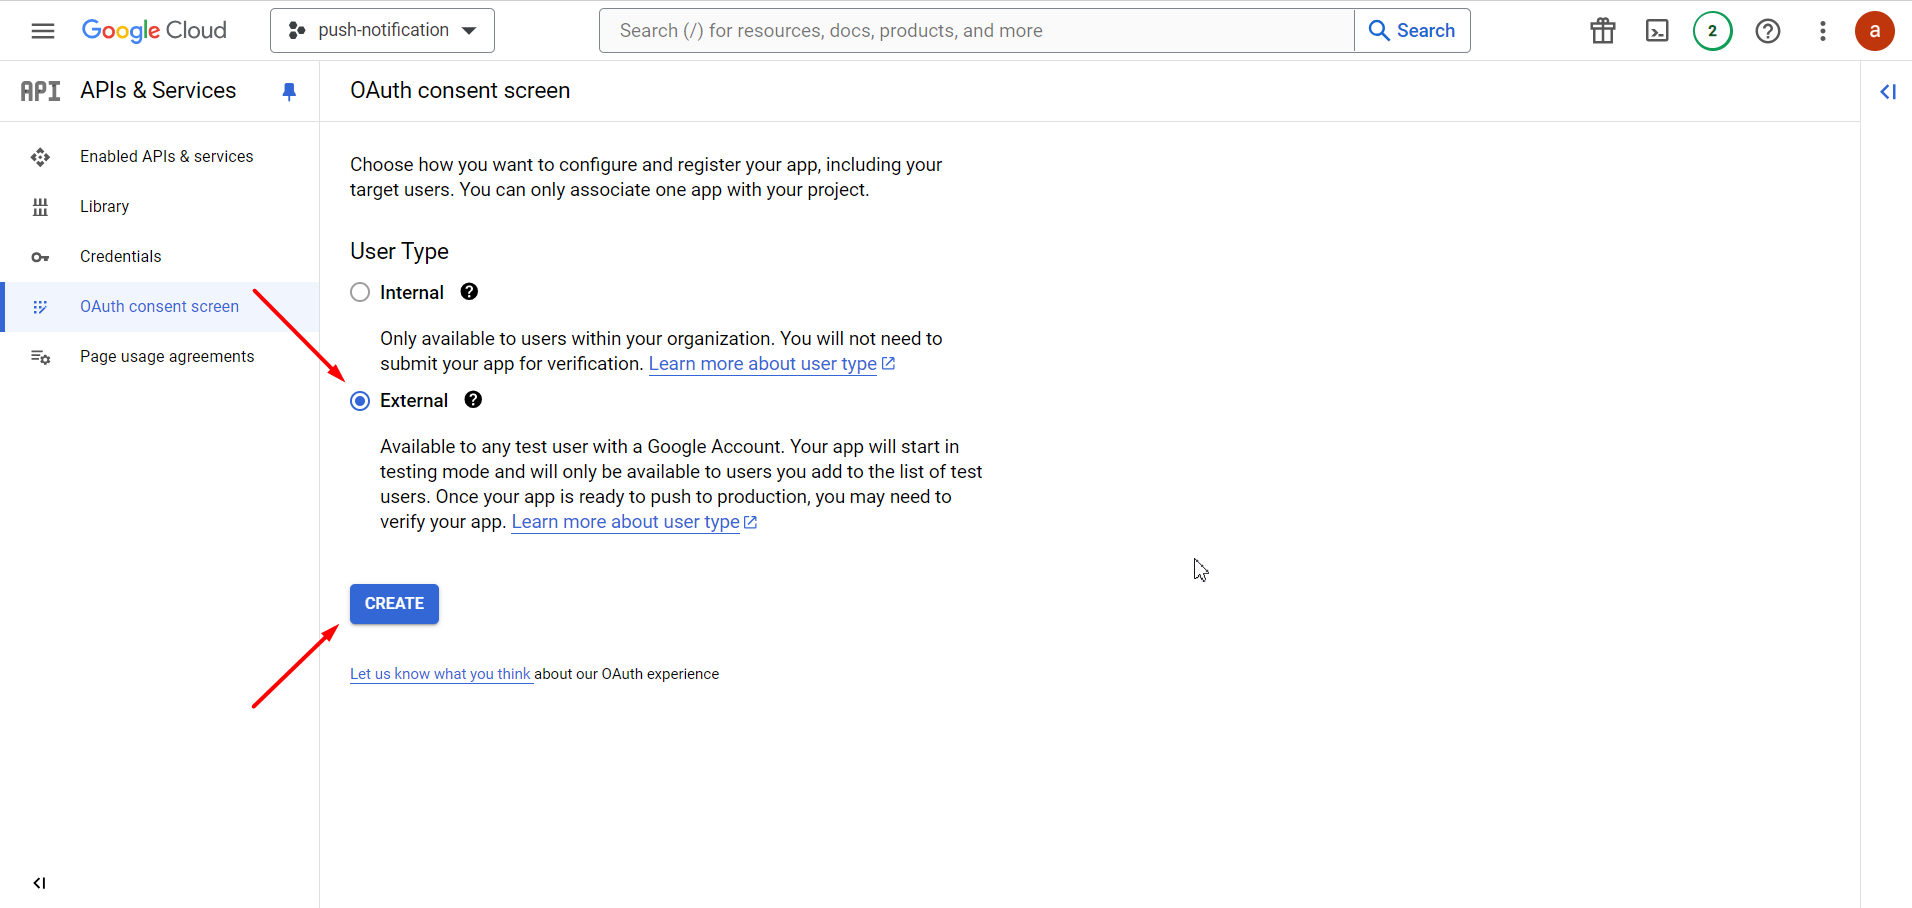
Step 3: Configure the OAuth Consent Screen
- Set Up OAuth Consent Screen:
- In the left sidebar, click on APIs & Services > OAuth consent screen.
- Choose External for user type and click Create.
- Configure the Consent Screen
- Fill in the necessary details such as App Name, User Support Email, and Developer Contact Information.
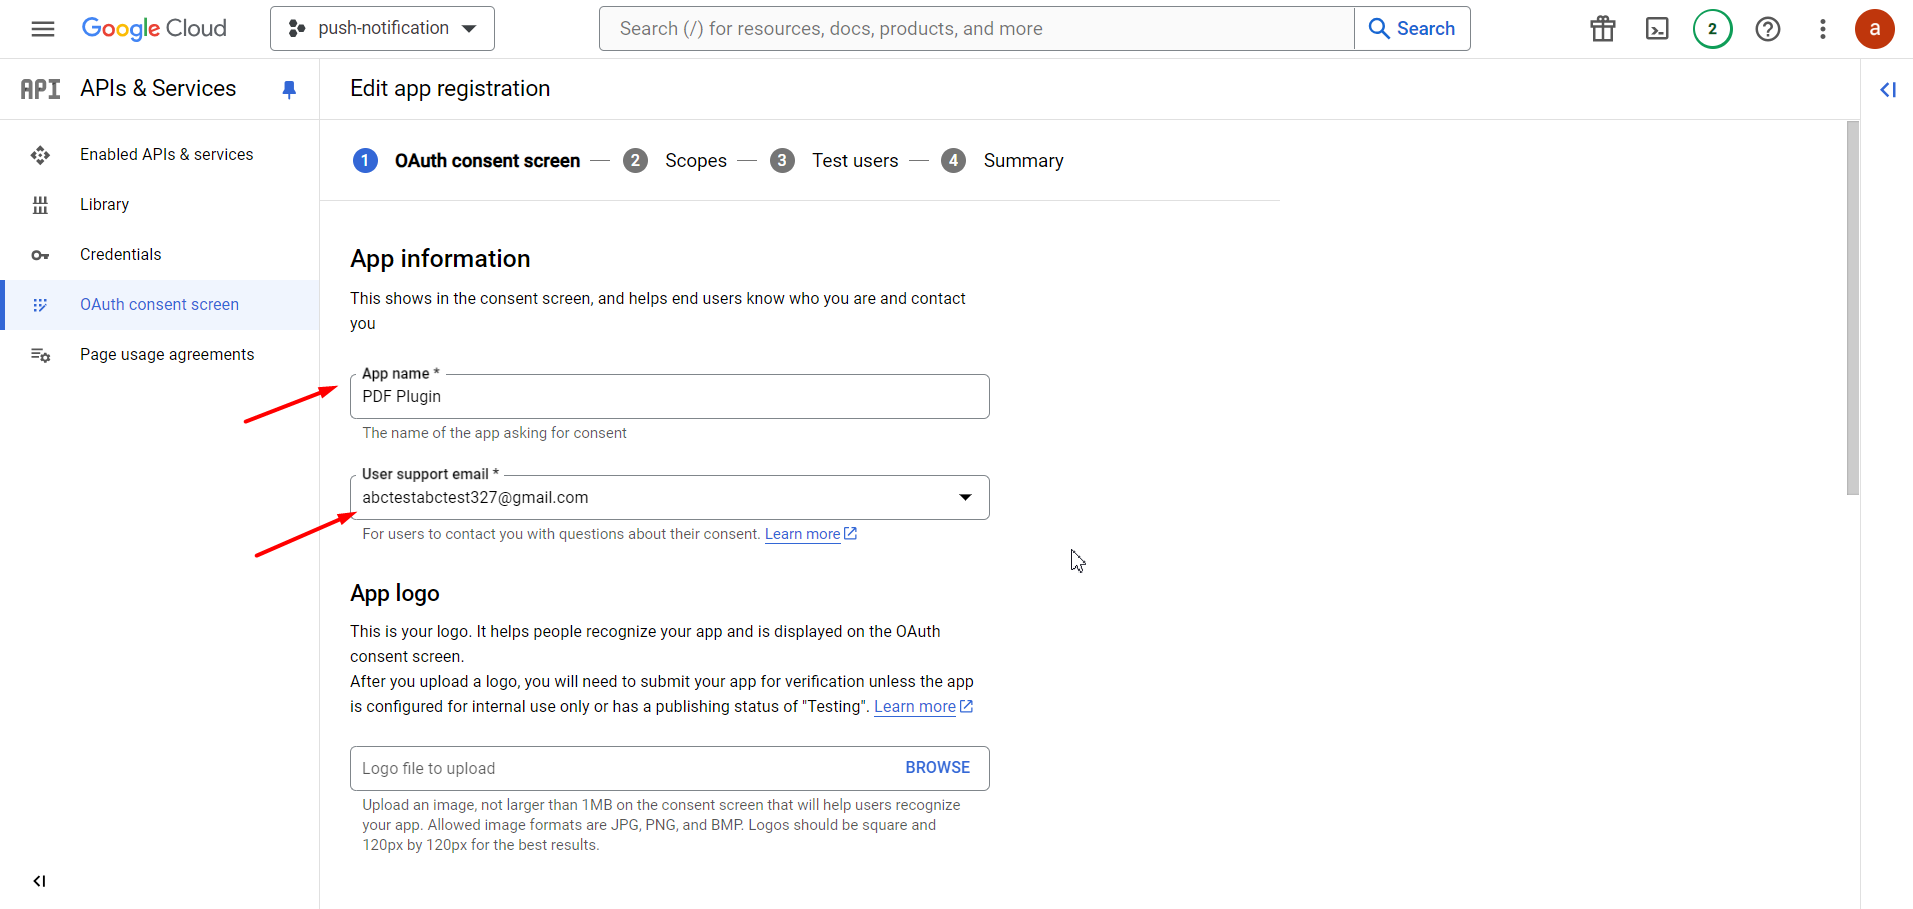
- Click Save and Continue.
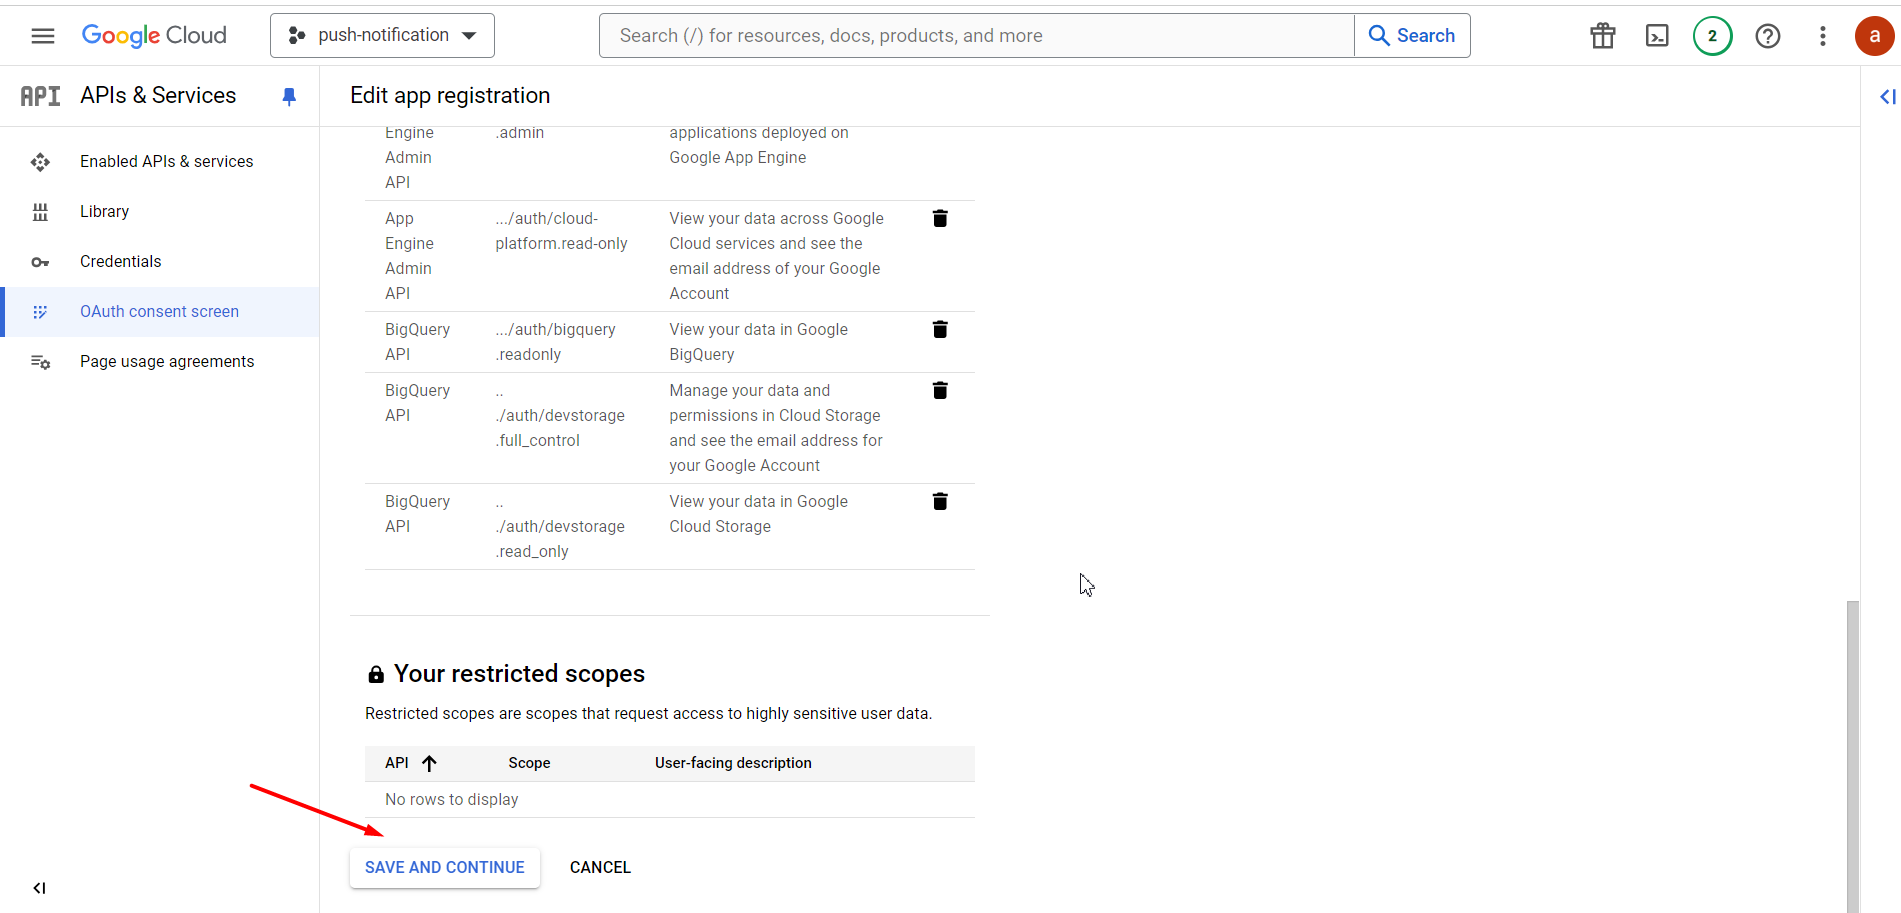
- Add Scopes (Optional):
- You can add scopes based on the permissions your application needs. For Google Drive, you might need scopes like https://www.googleapis.com/auth/drive.
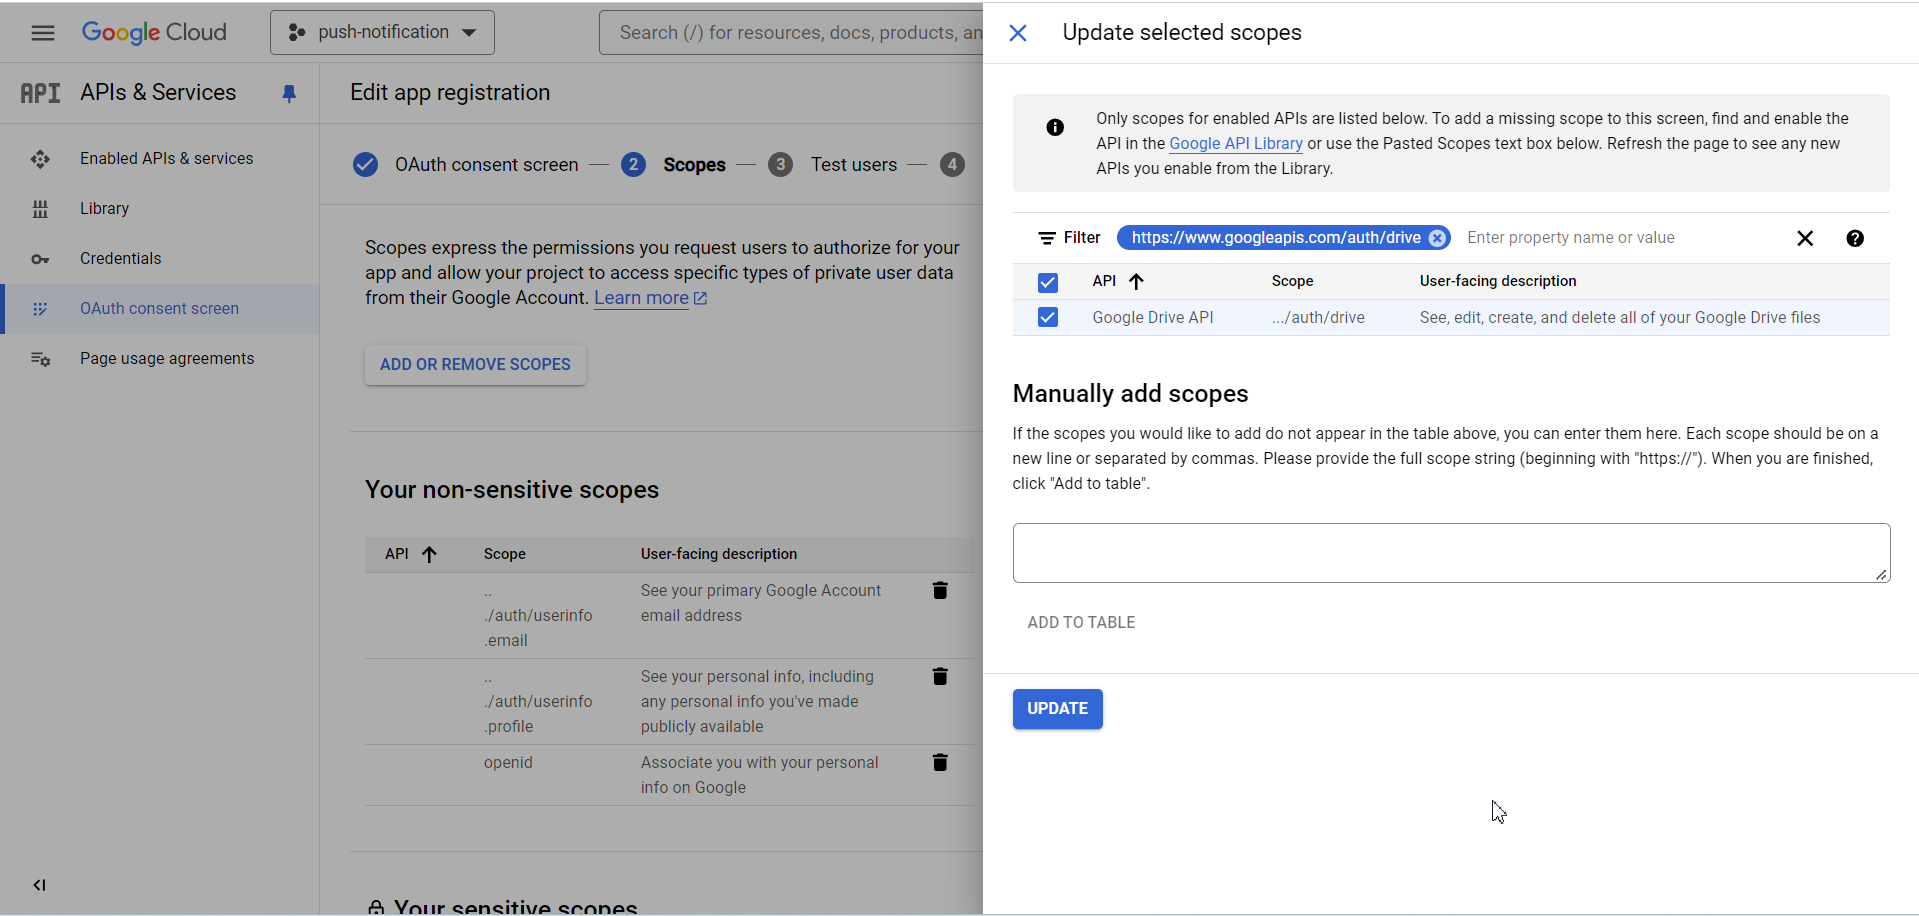
- Click Save and Continue.
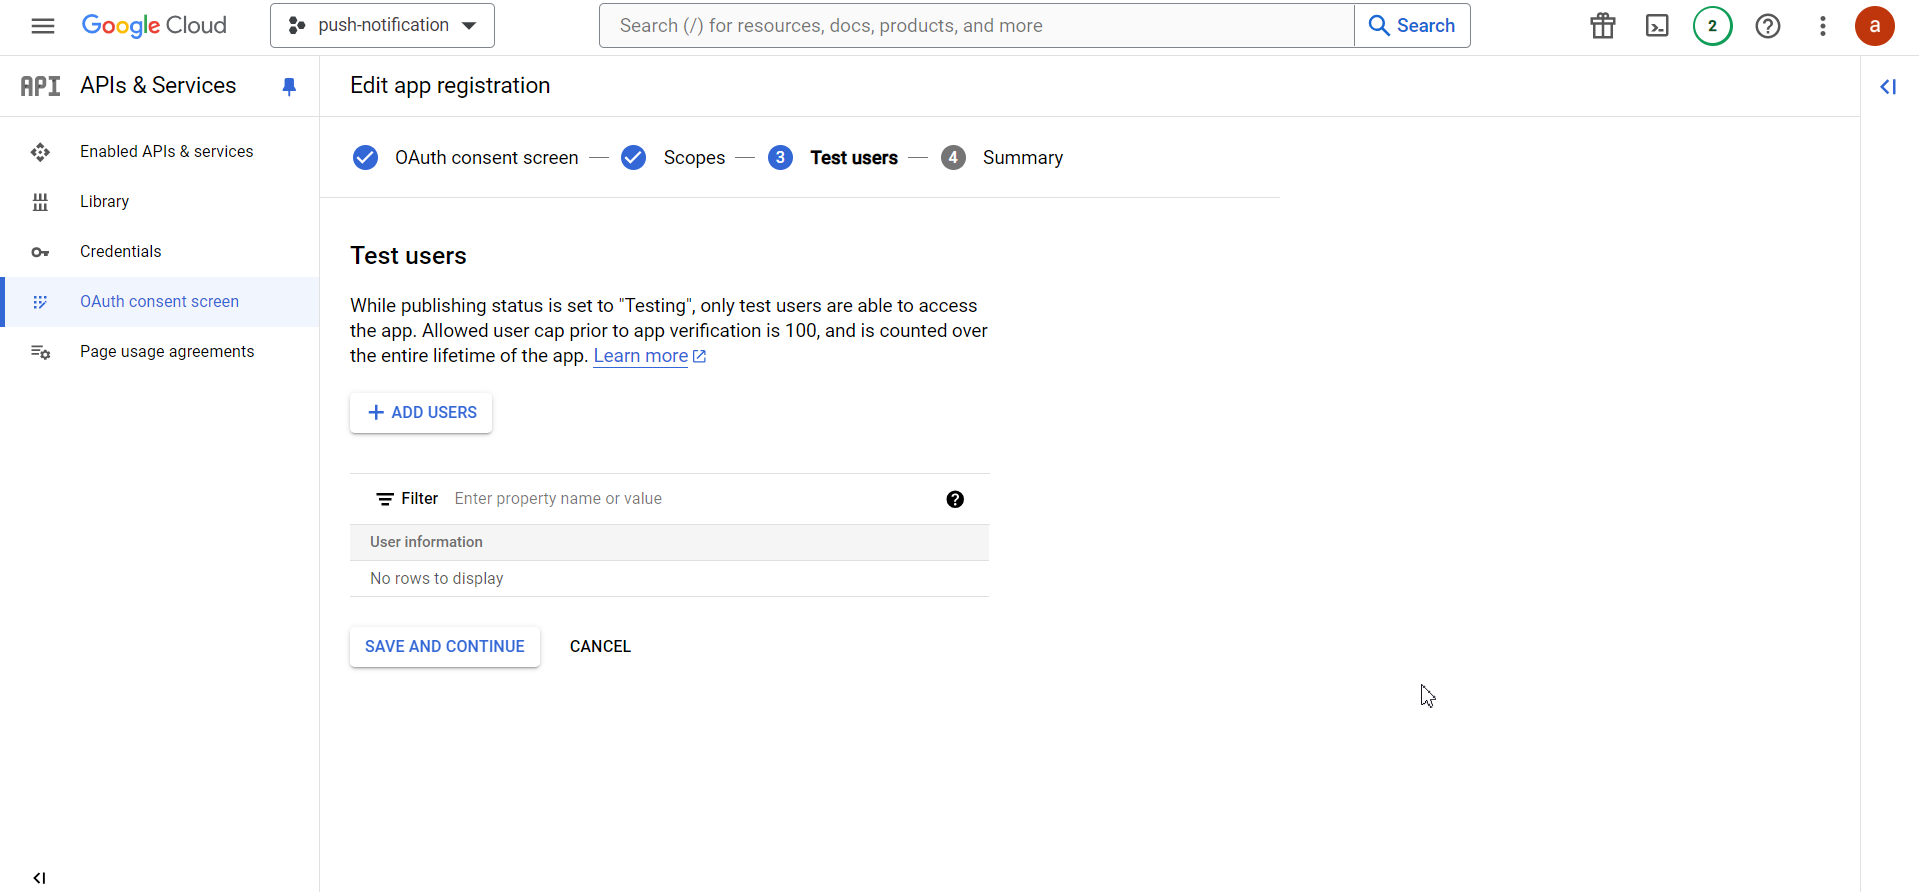
- Add Test Users:
- Add email addresses of users who can test your app. For now, you can add your own email.
- Click Save and Continue.
Step 4: Create OAuth 2.0 Credentials
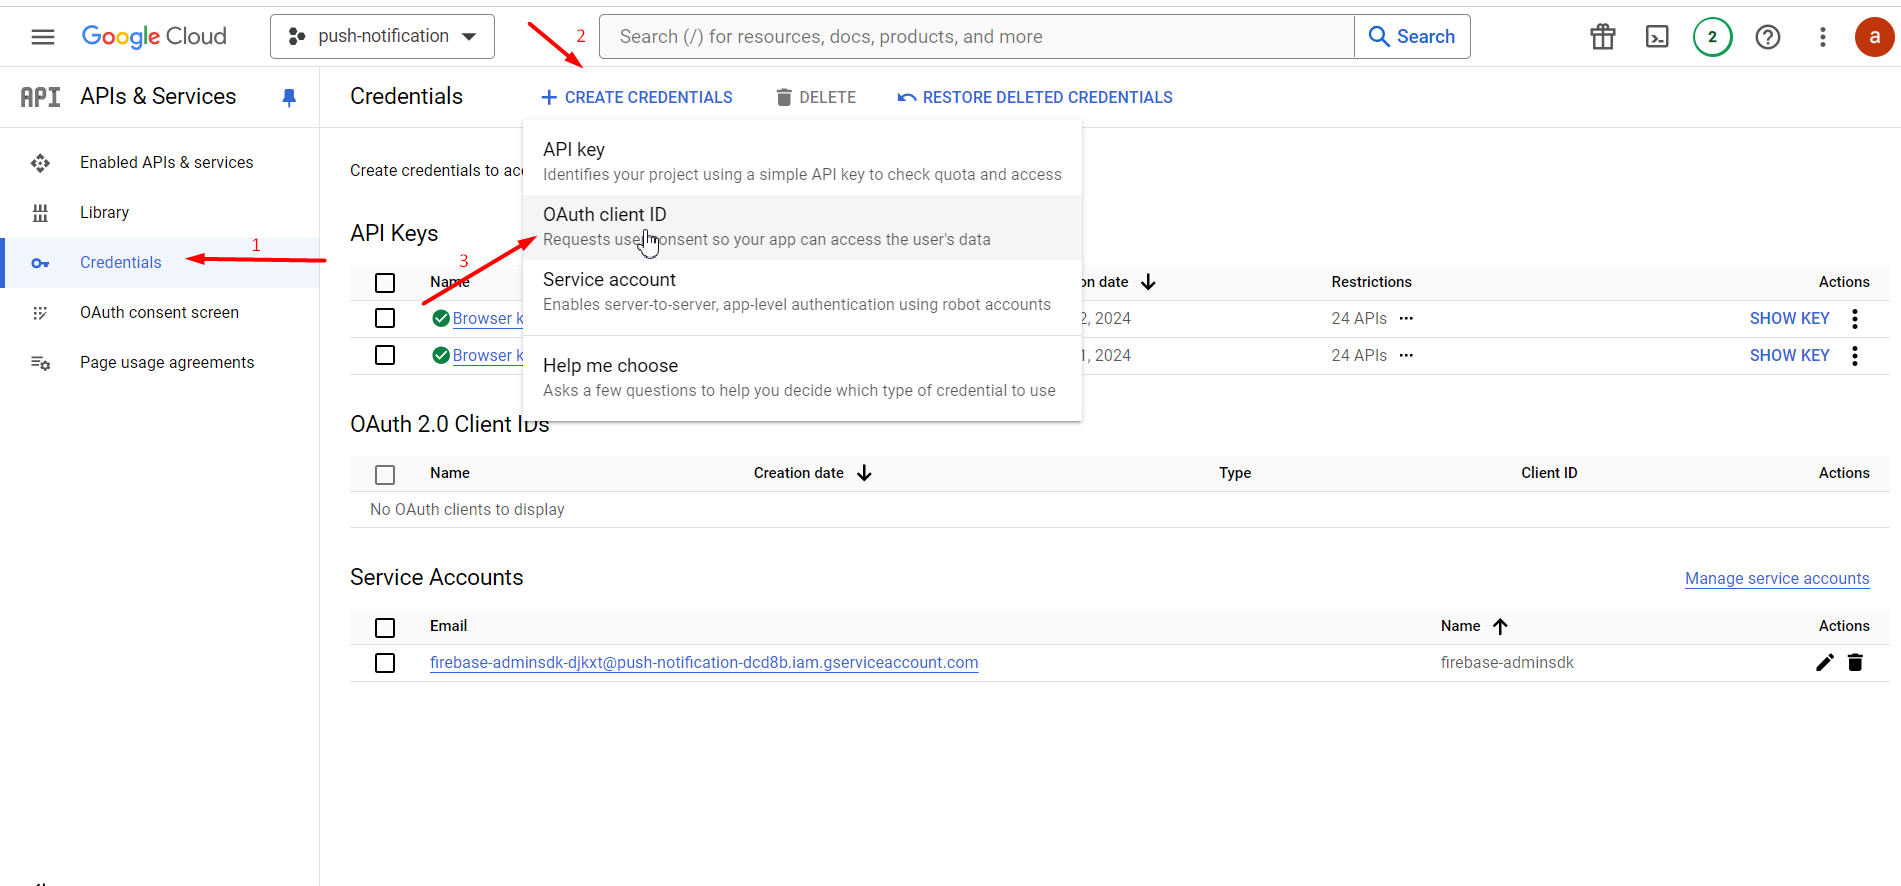
- Go to Credentials:
- In the left sidebar, click on APIs & Services > Credentials.
- Create Credentials:
- Click on Create Credentials and select OAuth 2.0 Client IDs.
- Configure OAuth Consent Screen:
- If prompted, configure the OAuth consent screen by filling in the necessary details.
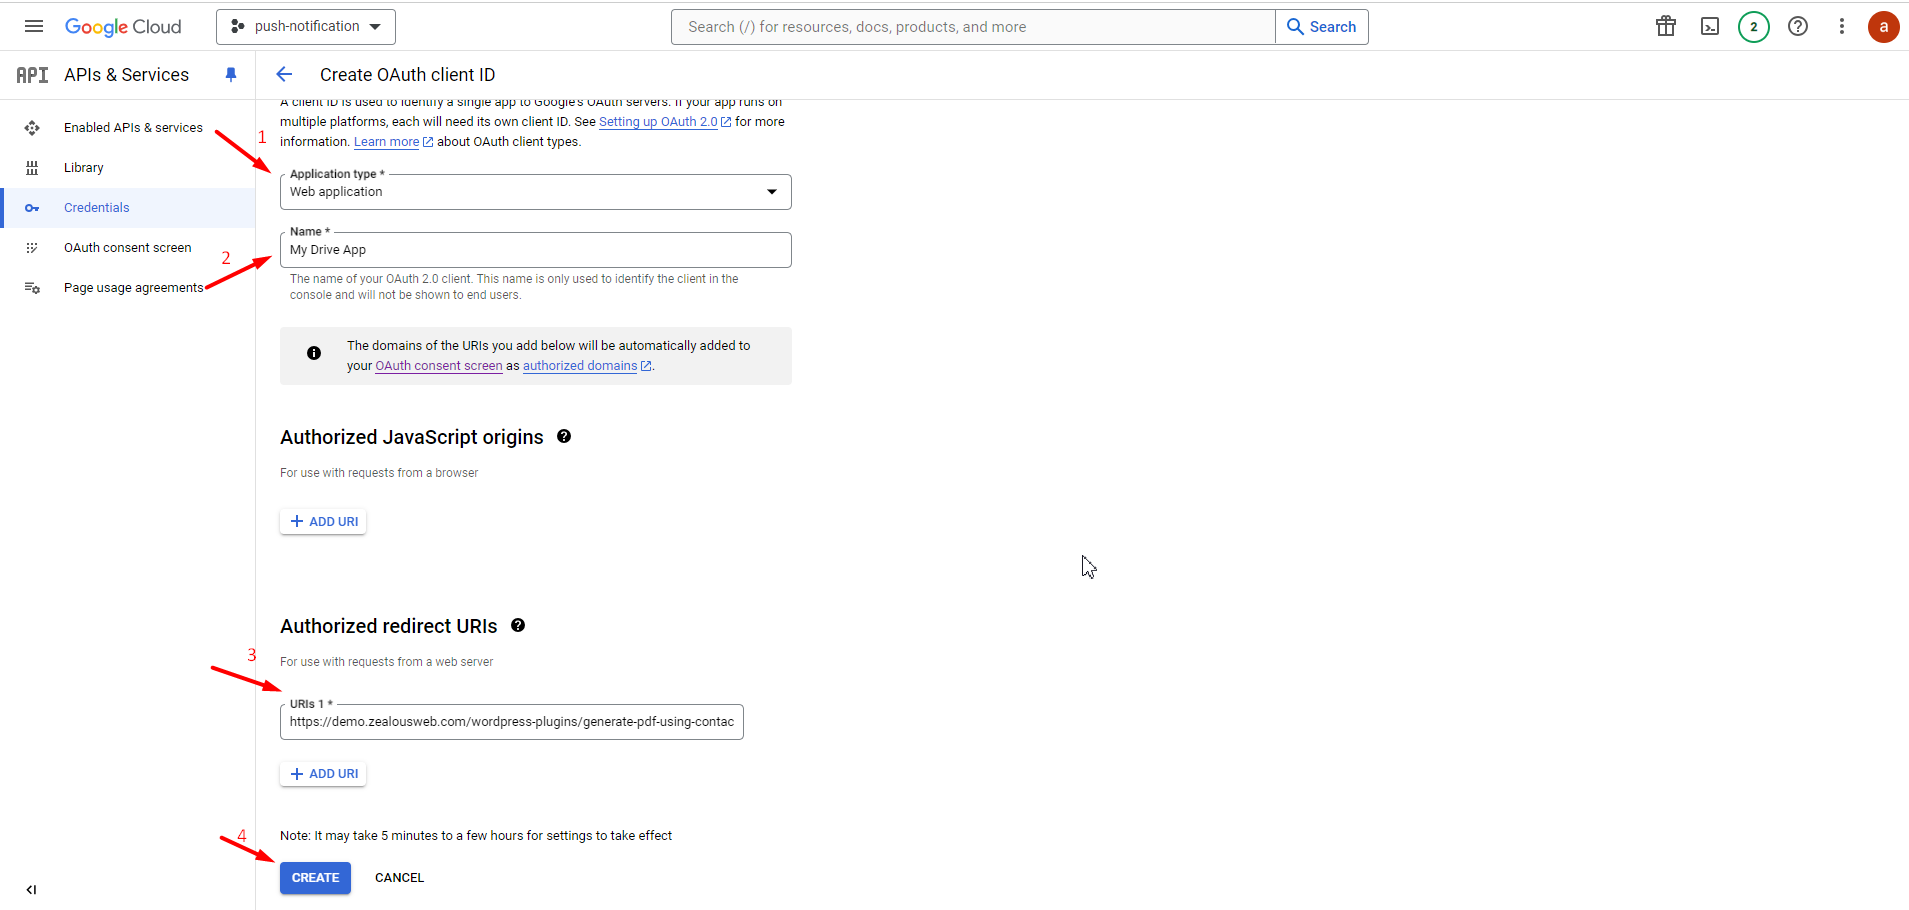
- Create OAuth Client ID:
- Select Application type as a Web application.
- Enter a name for the client ID (e.g., "My Drive App").
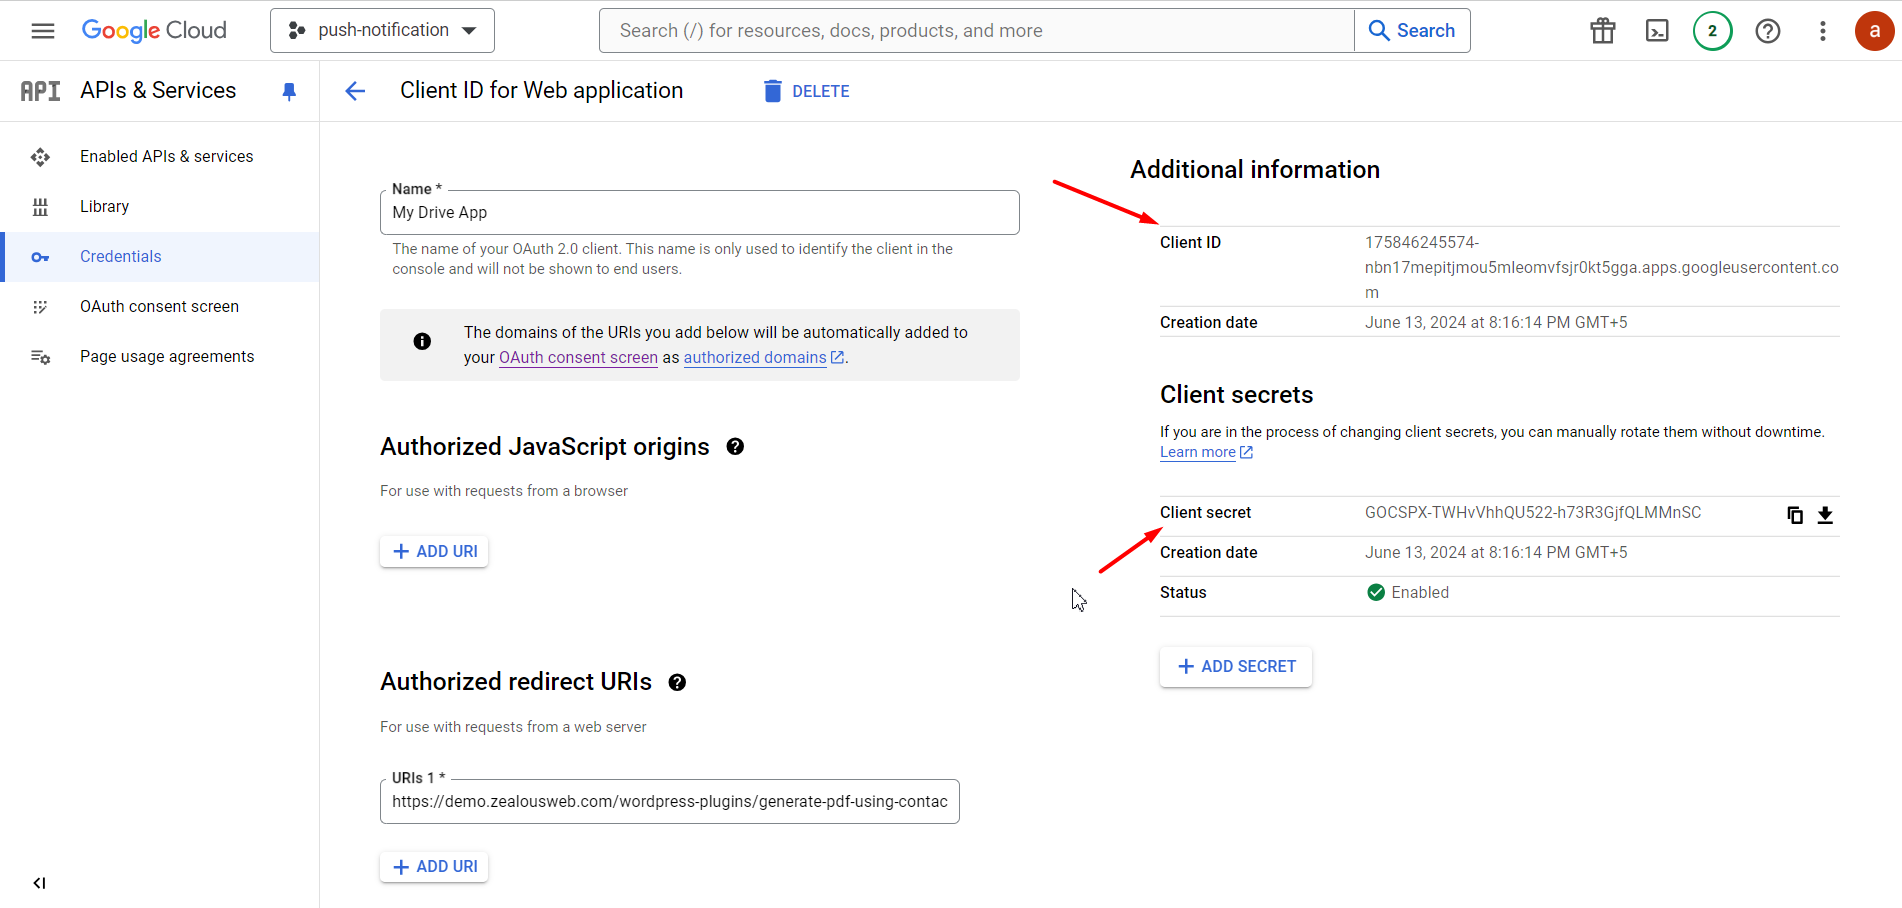
- Specify the authorized redirect URIs. These URIs are where Google will send responses to your authentication requests. If you are developing locally, you might use it. https://demo.zealousweb.com/wordpress-plugins/generate-pdf-using-contact-form-7-pro/wp-admin/admin.php?page=cf7pdf-general-setting.
- Get Client ID and Secret:
- After configuring, click Create.
- You will see a dialog with your Client ID and Client Secret. Save these values securely.
Dropbox Authentication:
To create a Dropbox App ID and App Secret for uploading images to Dropbox, follow these steps:
Step 1: Create a Dropbox Account
- Sign Up:
- If you don't have a Dropbox account, sign up at Dropbox.
Step 2: Create a Dropbox AppM
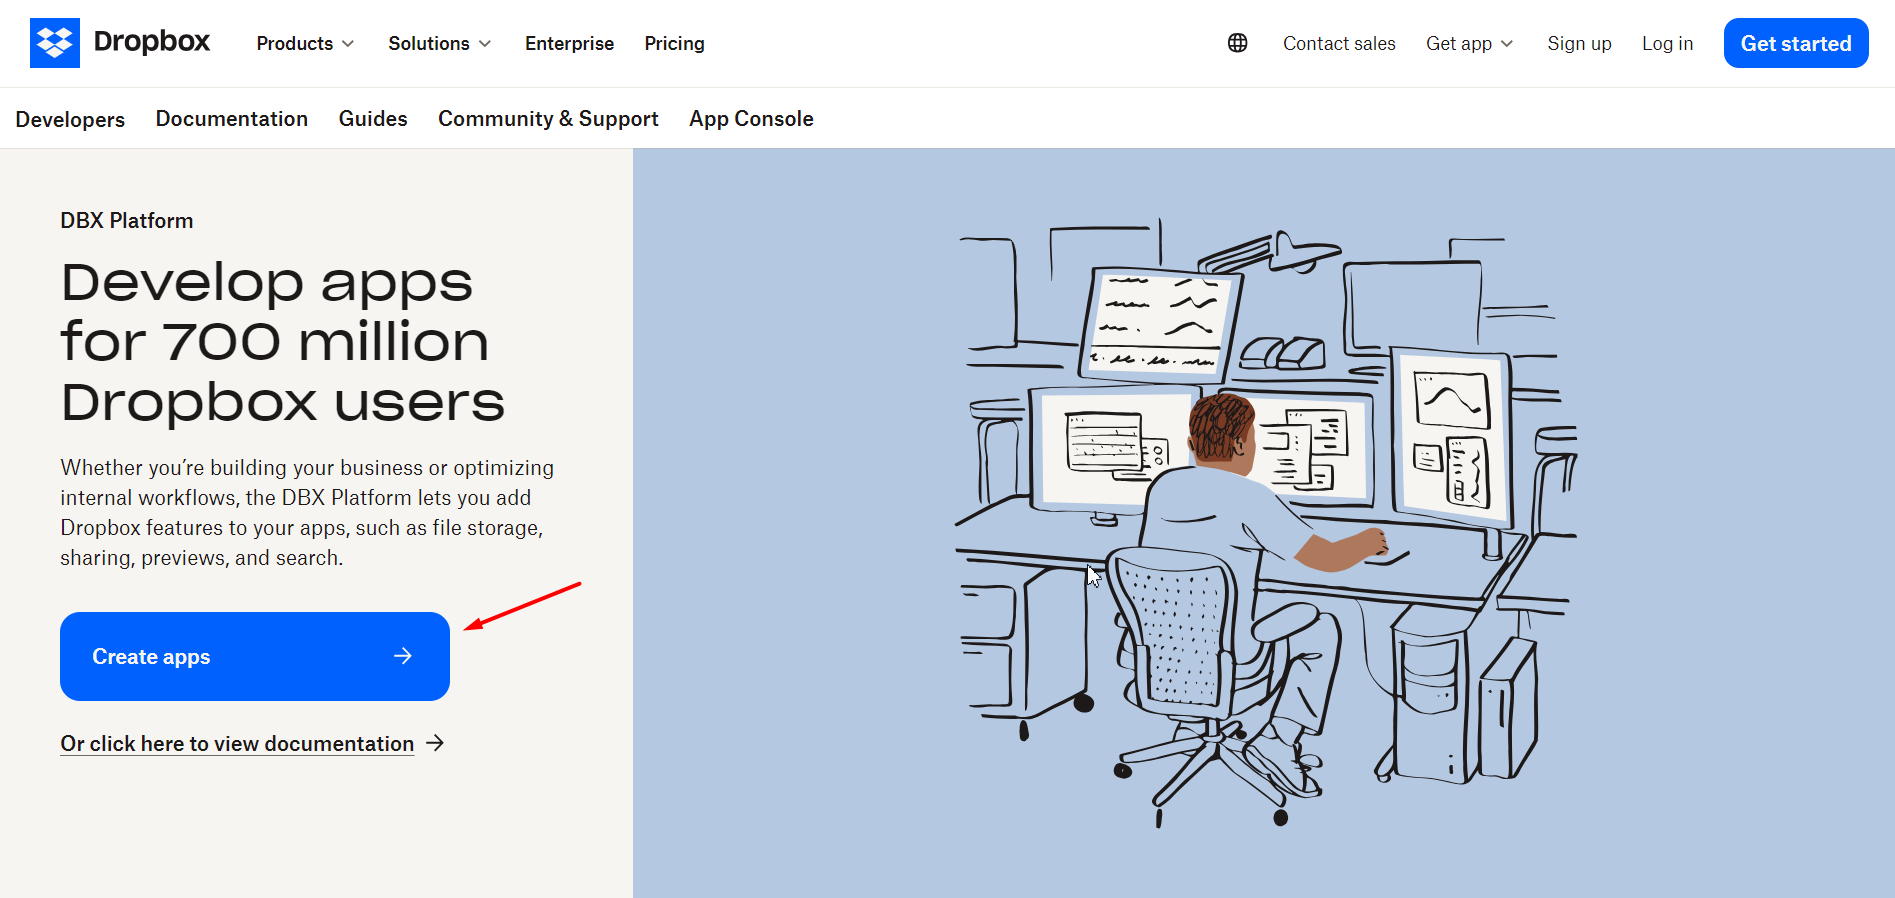
- Go to Dropbox App Console:
- Visit the Dropbox App Console.
- Create a New App:
- Click on Create App
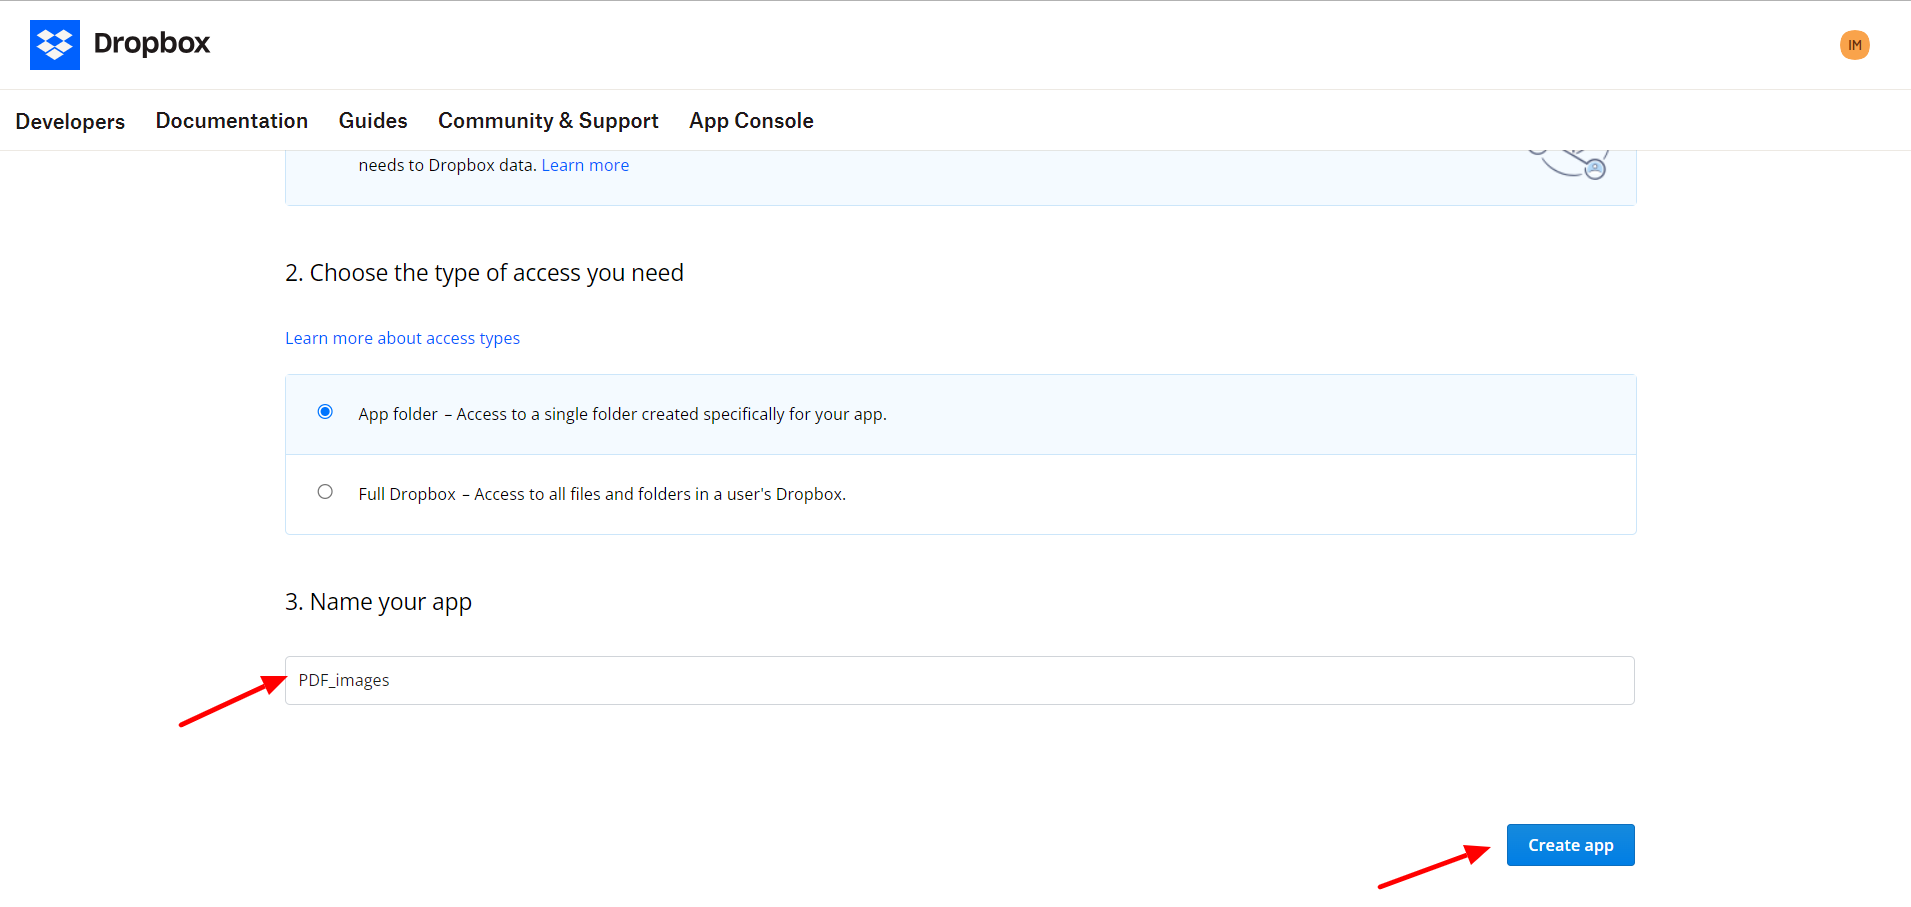
- Select Scoped access.li>
- Choose Full Dropbox or App folder based on your needs.
- Enter a unique name for your app.

- Click Create App.
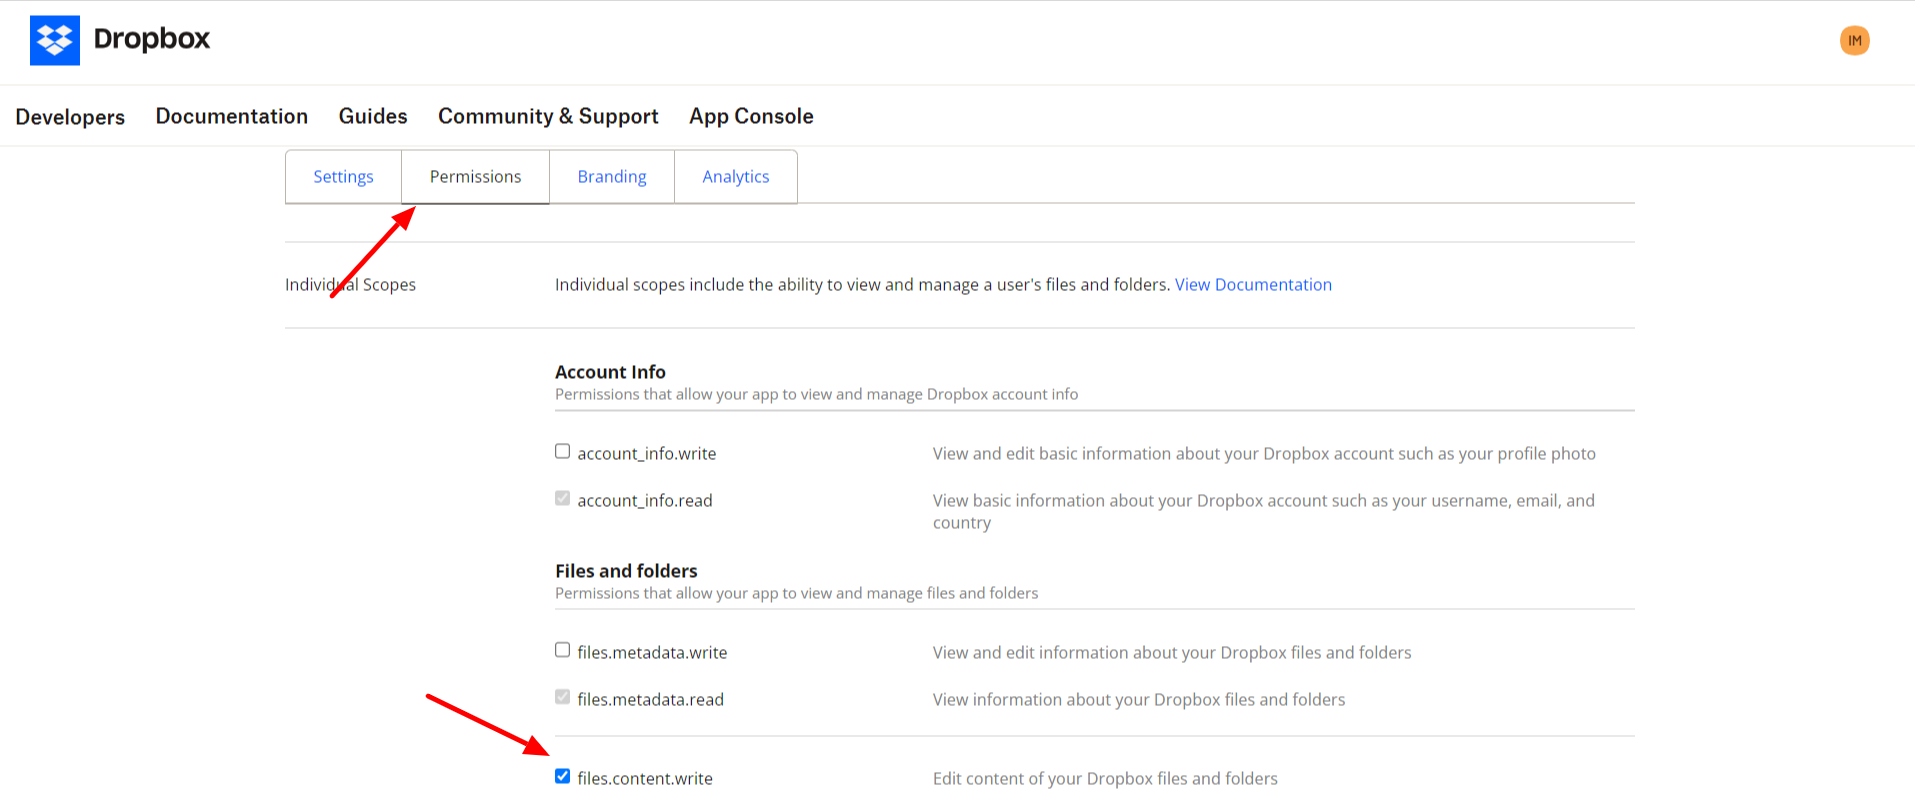
Step 3: Configure App Permissions
- Set Permissions:
- In the app settings, configure the required permissions, such as files.content.write for uploading images.
Step 4: Get App Key and Secret
- Get Credentials:
- After creating the app, you will see the App Key and App Secret on the app's settings page.
- Save these securely.
Step 5: Use the Credentials
- Authentication:
- Use the App Key and App Secret in your application to authenticate with Dropbox and perform API requests.
AWS S3 Bucket Authentication:
To upload images to AWS S3, you need to create and obtain an Access Key ID, Secret Access Key, and Bucket Name. Here's a step-by-step guide:
Step 1: Create an AWS Account
- Sign Up:
Go to AWS and create an account if you don't have one.
Step 2: Create an IAM User
- Go to the IAM Console:
- Visit the IAM Management Console.
- Create a New User:
- Click on Users > Add user.
- Enter a username and select Programmatic access.
- Set Permissions:
- Choose Attach existing policies directly.
- Search for and select AmazonS3FullAccess.
- Click Next: Tags, then Next: Review, and finally Create user.
- Get Access Keys:
- After creating the user, you will see the Access Key ID and Secret Access Key. Save these credentials securely.
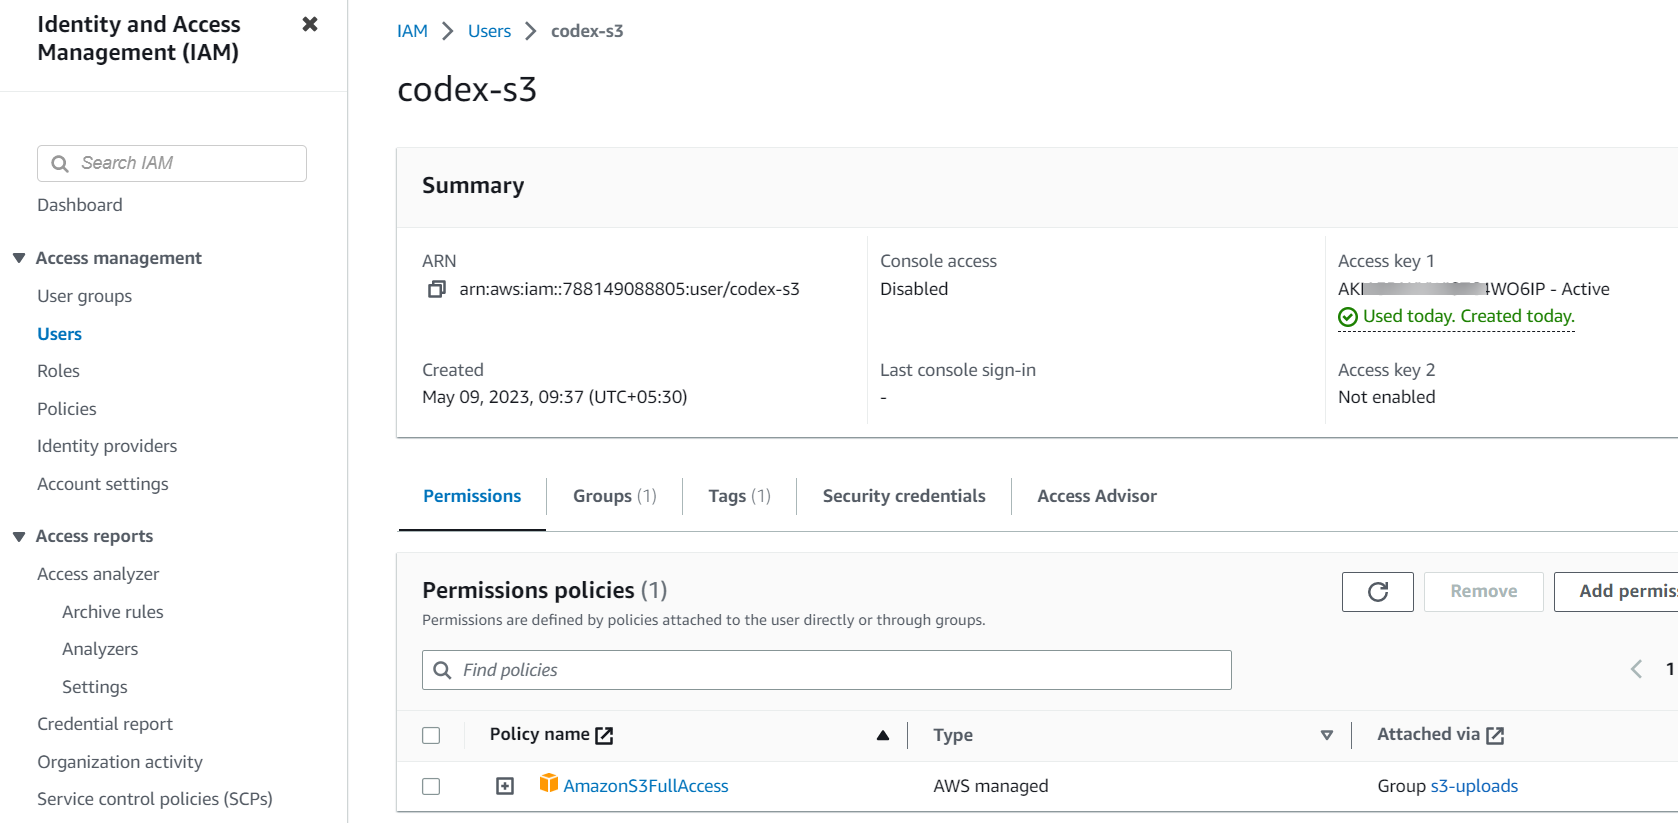
- After creating the user, you will see the Access Key ID and Secret Access Key. Save these credentials securely.
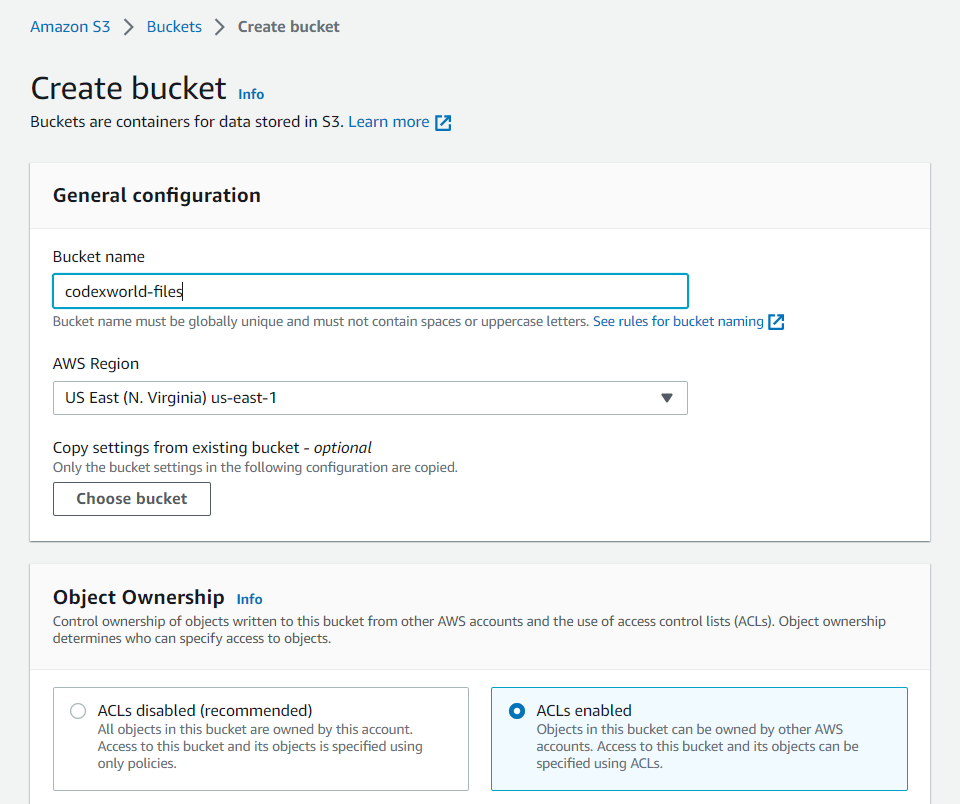
Step 3: Create an S3 Bucket
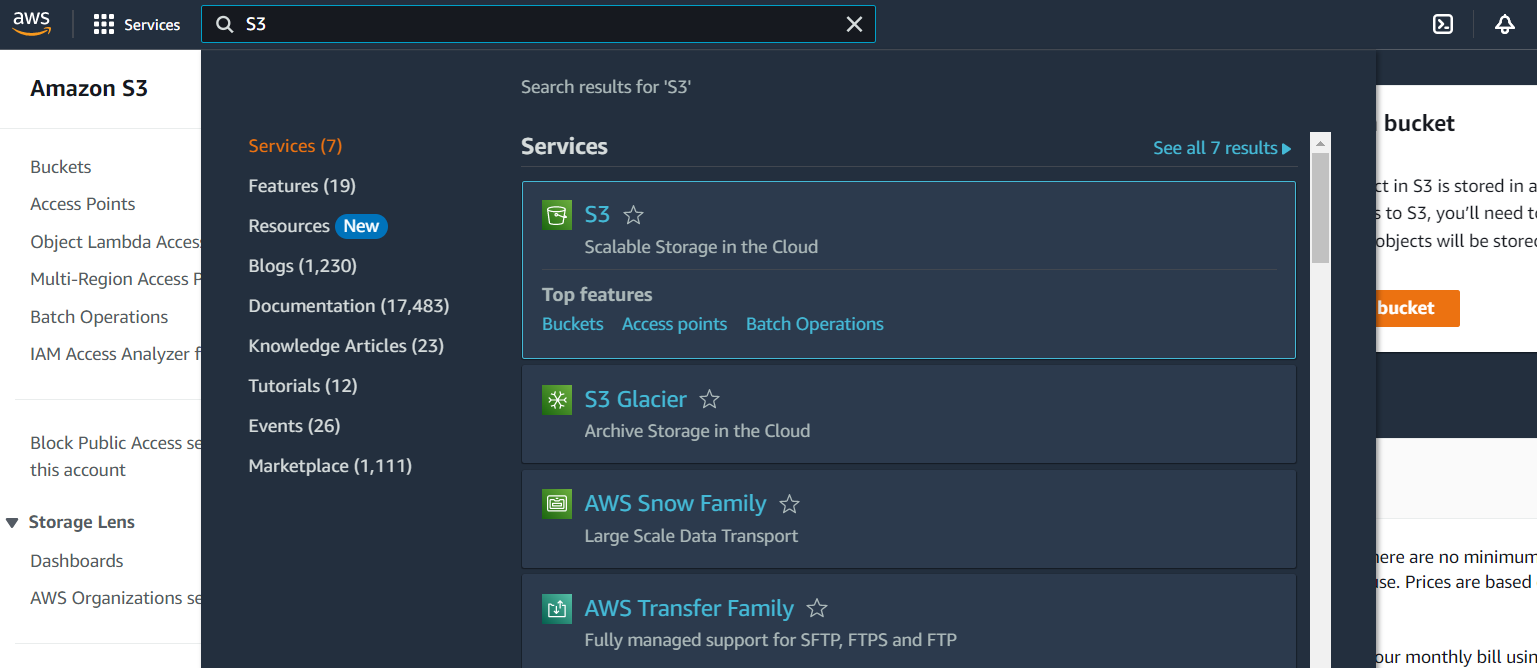
- Go to the S3 Console:
- Visit the S3 Management Console.
- Create a New Bucket:
- Click on Create bucket.
- Enter a unique bucket name and select a region.
- Click Create bucket.
Step 4: Configure Bucket Permissions (Optional)
- Set Bucket Policies:
- Go to the Permissions tab of your bucket.
- Set bucket policies if needed to control access permissions.
Get Support
FAQs
Is possible to add images from contact form 7?
At the moment, we offer editors for content creation of PDFs, and you can add images directly from the media library using HTML tags on this section - https://prnt.sc/JJ0b4oVshUXd. Simply include an image tag with the source URL of the image from the media library to add an image to your PDF. However, currently, we do not have the capability to display uploaded images from the Contact Form 7 File Control.
Generated PDF can download?
Yes, You can get an option with a success message to download a PDF link
Can we generate external links for PDF like Google Drive and Dropbox?
Yes, we have added features for updating your PDF directly after submit on Google drive or Dropbox and you get the link on Email.
Does this plugin require Contact form 7?
Yes, The 'Generate PDF using Contact Form 7' plugin requires Contact Form 7 to be activated. Contact Form 7 enables users to manage multiple contact forms with the option to customize the forms and contents of the mail with simple markup.
Change log
version 4.0
- PDF Analytics Dashboard: View all PDF activity in one place
- Usage Tracking: Monitor total PDFs generated, downloads, and emails sent
- Error Monitoring: Identify failed PDF generations
- Visual Reports: Analyze PDF data with charts (daily, monthly, yearly, custom range)
- Recent Activity: Track user email, actions, and timestamps
- Dashboard Widgets: Enable or disable dashboard widgets as needed
- Access helpful resources including documentation, FAQs, and support options in one place.
- Easily submit support tickets or explore guides to resolve issues quickly.
-
Stay updated with the latest insights through blogs and newsletter subscriptions.
version 3.1
- Signature feature improvements.
- Added a new option to Show or Hide Label Field Tags
version 3.0
- User Interface – Enjoy a cleaner, more user-friendly admin panel for easy setup and management.
- New Color Scheme & Branding – Fresh visuals and customizable colors to better match your brand style.
- More Text Formatting & Fonts – Expanded options to style your PDF content with new fonts and formatting tools.
- PDF Compression Option – Reduce PDF file size without losing quality to save space and improve speed.
- Accessibility Enhancements – Improved design to meet accessibility standards and ensure ease of use for everyone.
- Performance Boost – Faster PDF generation and optimized performance for smoother operation.
version 2.9
- Security Update:
- Updated the system to incorporate security patches, restricting file type uploads.
- Configured the system to allow only “.pdf” file uploads to the server.
- Add a setting for the header image position:
- Import/Export Settings
- CSV Export
- Add a page break tag
- Use Dashicons on tab titles
- Tag For Password protected PDFs
- Improved performance
- Resolved issues preventing PDFs from opening during preview.
- Replaced CodeMirror external libraries with WordPress defaults to reduce plugin size.
version 2.8
- Add – ‘Post Title’ or Current page title using the [_post_title] Shortcode in the PDF message body settings.”
- Secure plugin.
- Tested with WordPress 6.6.
version 2.7
- Updated subscription API URL.
- Tested with WordPress 6.6.
version 2.6
- Improved compatibility with WordPress VIP platform by refactoring code to adhere to VIP coding standards.
version 2.5
- Enable or Disable pdf attachment in mail
- In the Generate PDF Using Contact Form 7 Pro version, you can now attach PDF files to both "Mail 1" and "Mail 2"
- You have the flexibility to send them as PDF attachments via the default setting or to a designated email address.
version 2.4
- The issue on both the backend and frontend sides has been resolved.
version 2.3
- Our plugin now empowers users to generate PDF files effortlessly. These files can be conveniently stored in designated server folders or third-party locations like Amazon S3.
- This innovative functionality not only minimize server load but also optimizes storage space.
version 2.2
- Display all created PDF Form lists and Save PDF Form submitted data to the database.
- Fixed Bugs related to the Backend
version 2.1
- Supports Displaying Uploaded File In pdf
- Optimized Raw_field
version 2.0
- Attach Your own pdf as invoice with our Paypal, stripe, Authorize plugins
version 1.9
- Add New feature of PDF Templates
version 1.8
- Fixed bugs related Signature field in mail & pdf, CSS 404 not found.
version 1.7
- Fixed Active Tab issue on admin side setting page
version 1.6
- Fix bug of PDF attachement in Email
version 1.5
- Display date into different Format provided in PHP
- Support all special Mail Tags in PDF that alreday support in contact form 7 mails
version 1.4
- Add Preview option in admin side to show PDF preview without submit form from front side.
version 1.3
- Fixed Bug: open pdf in same window, new window & download option.
version 1.2
-
Supports _raw_field shortcode: Fetches label.
version 1.1
- Add missing fonts in MPDF library.
version 1.0
- Initial release