Smart Appointment & Booking Pro
Overview
Description
Create and Configure Forms: Easily design and customize forms to fit your needs, adjusting fields, questions, and design. Personalize thank-you messages, redirect users to relevant pages after form submission, and create specialized booking forms for different purposes.
Booking Calendar Settings: Set availability and time slots, manage and track bookings in the backend, and offer both physical and virtual appointments. Enable a waitlist feature, auto-approve bookings, and integrate booking events into your calendar.
Payment and Management: Accept secure payments through Stripe, handle modifications and cancellations, and edit booking entries as needed.
User Access: Display forms only to logged-in users, allow account creation, and automatically send usernames and passwords to new users.
Plugin's purpose and benefits
- Customized FormsEasily create and customize forms to gather specific data relevant to your needs.
- Thank-You MessagePersonalize the message users see after submitting a form.
- Redirection: Redirect users to a designated page or next step after successful form submission.
- Specialized Booking Forms Tailor forms for specific booking requirements, whether for appointments, sessions, or other services.
- Booking Calendar Set up availability, time slots, and scheduling preferences in the booking calendar.
- Guest Check-In Allow users to submit forms without needing an account.
- Booking Management Track and manage all appointments through the admin backend.
- Physical and Virtual Appointments Offer both in-person and virtual appointment options to customers.
- Waitlist Enable users to join a waitlist for fully booked slots, with options for later approval.
- Auto-Approval Automatically approve certain bookings to streamline the process.
- Calendar Integration Sync booking events with your calendar for better organization.
- Stripe Payment Gateway Provide secure payment processing for appointments through Stripe.
- Modifications and Cancellations Easily handle booking changes and cancellations through the admin panel.
- View and Edit Entries Access and make edits to booking entries as needed.
- Display to Logged-In Users Restrict form visibility to registered users for a more personalized experience.
- User Account CreationAllow users to create new accounts directly from the platform.
- Send Username and Password Automatically generate and send login credentials to new users.
- WordPress VIP Compatibility Ensure the plugin is compatible with WordPress VIP.
- Multi-Step Booking Form Implement a multi-step process in your booking forms for a step-by-step booking experience.
- Configure Forms Easily create and adjust forms, including customizing thank-you messages and redirection settings.
Get Started
Quick setup instructions
How To Use & Features
Clicking on the menu item labeled “WP Smart A & B” should display it as a separate menu item in the admin panel.
For Dashboard
- Total Submissions Track the total number of form submissions received through the plugin.
- Total Payments Monitor the total amount of payments processed.
- Successful Transactions View the number of transactions that were successfully completed.
- Refunds Keep track of any refunds processed through the system.
- Total Monthly Transactions - Displays transactions chart-wise on a monthly basis
- Total Yearly Transactions - Displays transactions in a pie chart format on a yearly basis.
Recent Users Registered on Site:
- User Name Display the names of newly registered users.
- Registration Date Show the date when each user registered on the site.
- View Your Recent Transactions - Displays the 5 most recent transactions.
- Filter - Displays transactions based on selected date, form, and status (Approved, Canceled, Refunded).
For WP Smart Form Builder A & B
- Form Name - The name of the appointment form.
- Shortcode - The shortcode used to embed or display the form.
- Date - The date when the form was created or last modified.
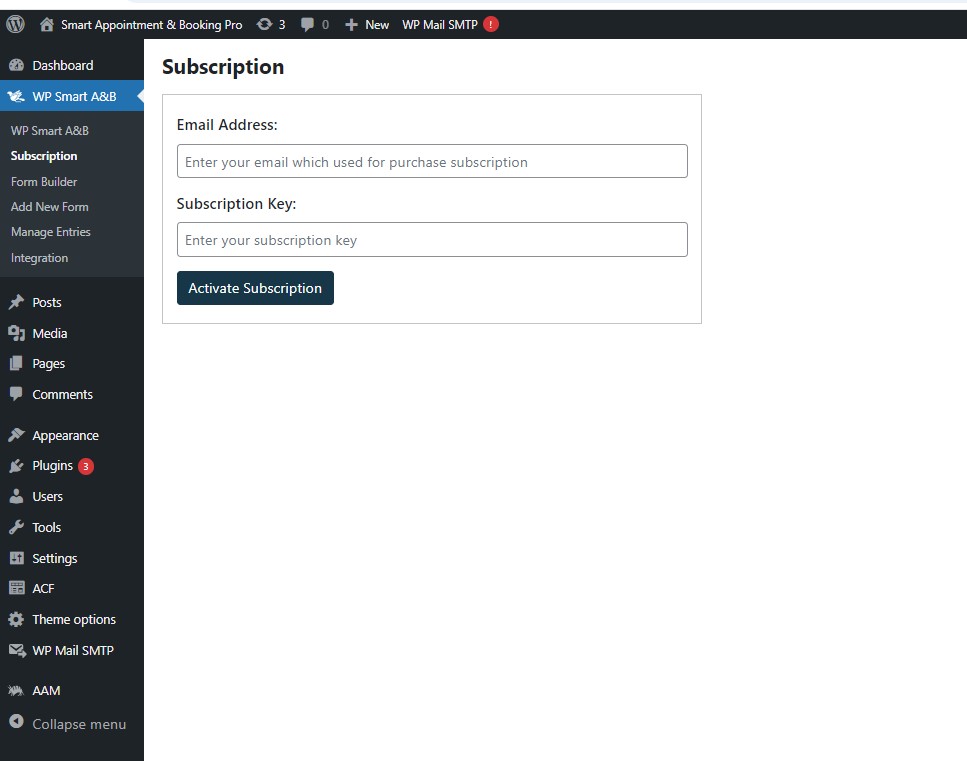
For Smart Appointment & Booking Add-on Subscription
If you activate the subscription purchase plugin, you'll receive an email with your subscription key.
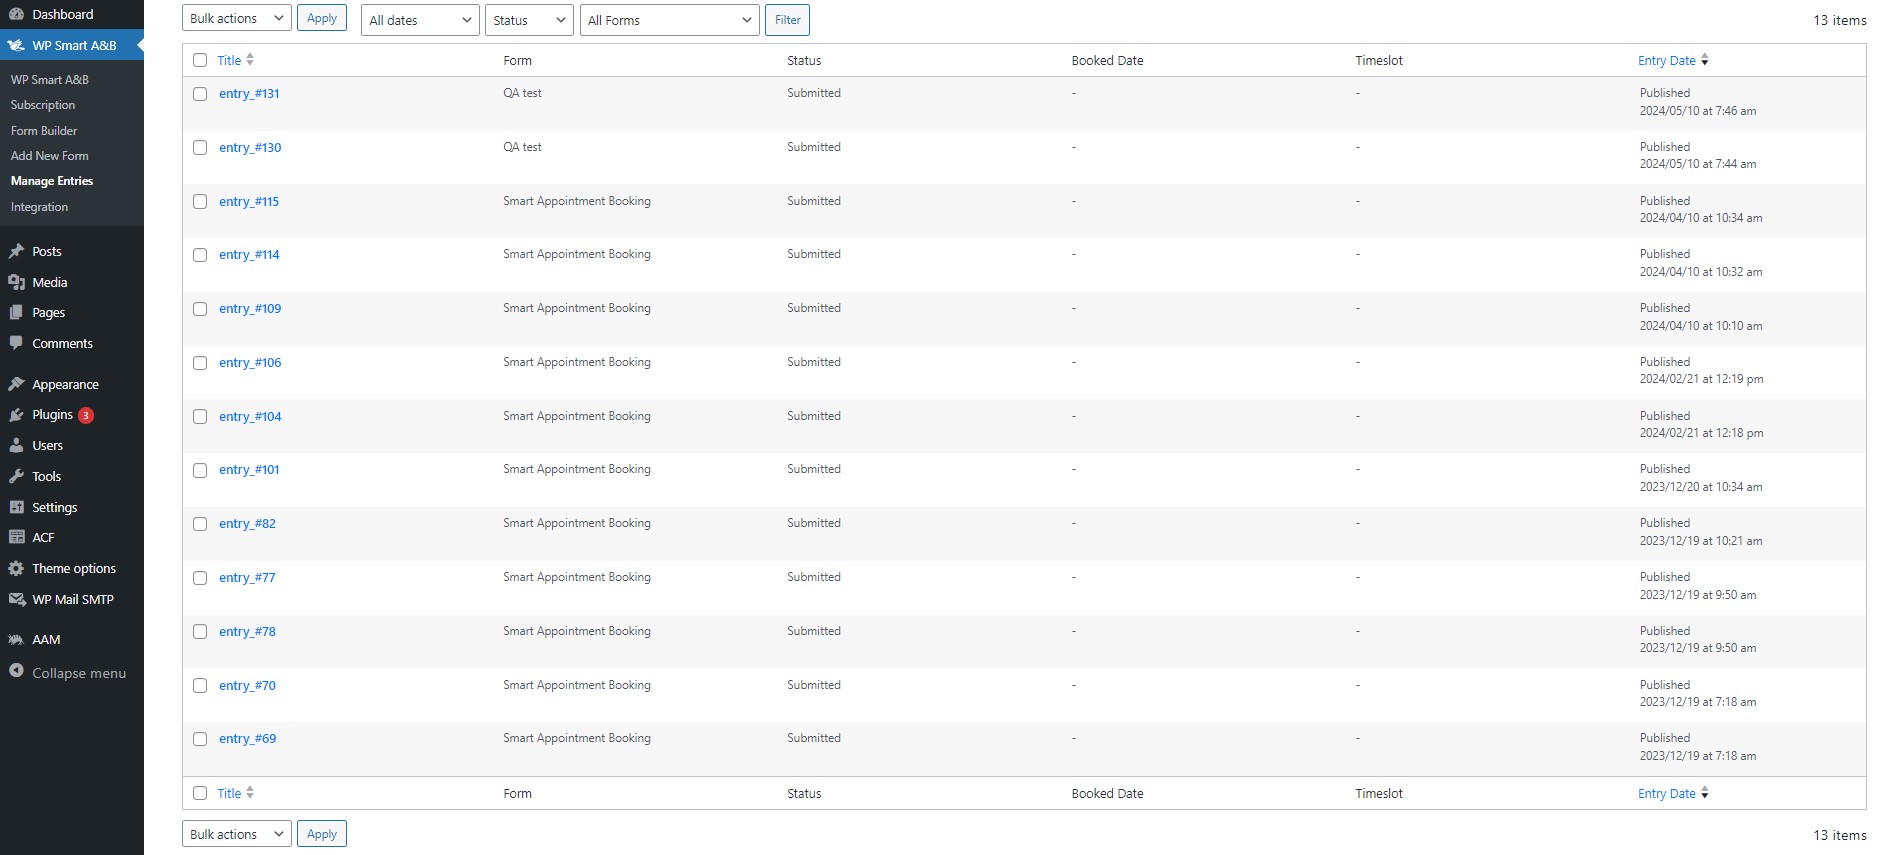
For Manage Entries
Title - entry_#number (e.g., entry_#001)
Form - Displays the form name.
Status - Current status of the booking, which can be one of the following:
- Booked
- Pending
- Canceled
- Approved
- Waiting
- Submitted
Booked Date - The date on which the booking was made.
Timeslot - The selected timeslot for the booking.
Date - The specific date of the appointment or event.
For Manage Entries Details
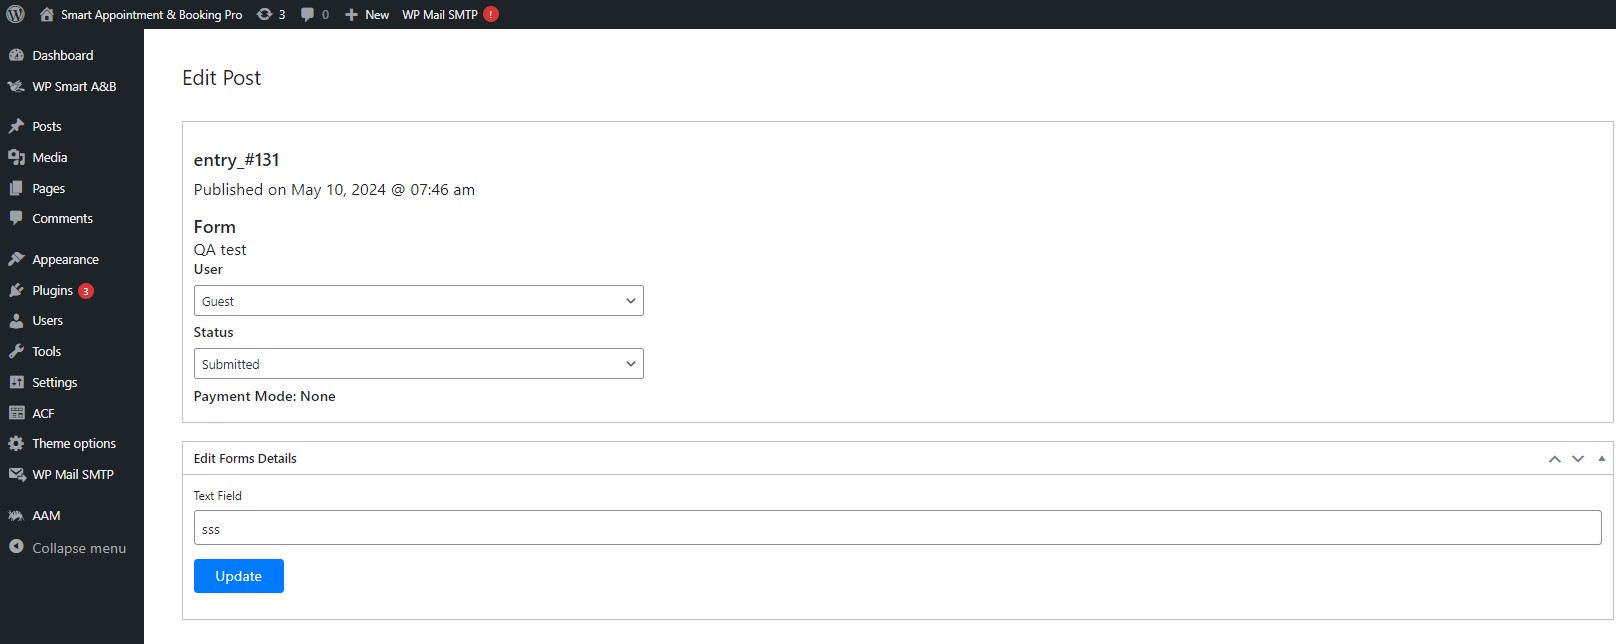
Booking Entry Details
- Entry ID - entry_#131
- Published On - Form submission date (e.g., May 10, 2024 @ 07:46 AM)
- Form - Displays the name of the associated form.
- User - Displays the name of the user who made the booking.
- Status
- Booked
- Pending
- Canceled
- Approved
- Waiting
- Submitted
Form Details
- Display the detailed information entered in the form.
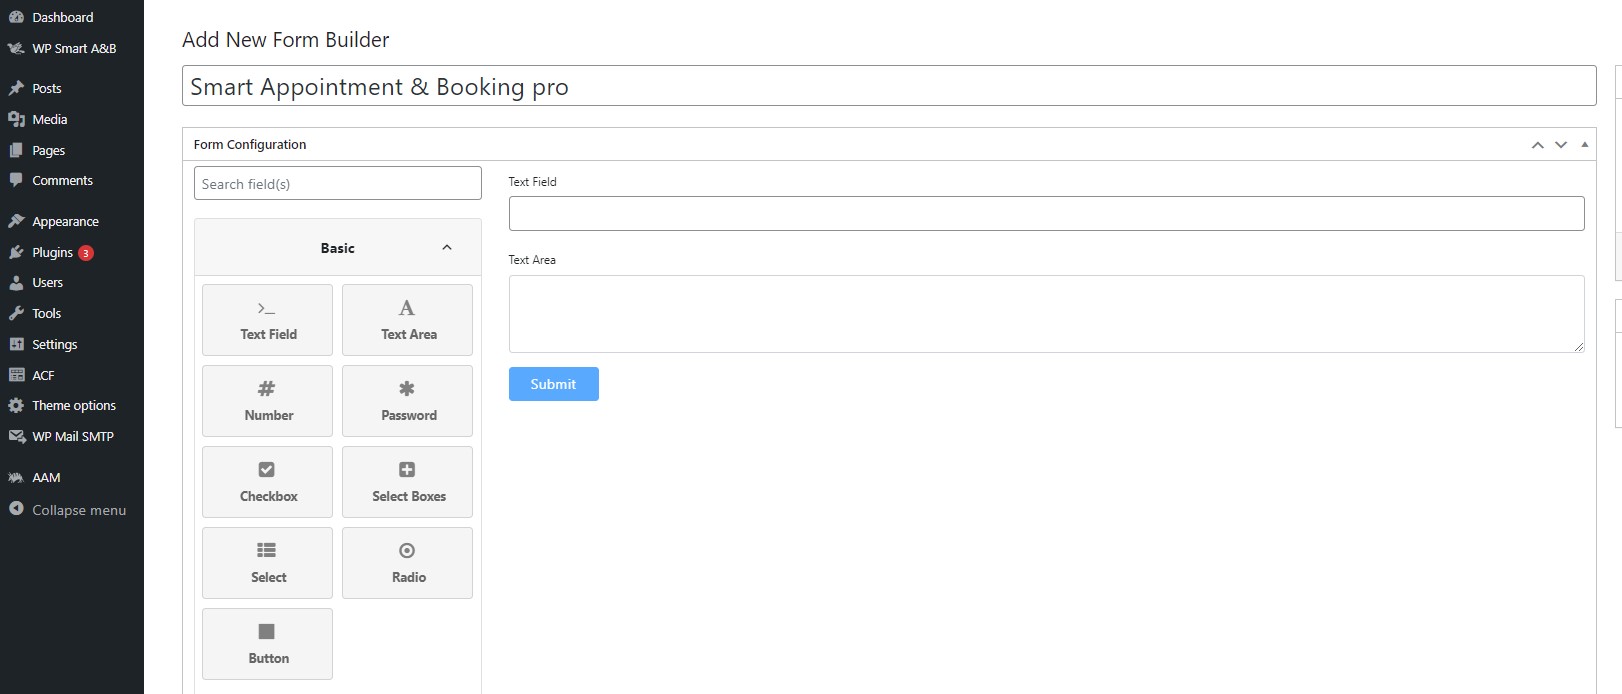
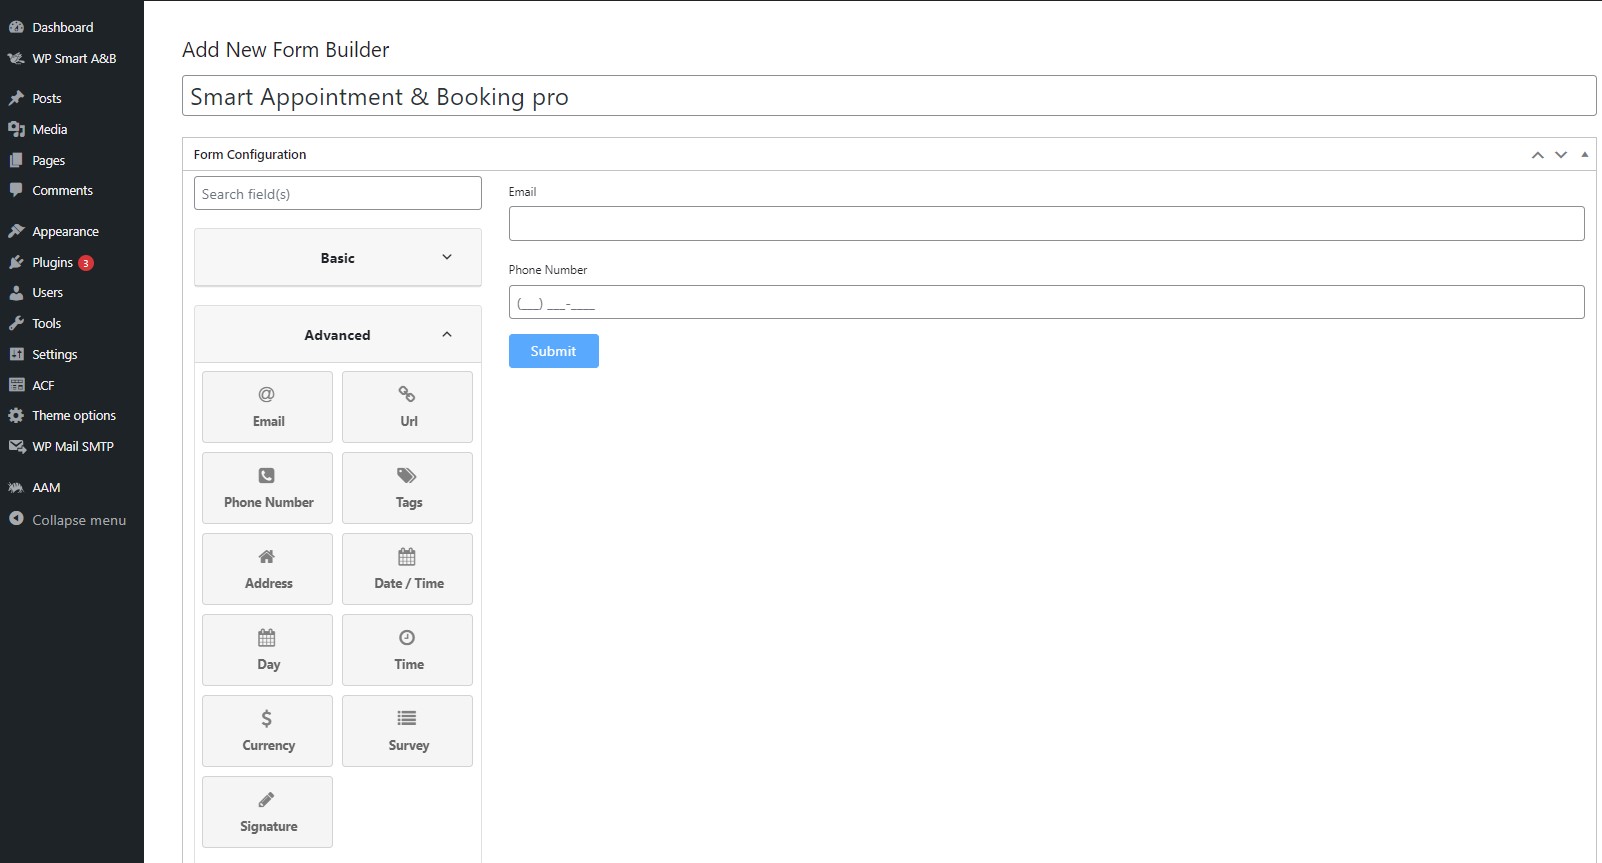
For Add New Form Basic
The form configuration includes four main types of fields:
- Text Field - Create a text input field.
- Text Area - For longer text input.
- Number - Input for numerical values.
- Password - Field for password entry.
- Checkbox - For multiple selections.
- Select Boxes - Dropdown menus for multiple selections.
- Select - Single dropdown menu for selection.
- Radio - For single-choice options.
- Button - Action buttons.
Advanced
- Email - Input for email addresses.
- URL - For web URLs.
- Phone Number - Input for phone numbers.
- Tags - For tagging or categorizing.
- Address - Input for addresses.
- Date / Time - Fields for date and time input.
- Day - Input for selecting a day.
- Time: Input for selecting a time.
- Currency - Field for currency values.
- Survey - For survey-related inputs.
- Signature - For capturing signatures.
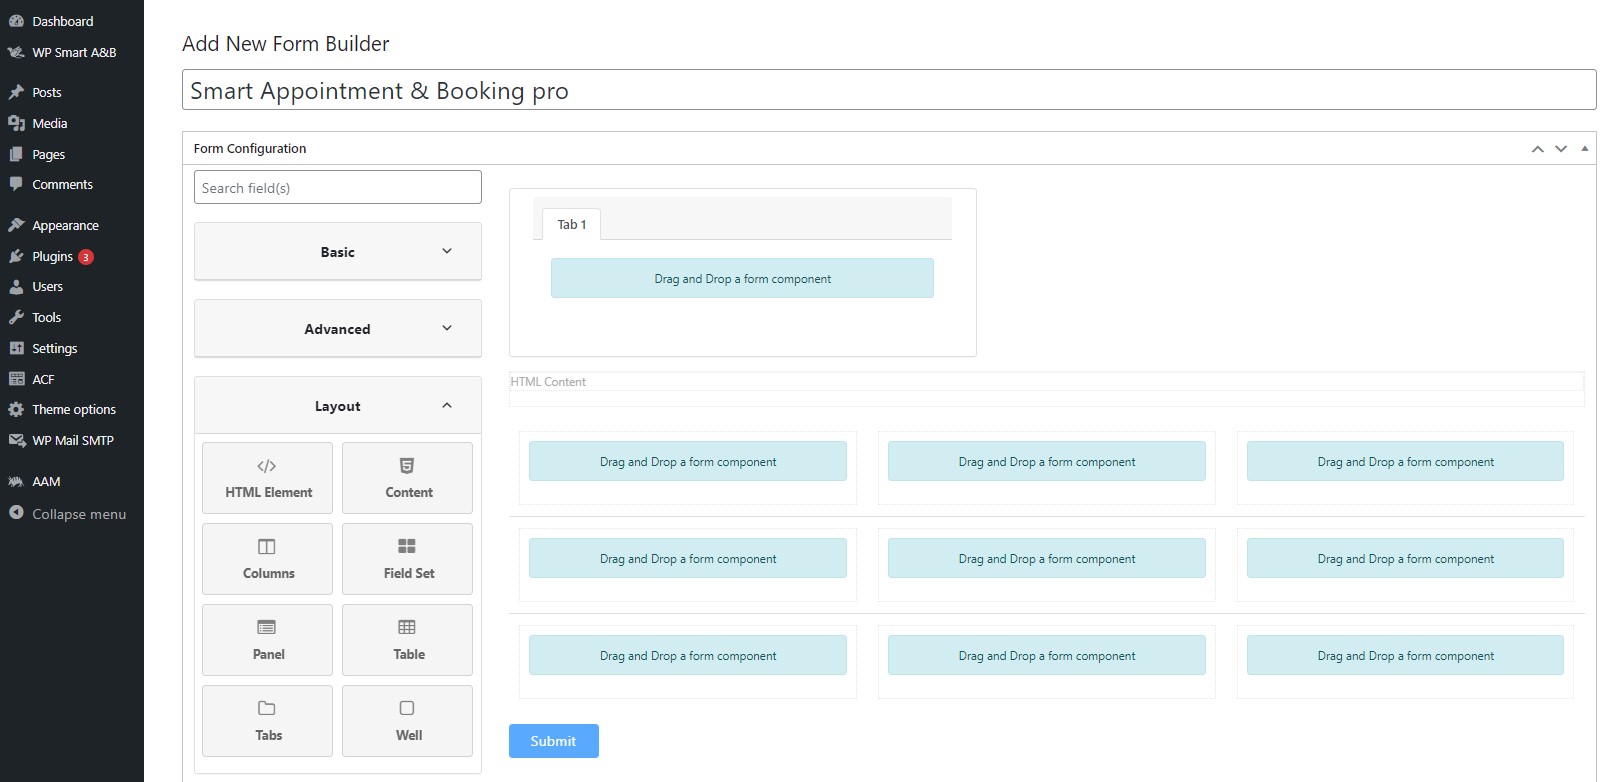
Layout
- HTML Element - Custom HTML elements.
- Content - For adding content blocks.
- Columns - Layout with multiple columns.
- Field Set - Grouping of related fields.
- Panel - For organizing fields in panels.
- Table - For tabular data.
- Tabs - For tabbed content sections.
- Well - Styled container for content.
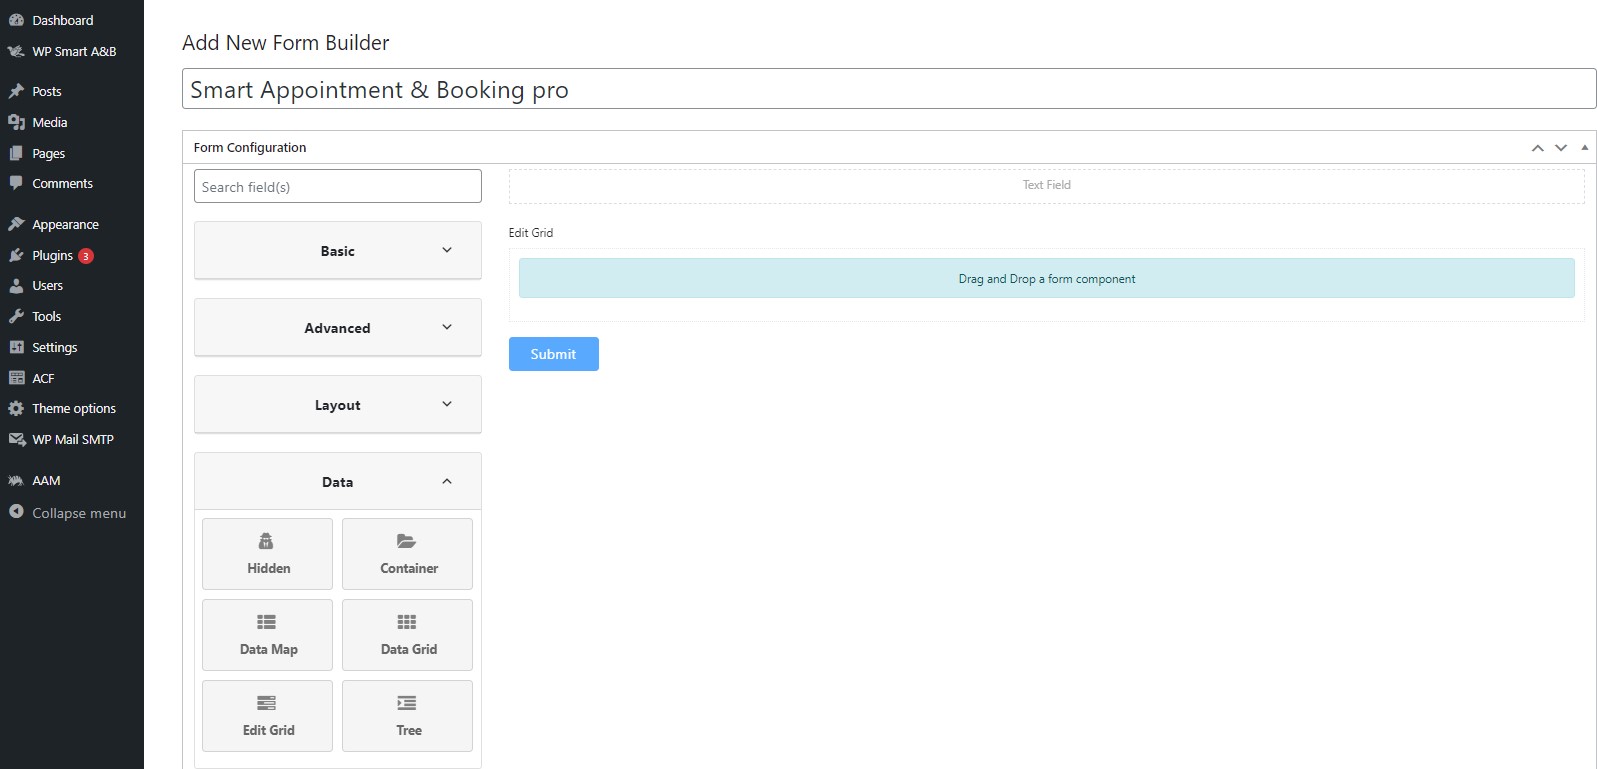
Data
- Hidden - Hidden fields for storing data not visible to users.
- Container - Grouping of fields into containers.
- Data Map - Mapping of data fields.
- Data Grid - Grid layout for data display.
- Edit Grid - Editable grid layout.
- Tree - Hierarchical data display.
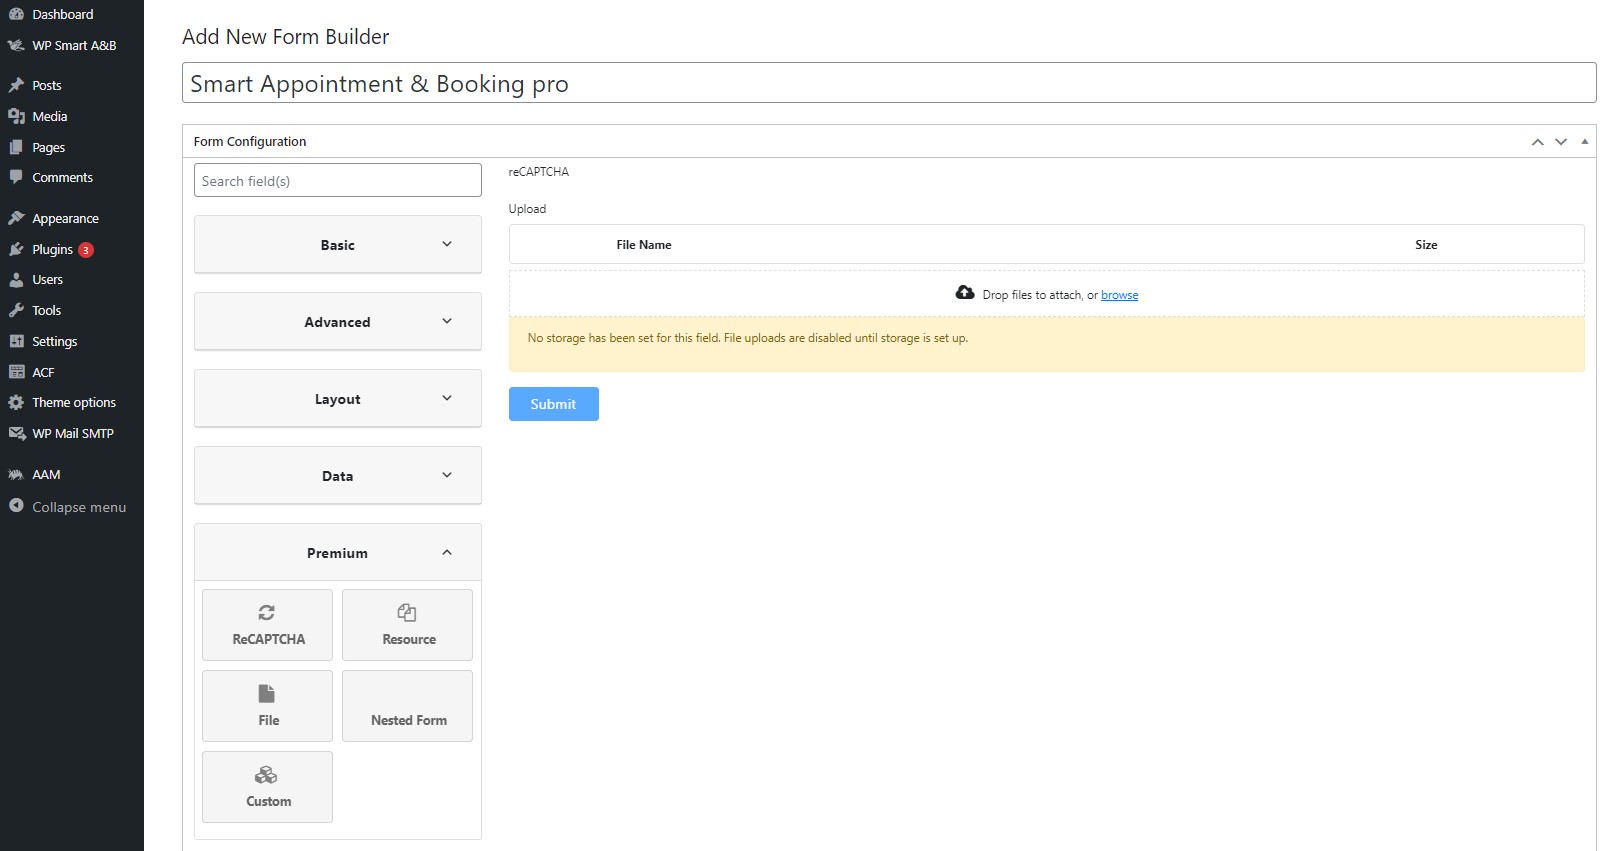
Premium
- reCAPTCHA Add Google reCAPTCHA to your forms for enhanced security and to prevent spam submissions.
- Resource Manage and allocate resources (like rooms or staff) directly through the booking system.
- File Allow users to upload files as part of their booking or form submission process.
- Nested Form Create and manage forms within other forms for complex data collection needs.
- CustomCustomize forms, fields, and settings to meet specific requirements for your business
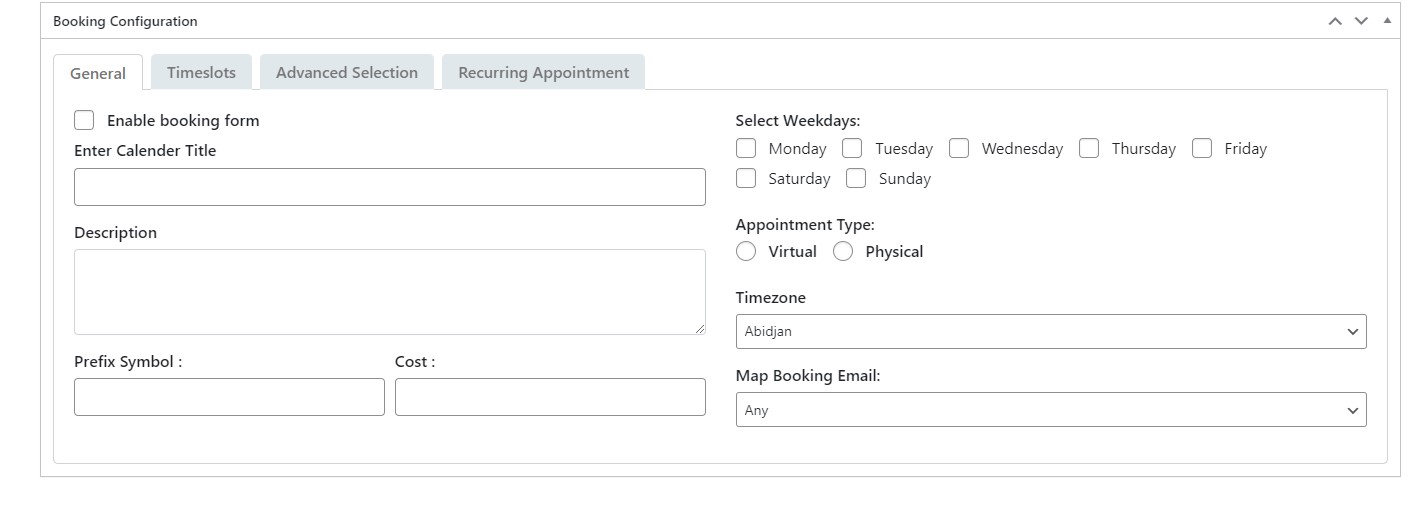
General
- Enable or Disable Booking Form - Option to enable or disable the booking form.
- Enter Calendar Title - Input field for the calendar title.
- Description - Field to enter a description for the booking form.
- Prefix Symbol - Input field to enter a prefix symbol.
- Cost - Input field to specify the cost.
- Select Weekdays - Multiple selection options for weekdays.
- Monday - Option to select or not select.
- Tuesday - Option to select or not select.
- Wednesday - Option to select or not select.
- Thursday - Option to select or not select.
- Friday - Option to select or not select.
- Saturday - Option to select or not select.
- Sunday - Option to select or not select.
- Appointment Type - Option to enable one type of appointment.
- Virtual - Enable virtual appointments.
- Physical - Enable physical appointments.
- Timezone - Dropdown to select the timezone.
- Map Booking Email - Option to select the email form.
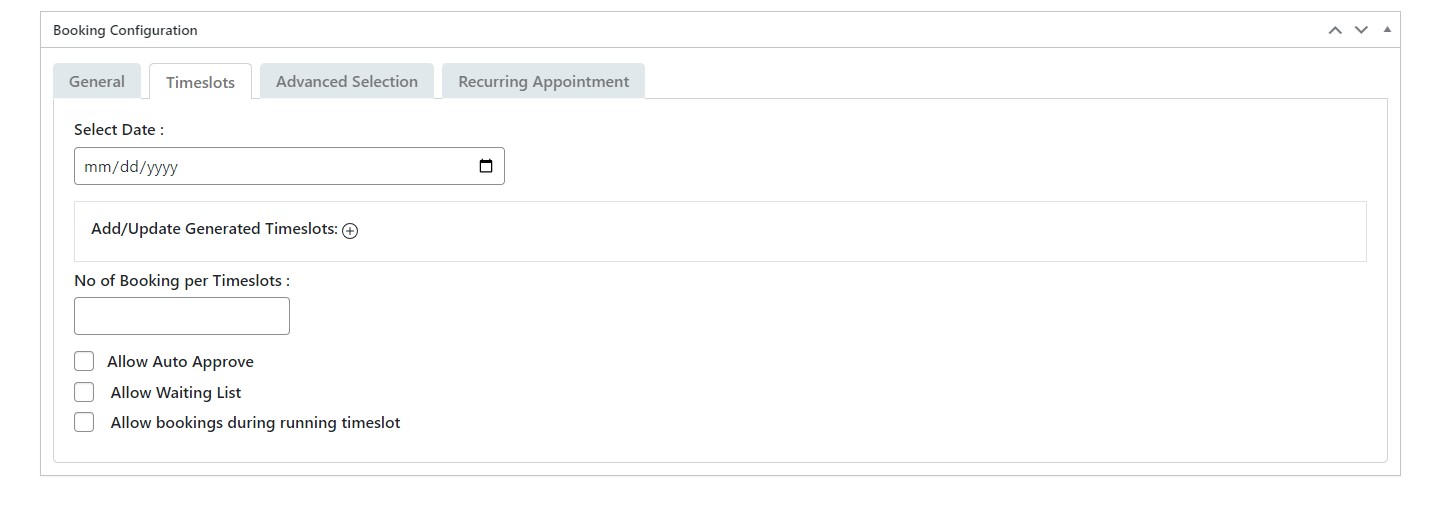
Timeslots
- Select Date - Date picker to select a date.
- Add/Update Generated Timeslots:
- Start Time - Time picker to set the start time.
- End Time - Time picker to set the end time.
- Number of Bookings per Timeslot - Input field to specify the number of bookings allowed per timeslot.
- Allow Auto Approve - Toggle on/off for auto-approving bookings.
- Allow Waiting List - Toggle on/off for allowing a waiting list.
- Allow Bookings During Running Timeslot - Toggle on/off for allowing bookings during an ongoing timeslot.
- Bookings Stop After Minutes of Start Time -
- HH - Input for hours.
- MM - Input for minutes.
Advanced Selection
- Select Date - Date picker to select a date.
- Add/Update Generated Timeslots:
- Start Time - Time picker to set the start time.
- End Time - Time picker to set the end time.
- Number of Bookings per Timeslot - Input field to specify the number of bookings allowed per timeslot.
- Allow Auto Approve - Toggle on/off for auto-approving bookings.
- Allow Waiting List - Toggle on/off for allowing a waiting list.
- Allow Bookings During Running Timeslot - Toggle on/off for allowing bookings during an ongoing timeslot.
- Bookings Stop After Minutes of Start Time -
- HH - Input for hours.
- MM - Input for minutes.
Recurring Appointment
- Enable Recurring Bookings - Option to enable recurring bookings.
- Repeat Recurring -
- Daily - Option to repeat daily.
- Every Weekend - Option to repeat every weekend.
- Every Weekday - Option to repeat every weekday.
- Certain Days - Option to repeat on specific days.
- Select Weekdays - Multiple selection options for specific weekdays.
- Monday - Option to select or not select.
- Tuesday - Option to select or not select.
- Wednesday - Option to select or not select.
- Thursday - Option to select or not select.
- Friday - Option to select or not select.
- Saturday - Option to select or not select.
- Sunday - Option to select or not select.
- Add Holidays - Option to select multiple holidays.
- Select Date - Date picker to select holiday dates.
- End Repeats -
- Never - Option to never end repeating.
- On Date - Date picker to select an end date for repeating.
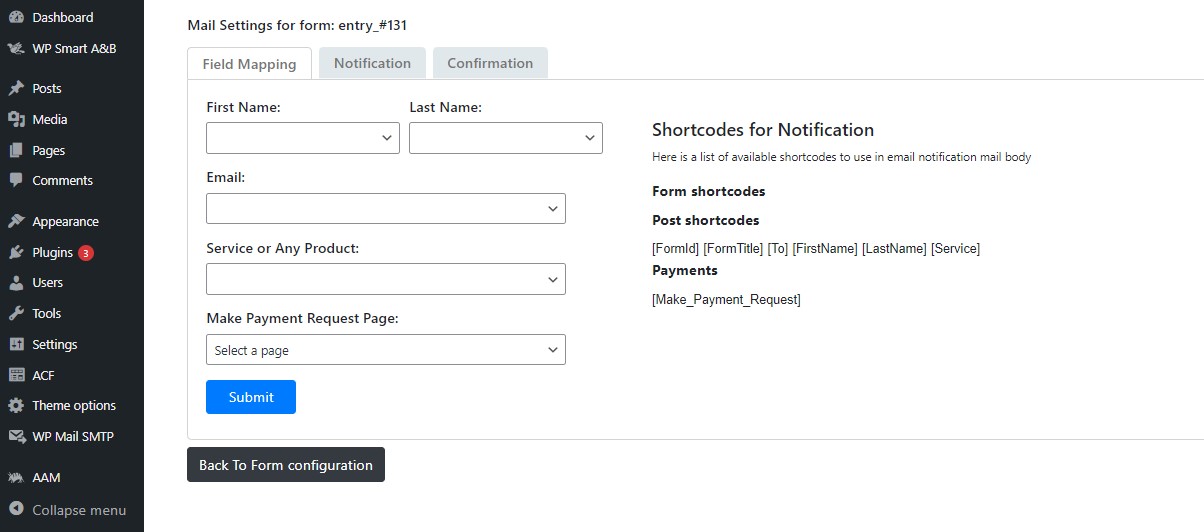
Field Mapping
- First Name - Select from a list of form fields.
- Last Name - Select from a list of form fields.
- Email - Select from a list of form fields.
- Service - Select from a list of form fields.
- Cancel Booking Page - Select a page for cancellation.
Shortcodes for Notification
- Available Shortcodes for Email Notification -
- Form Shortcodes -
-
[textField] [email] [textArea] [To] [FirstName] [LastName] [Service]
- Post Shortcodes -
-
[FormId] [FormTitle]
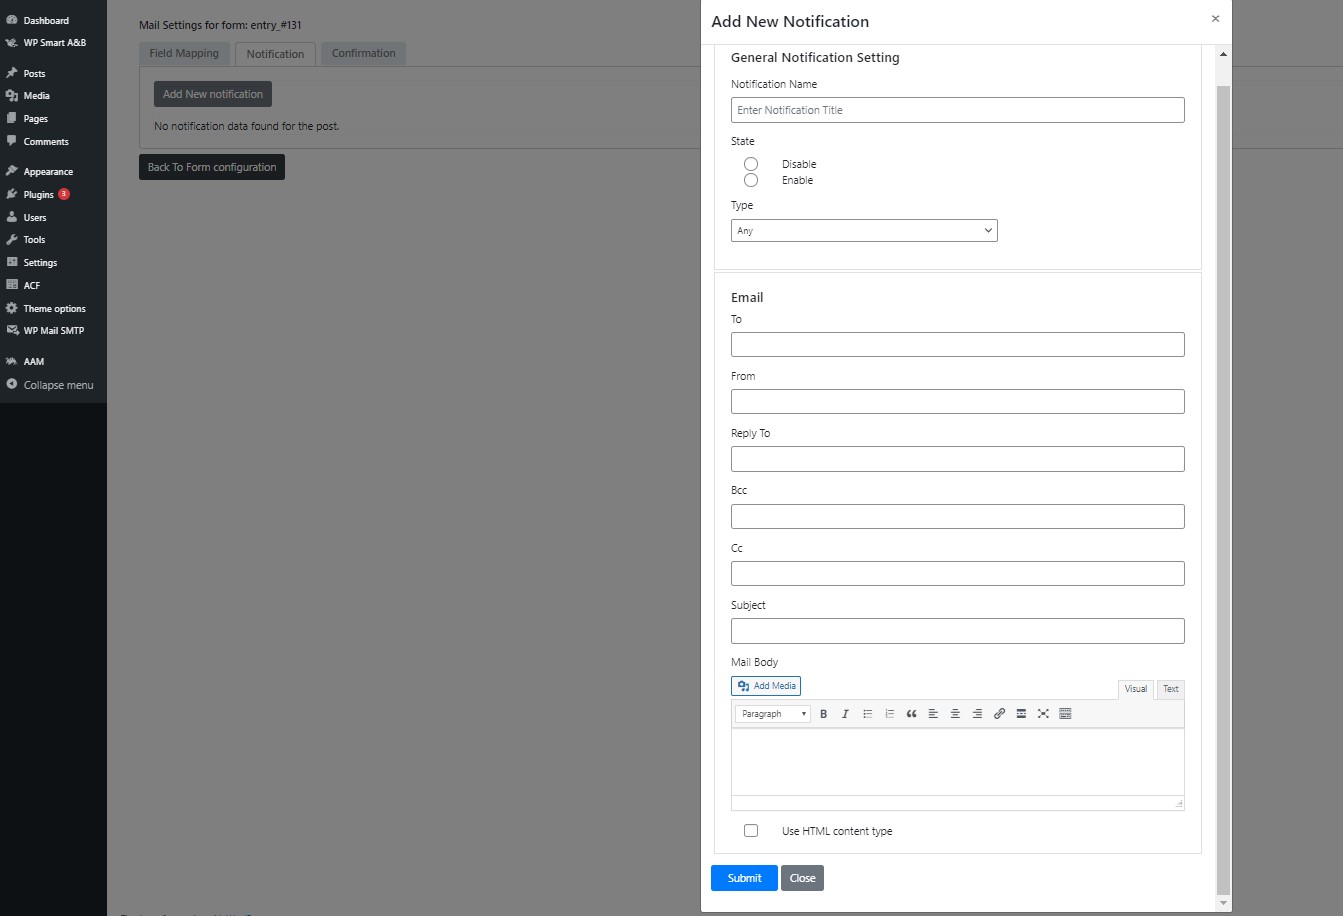
Notification
- Add New Notification
- General Notification Setting -
- Notification Name -Enter the notification name.
- State -
- Disable - Option to select or not select.
- Enable - Option to select or not select.
- Type -Select one option:
- Booked
- Pending
- Canceled
- Approved
- Waiting
- Submitted
- Email Settings -
- To - Enter the recipient's email address.
- From - Enter the sender's email address.
- Reply To - Enter the reply-to email address.
- Bcc - Enter Bcc email addresses.
- Cc - Enter Cc email addresses.
- Subject - Enter the email subject.
- Mail Body - Compose the email body.
- Use HTML Content Type - Option to use HTML for the email content.
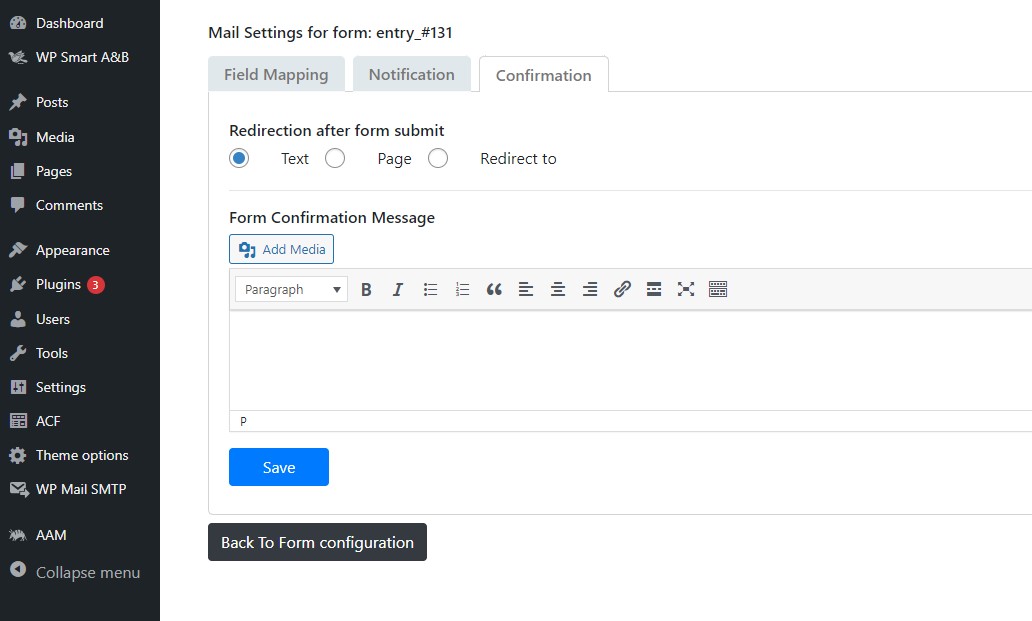
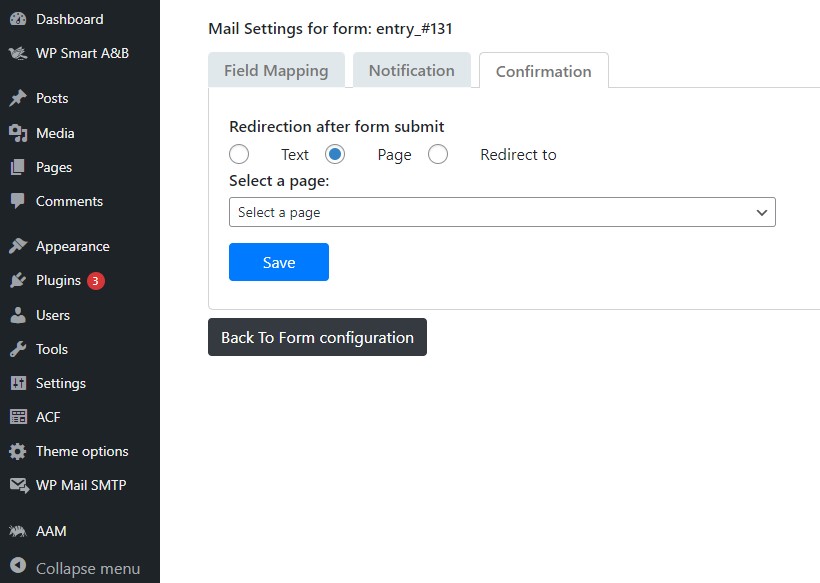
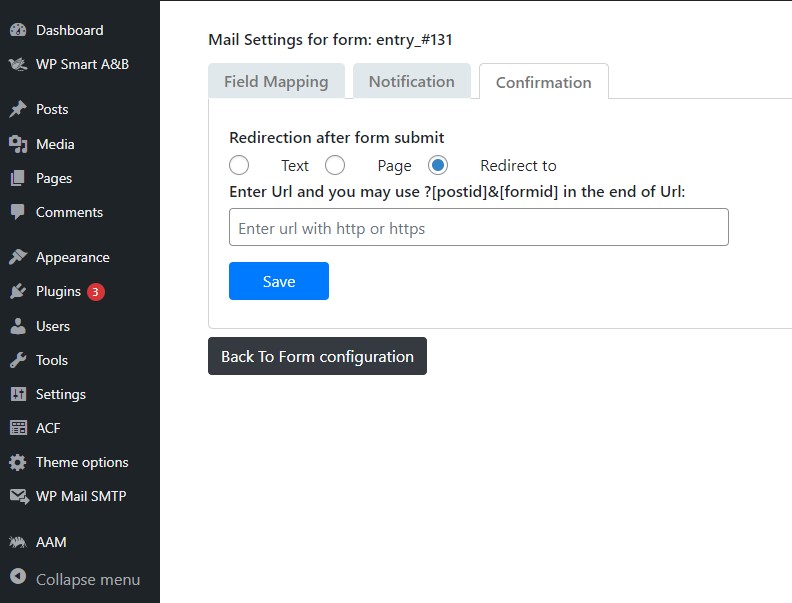
Confirmation
- Texts - Enter confirmation text.
- Pages - Select a page for confirmation.
- Redirect to - Add a link for redirection (e.g., google.com).
Integrations
- Client ID Unique identifier provided by the integrated service for authentication purposes.
- Secret ID A secret key used alongside the Client ID to securely connect with external services.
- Redirect URL The URL to which users are redirected after a successful authentication or integration process.
Get Support
FAQs
Why should I upgrade to Smart Showcase for Google Reviews Pro from the free version?
Upgrading to the Pro version of Smart Showcase for Google Reviews Pro gives you more control. You get extra features like being able to filter reviews, show more reviews, and customize the way they look. You can also pin your selected reviews to the top, making it easy to highlight specific feedback. Additionally, it supports multiple locations if you have more than one business.
Change log
Version 1.4
- Added Gutenberg Block
- Added compatibility with Elementor
Version 1.3
- Brand-New, Redesigned Admin Dashboard for an Improved User Experience.
- Bar & Pie Charts for Clearer Data Visualization.
- Optimized Plugin Performance for Seamless Functionality.
Version 1.2
- Improved compatibility with WordPress VIP platform by refactoring code to adhere to VIP coding standards.
Version 1.1
- Implementing a multi-step booking form in the plugin, allowing you to use the form for step-by-step bookings.
Version 1.0
- 1.0 is Initial Release


