User Registration Using Contact Form 7 Pro
Overview
Description
ZealousWeb's new WordPress plugin, "User Registration Using Contact Form 7 Pro," makes it easy to handle website registration and login. You can create signup forms by choosing fields like username and email. Admins can manage users and assign roles without needing to use WP or PHP code. The plugin integrates smoothly with WordPress, offers a debug mode for troubleshooting, supports multiple registration and login forms, custom validation messages, SMTP settings, and WooCommerce. It also includes "forgot password" and "reset password" features for a complete user management solution.
Plugin's purpose and benefits
- BuddyPress
- BuddyPress Profile Field Mapping: Mapping field This should include a dropdown list showing all BP profile fields. This mapping can be saved and reused across multiple forms.
- Custom Field Mapping for BuddyPress Profiles: Custom fields (text, textarea) are mapped in a dedicated section for advanced users.
- BuddyPress Activity Stream Integration: An option allows admins to enable or disable logging of user registration and profile updates to the BuddyPress activity stream.
- BuddyPress Registration Compatibility: Seamlessly integrates with BuddyPress for user registration compatibility.
- Auto-Login after Registration: Users are automatically logged in after completing the registration process
- Custom Validation Messages: Set personalized validation messages for reset and forgot password functionalities.
- Forgot Password and Password Reset Options: Enable users to reset their passwords conveniently.
- Social Sign Up + Login: Allow users to sign up and log in using popular social media platforms like Google, Facebook, and Apple.
- Push Notifications: Keep users engaged with push notifications sent to registered users.
- Multi-Step Form Compatibility: Ensure smooth integration between Contact Form 7 and the Multi-Step extension for intuitive multi-step forms.
- BuddyPress Registration Compatibility: Seamlessly integrates with BuddyPress for user registration compatibility.
- Email Templates for Contact Form 7: Customize email templates or bypass default email notifications for personalized registration and login email notifications.
- Advanced Custom Field Mapping: Create advanced custom fields for user profiles and map them to Contact Form 7 fields for a tailored user experience.
- WooCommerce Field Mapping: Map WooCommerce fields for streamlined user data collection.
- Compatibility with WordPress VIP: Ensure compatibility with WordPress VIP for a reliable and secure platform.
- Profile Dashboard: Access a centralized hub where you can conveniently view vital information and efficiently manage your account.
- Edit Profile: Easily update and personalize your profile details to ensure they're always accurate and current.
- Change Password: Enhance security by conveniently updating your password whenever necessary, ensuring the protection of your account.
- Social Sign Up + Login: Enable users to register and log in using popular social media platforms like Google, Facebook, and Apple.
- Push Notifications: Implement push notifications to keep registered users informed and engaged with your site's updates.
- Compatibility with Multi-Step for Contact Form 7: Ensure smooth integration between Contact Form 7 and the Multi-Step extension, allowing for the creation of intuitive and user-friendly multi-step forms.
- Multi-Language Support: Our plugin will enable seamless multilingual support, automatically detecting user preferences and providing translations for all site elements. It integrates with popular translation services and offers tools for manual translations.
- Seamless Registration with Contact Form 7: Users can easily register on the site using the Contact Form 7 plugin.
- Automatic Password Email: Upon registration completion, users receive an email with an auto-generated password for seamless login.
- Debug Mode: Utilize a debug mode option for effective troubleshooting during development.
- WooCommerce Field Integration: Collect user data seamlessly with integration into WooCommerce fields.
Get Started
Quick setup instructions


How To Use & Features
To use this plugin, first activate Contact Form 7. Then, install and activate the User Registration Using Contact Form 7 Pro plugin.
wp-admin > CF7 User Registration > Settings to configure it.
User Registration Form Settings
Select Registration Form
- Select Registration Form: Choose the appropriate form for User Registration from the available options.
- Enable Registration Form: Temporarily enable the registration form by activating this feature.
For General Settings

- Enable Auto Login After User Registration: Check this box to allow users to automatically log in to the website immediately after they complete the registration process.
- Skip Contact Form 7 Email: Tick this checkbox if you want to bypass the default email sent by Contact Form 7.
- Enable Password Field:Enable this option to allow users to set their password during registration. Ensure you select the correct
- User Approval Option: Choose whether newly registered users can access the login page immediately or require admin approval before they can log in.
- Select User Role Field: Define the user role for new registrations by selecting the appropriate option.
- Select Success URL: Specify the page where users will be redirected after a successful registration.
- User Registration Message :Enter the message to show when user successfully registered.
Registration Mapping
- Select Email Field: Select the field name for User's Email Address.
- Select Username Field: Select the field name for Username.
- Select Password Field:
- Select the field name for Password.
- This Will Only Apply If Enable Password Field is enabled.
- Select Biographic Info Field: Select the field name for the Biographic Info.
- Save Settings: Ensure all settings are saved properly.
- Adding the Form to a Page: Once you have configured all the settings for the Registration and Login form, add the Contact Form 7 shortcode to the desired page.
- Add Form Shortcode: Place the form's shortcode on the selected page. The form should match the one chosen for the registration process. The same steps apply for setting up the login form.
For Field Mapping


Advanced Custom Field Mapping:
- To effectively map Advanced Custom Fields (ACF) to Contact Form 7 (CF7) fields, you'll need to have both the ACF plugin and CF7 plugin installed and activated on your WordPress site.
- To Map ACF fields to Contact Form 7 (CF7) fields, follow these simple guidelines:
- Supported ACF Fields
You can map these types of ACF fields to CF7 fields:
- Text: Single line of text.
- Textarea: Multi-line text.
- Checkbox: Multiple selectable options.
- Radio: Single selectable option.
- Select (Dropdown with multiple select): A list of options where you can select multiple choices.
- Number: Numeric input.
- Date Picker: A field to pick a date.
- Email: A field for email addresses.
- Link: A field for web addresses.
- Date Timepicker: A field to pick both date and time.
For Woocommerce Field Mapping


WooCommerce Field Mapping:
To integrate WooCommerce Field Mapping with CF7 (Contact Form 7), follow these steps:
- Install WooCommerce: Go to your WordPress dashboard, navigate to Plugins > Add New, search for "WooCommerce," and install it. Activate the plugin once it's installed.
- Activate CF7 (Contact Form 7): If you haven't already, install and activate the Contact Form 7 plugin. This plugin is widely used for creating forms on WordPress.
- Map Fields: After activating both plugins, you can start mapping fields between CF7 forms and WooCommerce product fields. For instance, you can map a CF7 form field like "Name" to various WooCommerce fields such as Billing Email, Billing First Name, Billing Last Name, Billing Company, Billing Address, Billing Address 2, Billing Country, Billing State, Billing City, Billing Phone, and Billing Zipcode, among others.
For BuddyPress


BuddyPress Field Mapping:
To integrate BuddyPress Field Mapping with CF7 (Contact Form 7), follow these steps:
- Install BuddyPress: Go to your WordPress dashboard, navigate to Plugins > Add New, search for "BuddyPress," and install it. Activate the plugin once it's installed.
- Activate CF7 (Contact Form 7): If you haven't already, install and activate the Contact Form 7 plugin. This plugin is widely used for creating forms on WordPress.
- BuddyPress Profile Field Mapping: In the form settings, you can configure each CF7 field to correspond with a BuddyPress profile field.
- A Field Mapping section will allow you to select which BuddyPress fields are mapped to which CF7 form fields.
- This can include standard fields (name, email) or custom fields (text, textarea, dropdowns).
- Save the field mapping for use across multiple forms, which allows you to reuse the mapping configuration in different form submissions.
- Custom Field Mapping for BuddyPress Profiles: Admins can map custom fields between CF7 and BuddyPress profiles:
- In a dedicated Field Mapping section within CF7, provide options for mapping custom fields (such as text or textarea) to the BuddyPress profile fields.
- This can be useful for custom BuddyPress profiles where advanced fields are being used.
- Custom fields can include dropdowns, radio buttons, checkboxes, and more.

- BuddyPress Activity Stream Integration: Add an option for logging user registration and profile updates to BuddyPress Activity Streams.
- Enable or Disable Activity Logging:
- Include a checkbox option for the admin to Enable or Disable the logging of activities such as user registration or profile updates.
When enabled, activities will be logged in the BuddyPress Activity Stream, ensuring that users and admins can track important updates in the user profiles.
For Push Notification

Note: Using HTTPS for Push Notifications
When you use push notifications on a website it's important to use HTTPS (Hypertext Transfer Protocol Secure). HTTPS encrypts the data sent between users and the server, making it more secure. This encryption helps protect sensitive information from being intercepted by unauthorized parties. Therefore, ensure that your website uses HTTPS to ensure the security of push notifications.
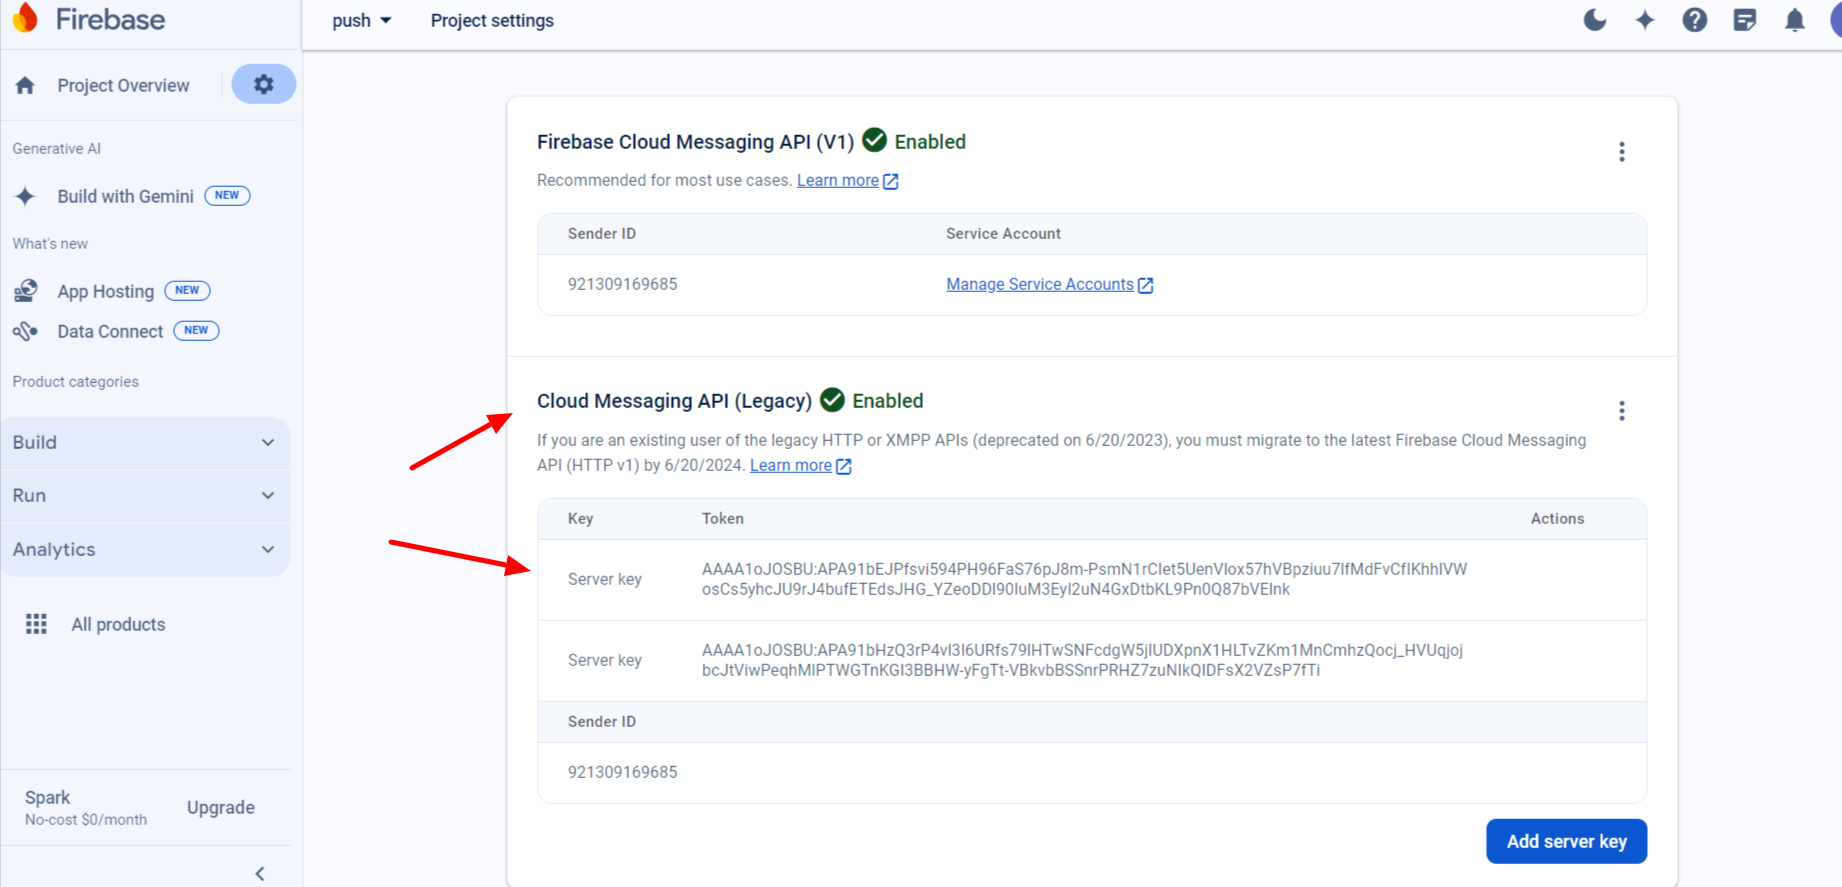
For Creating CF7 Registration Form Push Notification:
- When you register using the CF7 form, you'll receive push notifications.
Manual Push for Notification All Users:
- We send push notifications to all users manually.
For Social Sign-up

Google Sign Up Setting
- App ID: Obtain this from the Google Developers Console when you register your application.
- App Secret: Also obtained from the Google Developers Console. This is a confidential code used to authenticate your application.
Facebook Sign Up Setting

- App ID: Obtain from the Facebook Developers portal when you register your application.
- App Secret: Similar to Google, this is a secret code provided by Facebook when you create your app.
Apple Sign Up Setting

- App ID: Generated when you register your application in the Apple Developer portal.
- App Secret: For Apple Sign In, you use a private key linked to your Apple Developer account instead of an app secret.
Social Sign-up In Front-end
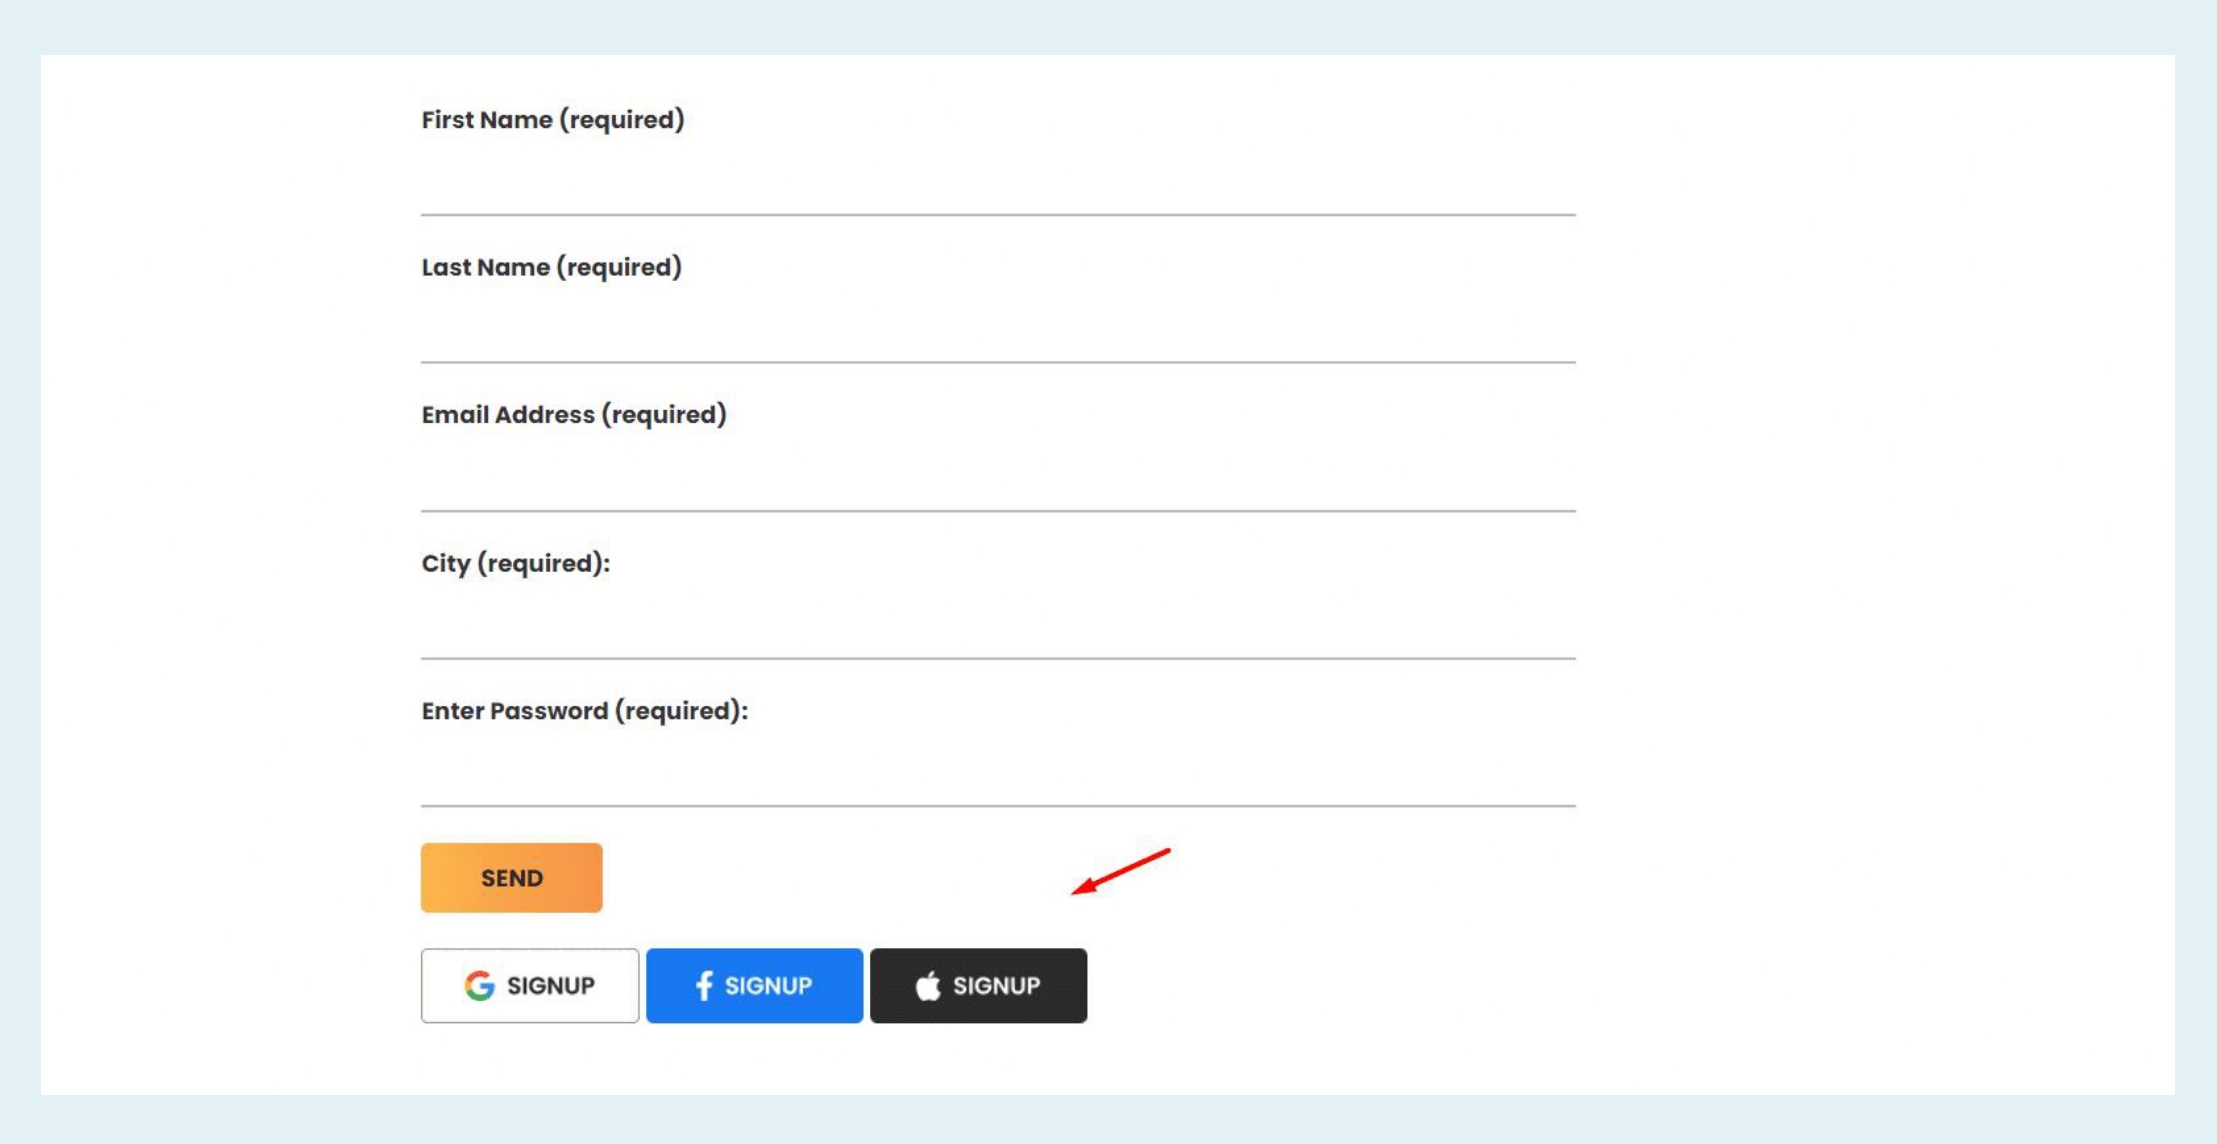
- Sign up" is shown on the front.
User Login Form Settings

Select Login Form
- Choose the appropriate form for User Login from the available options.
Enable Login Form
- Temporarily enable the Login form by activating this feature.
For Login settings
- Login Email Field: Select the field where users enter their email address.
- Login Password Field: Select the field where users enter their password.
- Login Success URL: Choose the page where users should be redirected after a successful login.
- User Disable Message:Enter the message to show when user is disable and try to login.
Email Settings
For SMTP Settings

It looks like you're setting up SMTP (Simple Mail Transfer Protocol) settings for sending emails programmatically. Here's a breakdown of what each setting typically involves:
- Mailer Type:
- This specifies the method used to send emails. Options include using the default PHP mailer or configuring it to use SMTP.
- From Email Address:
- The email address that will appear in the "From" field when recipients receive your email.
- From Name:
- The name associated with the "From" email address, which recipients will see.
- SMTP Host:
- The hostname or IP address of the SMTP server that you are using to send emails.
- Type of Encryption:
- Specifies the encryption method used when communicating with the SMTP server. Options typically include None, SSL/TLS, or STARTTLS.
- SMTP Port:
- The port number used by the SMTP server. This varies depending on the encryption type (e.g., 25 for non-encrypted, 465 for SSL/TLS, or 587 for STARTTLS).
- SMTP Authentication:
- Whether SMTP authentication is required to send emails. This is usually set to "Yes", and you provide a username and password.
- SMTP Username:
- The username used for authentication when connecting to the SMTP server.
- SMTP Password:
- The password associated with the SMTP username for authentication.
For Email Template

Contact Form 7 Email Template is an extension for Contact Form 7 that allows you to customize the email sent through the contact form, both for users and admins. You can choose from various pre-developed email templates and easily customize them to meet your needs.
For Reset Password Setting

Forgot Password:
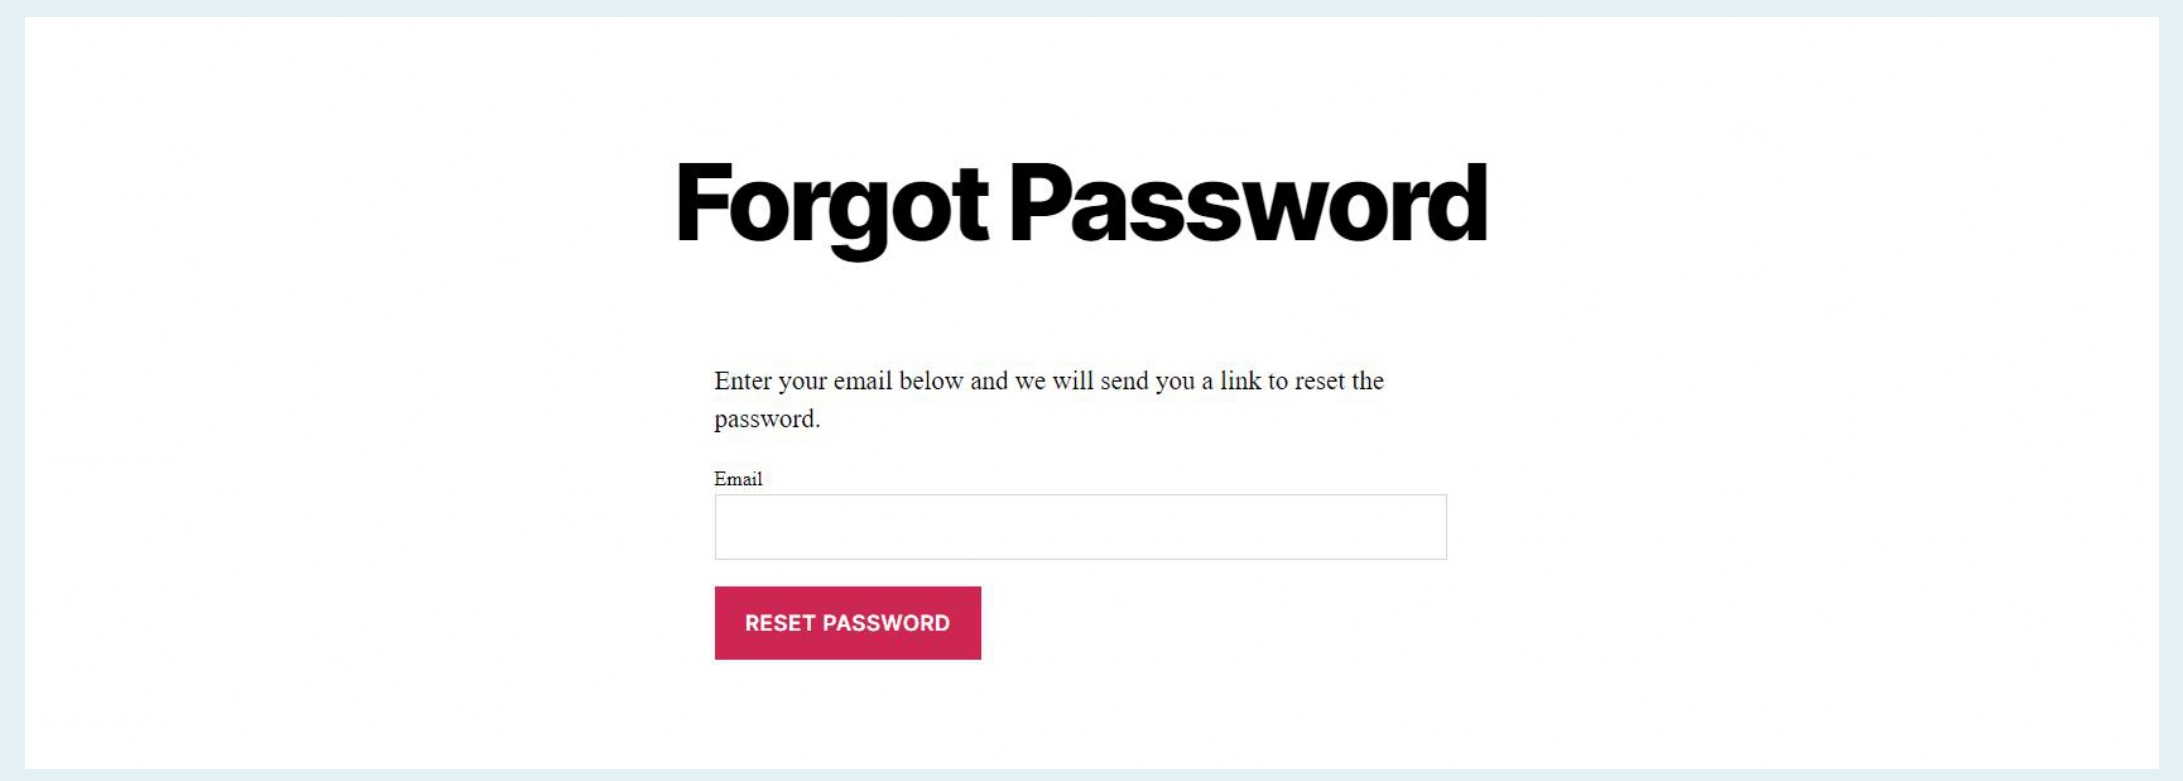
- This plugin also provides Forgot Password and Reset Password options along with Registration and Login. You can use the below shortcode for Forgot Password:
[zurcf7_forget_password]
Reset Password:
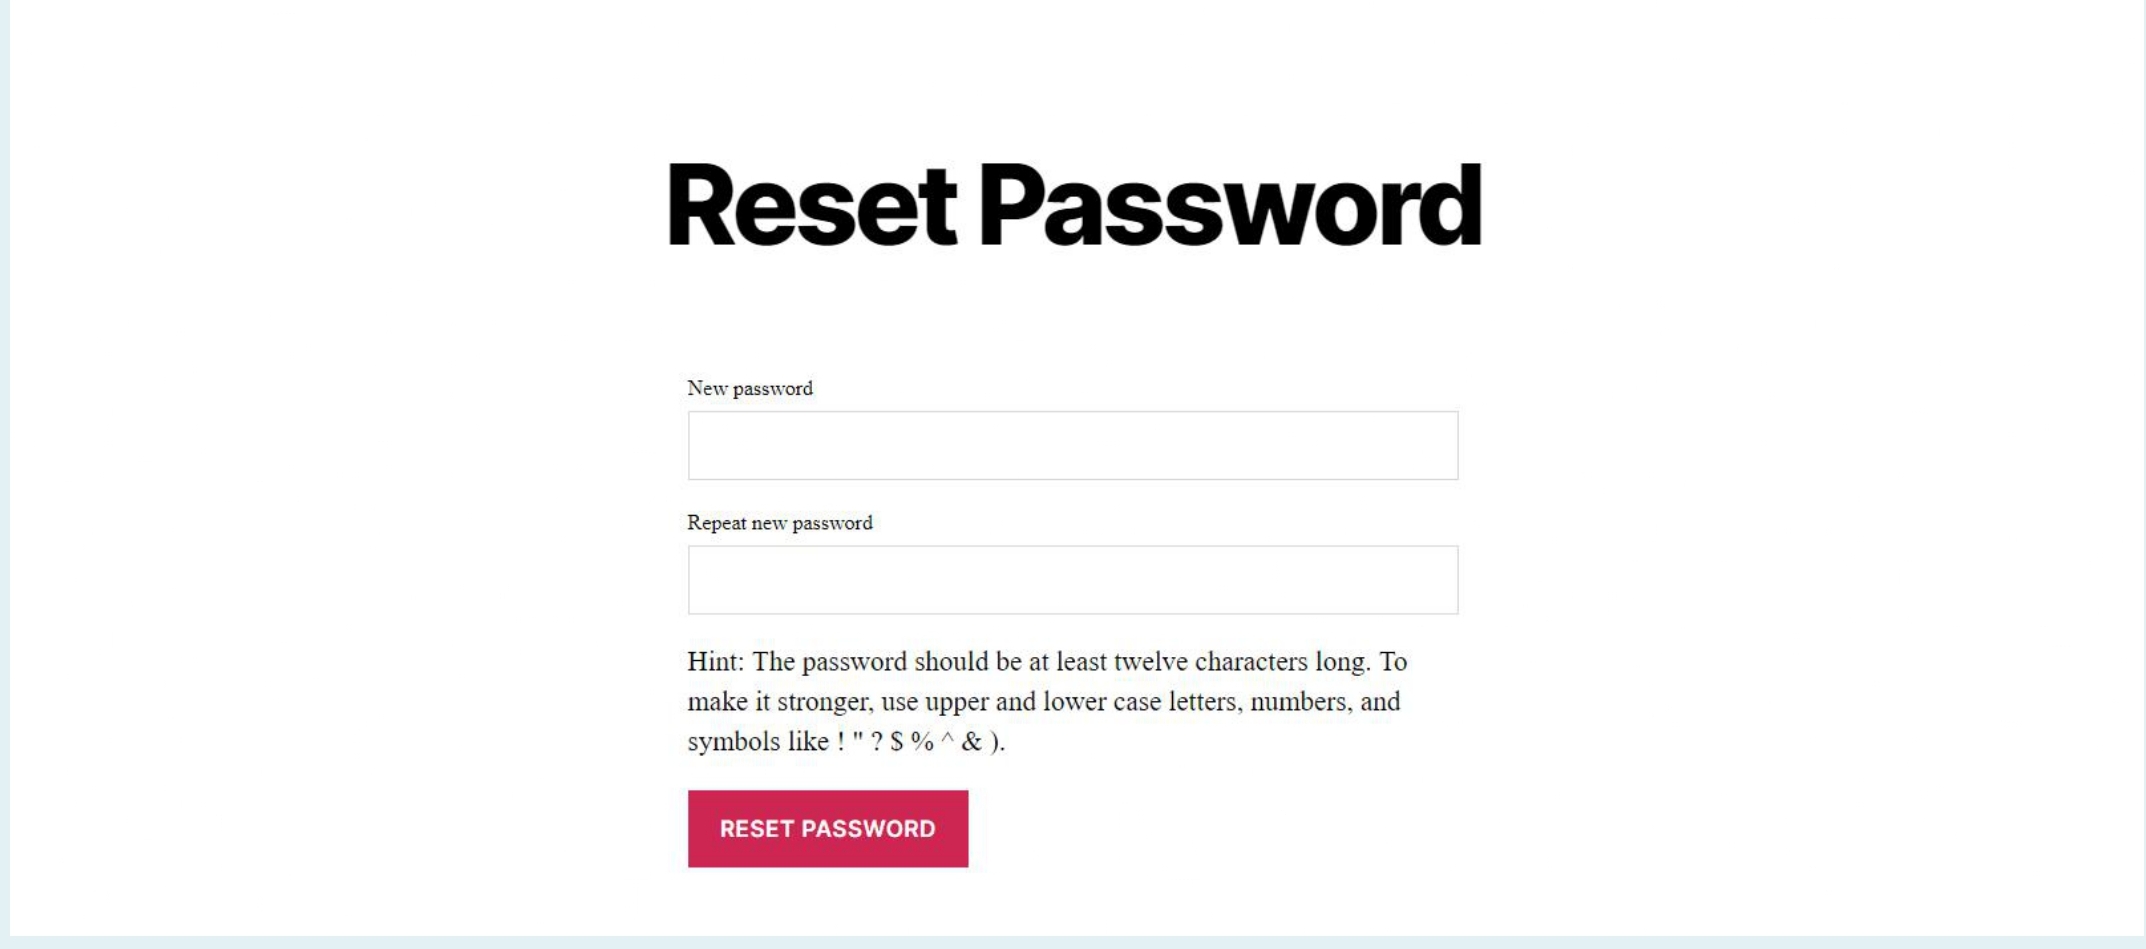
Contact Form 7 Reset Password Setting is a feature that lets users reset their passwords through Contact Form 7. It simplifies password management by allowing users to easily change their passwords if they forget them, ensuring a secure process.
To use the reset password feature, include the following shortcodes in your form:
[zurcf7_reset_password_custom_form]
Password Field for the form:
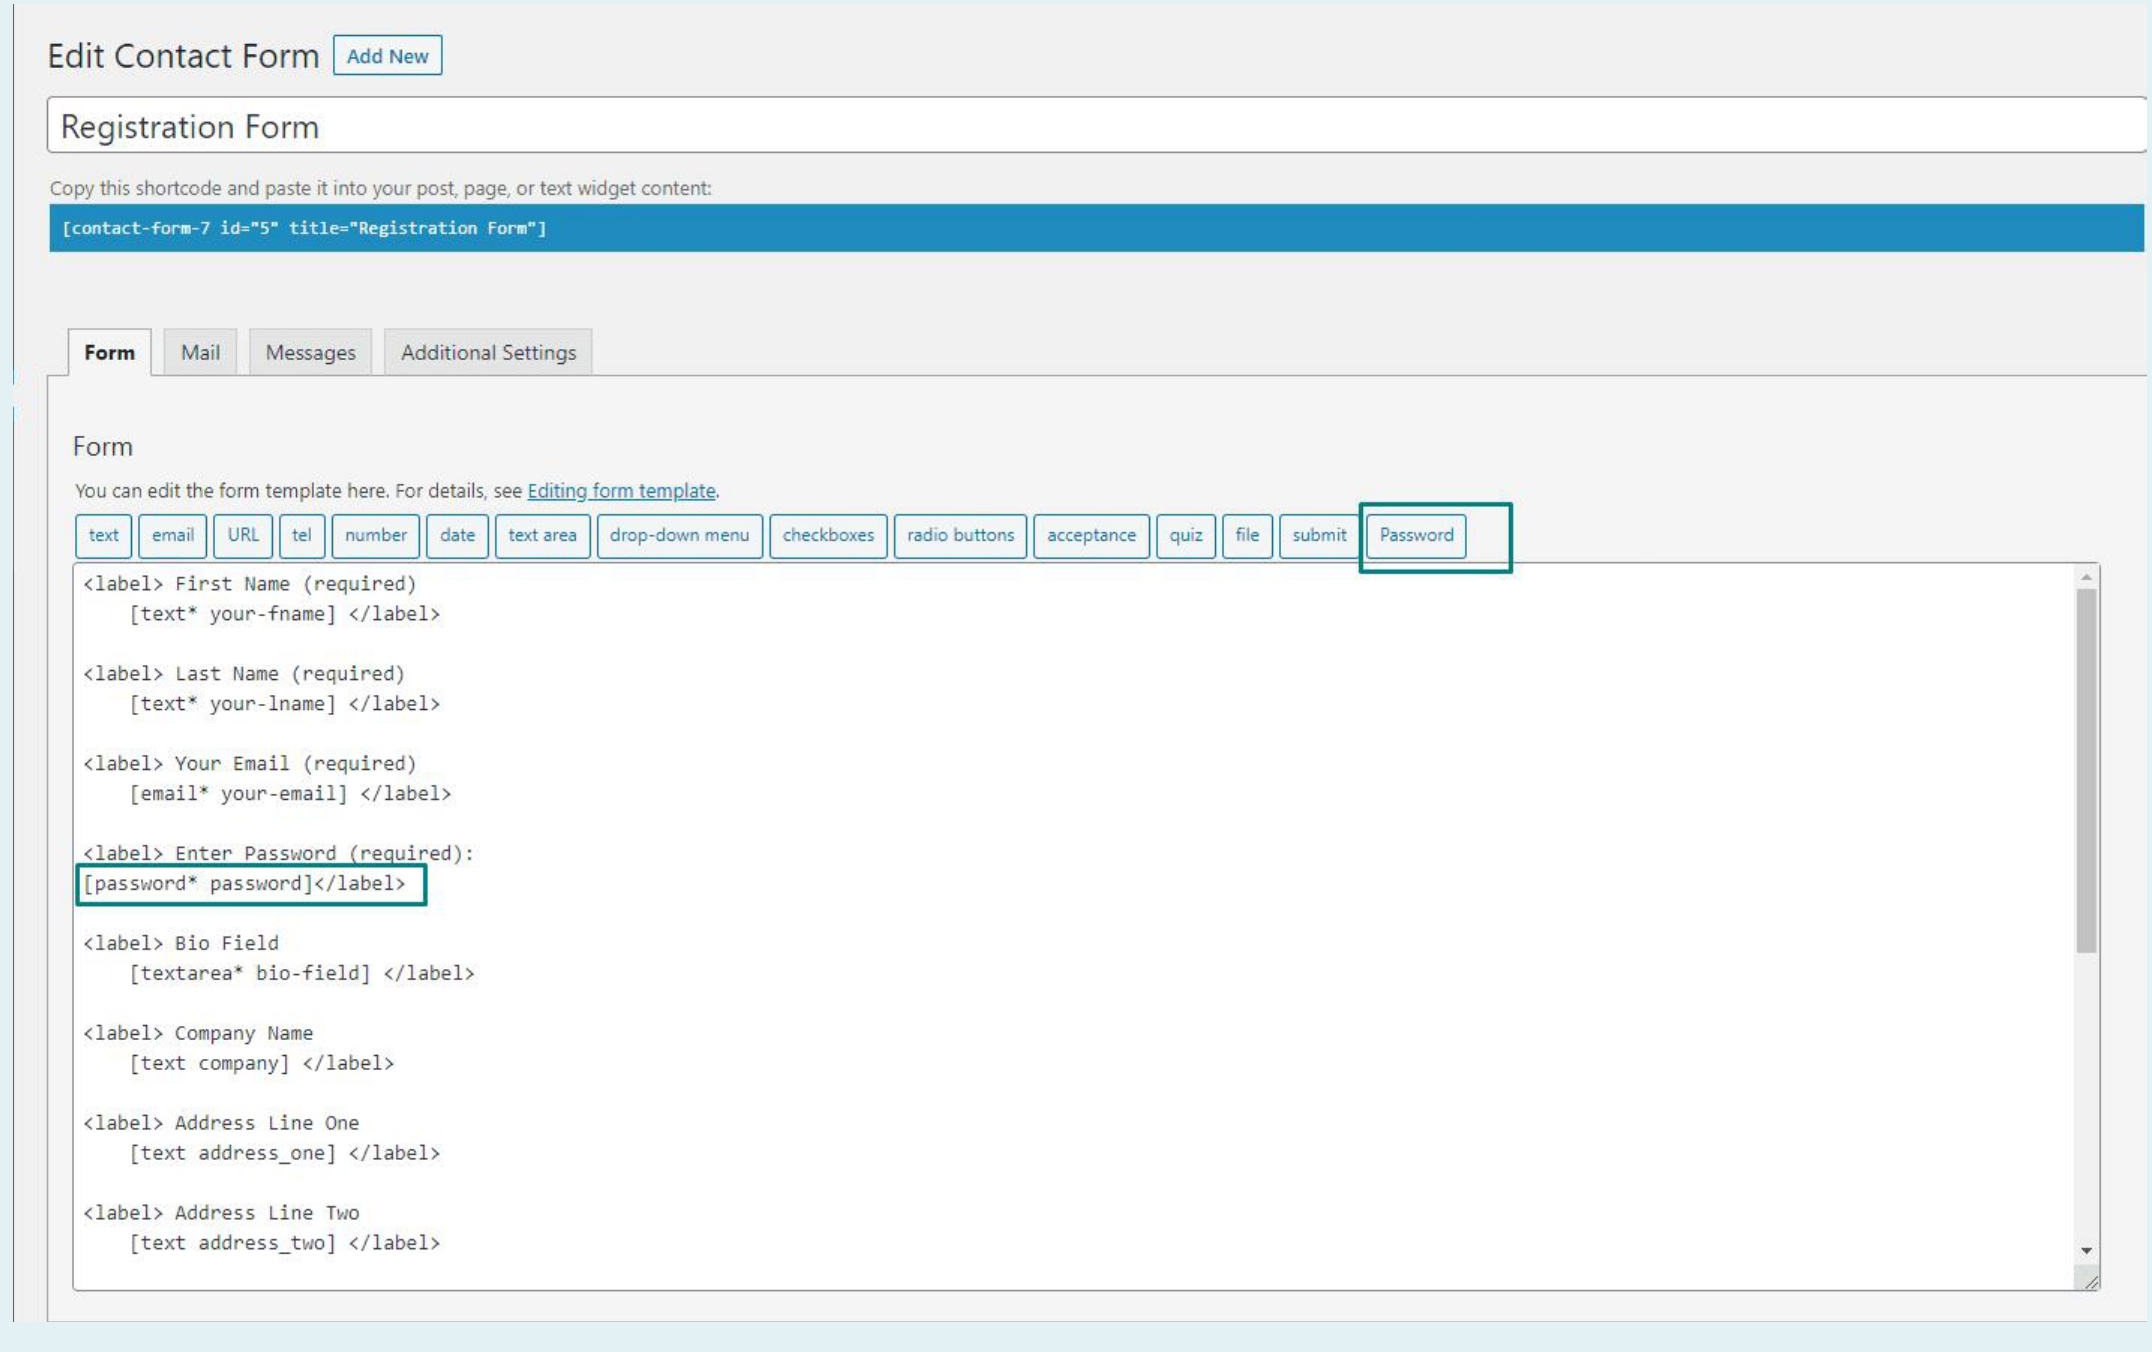
- You can use the password field for the Contact Form 7 Form field as shown below:
Password Field in Front-end:
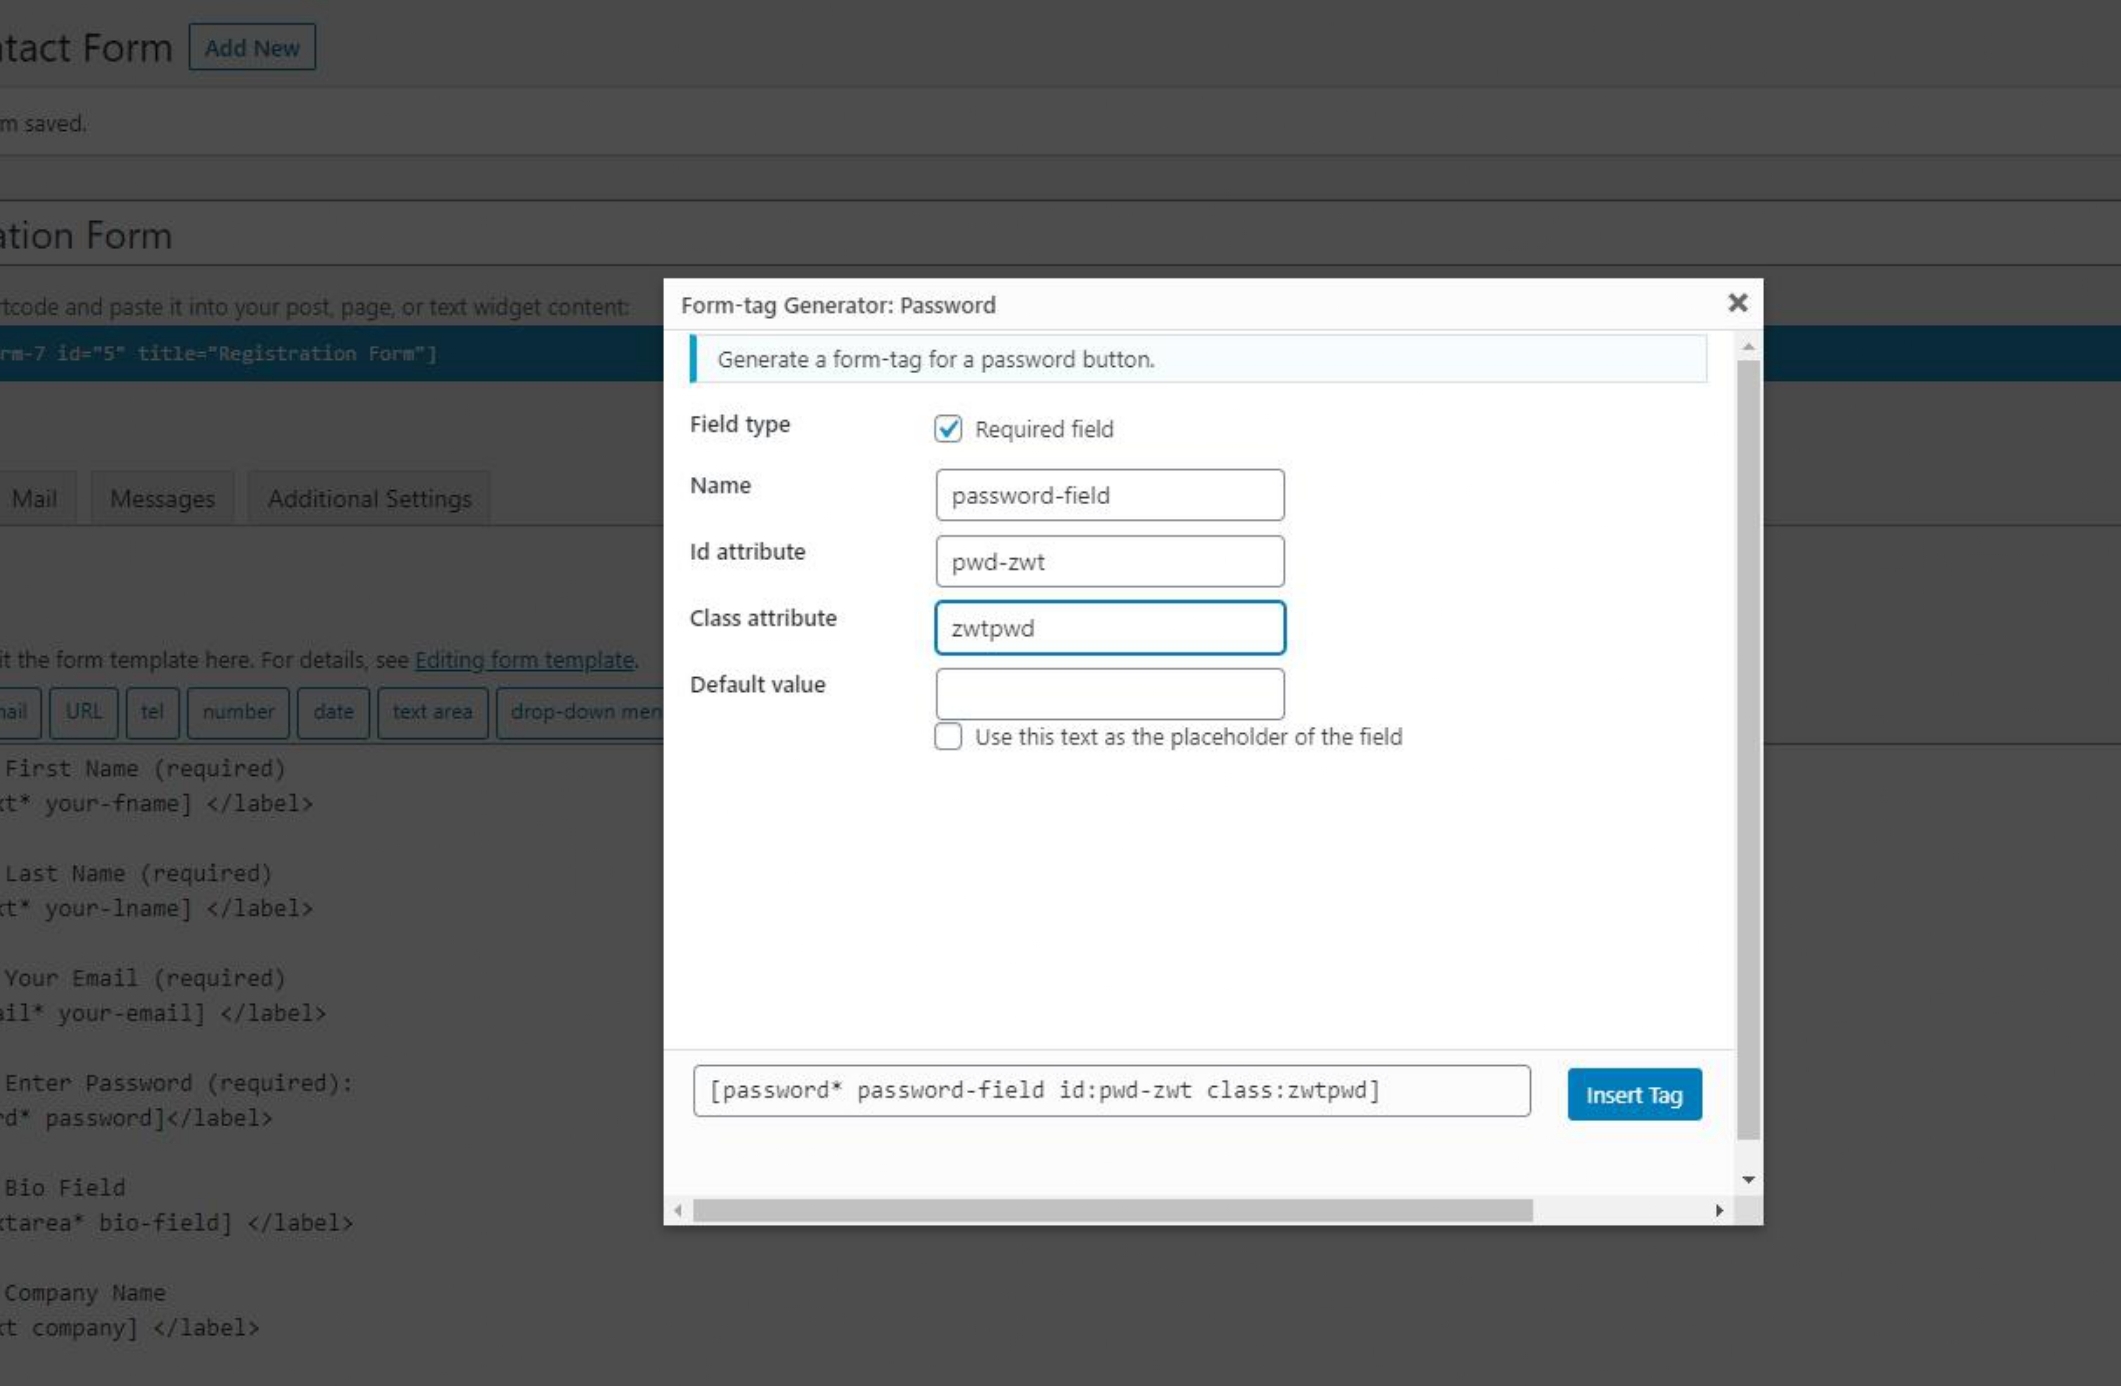
- To create a password field in Contact Form 7 (CF7), you can use the [password] tag. This tag will generate a password input field where users can enter a password.
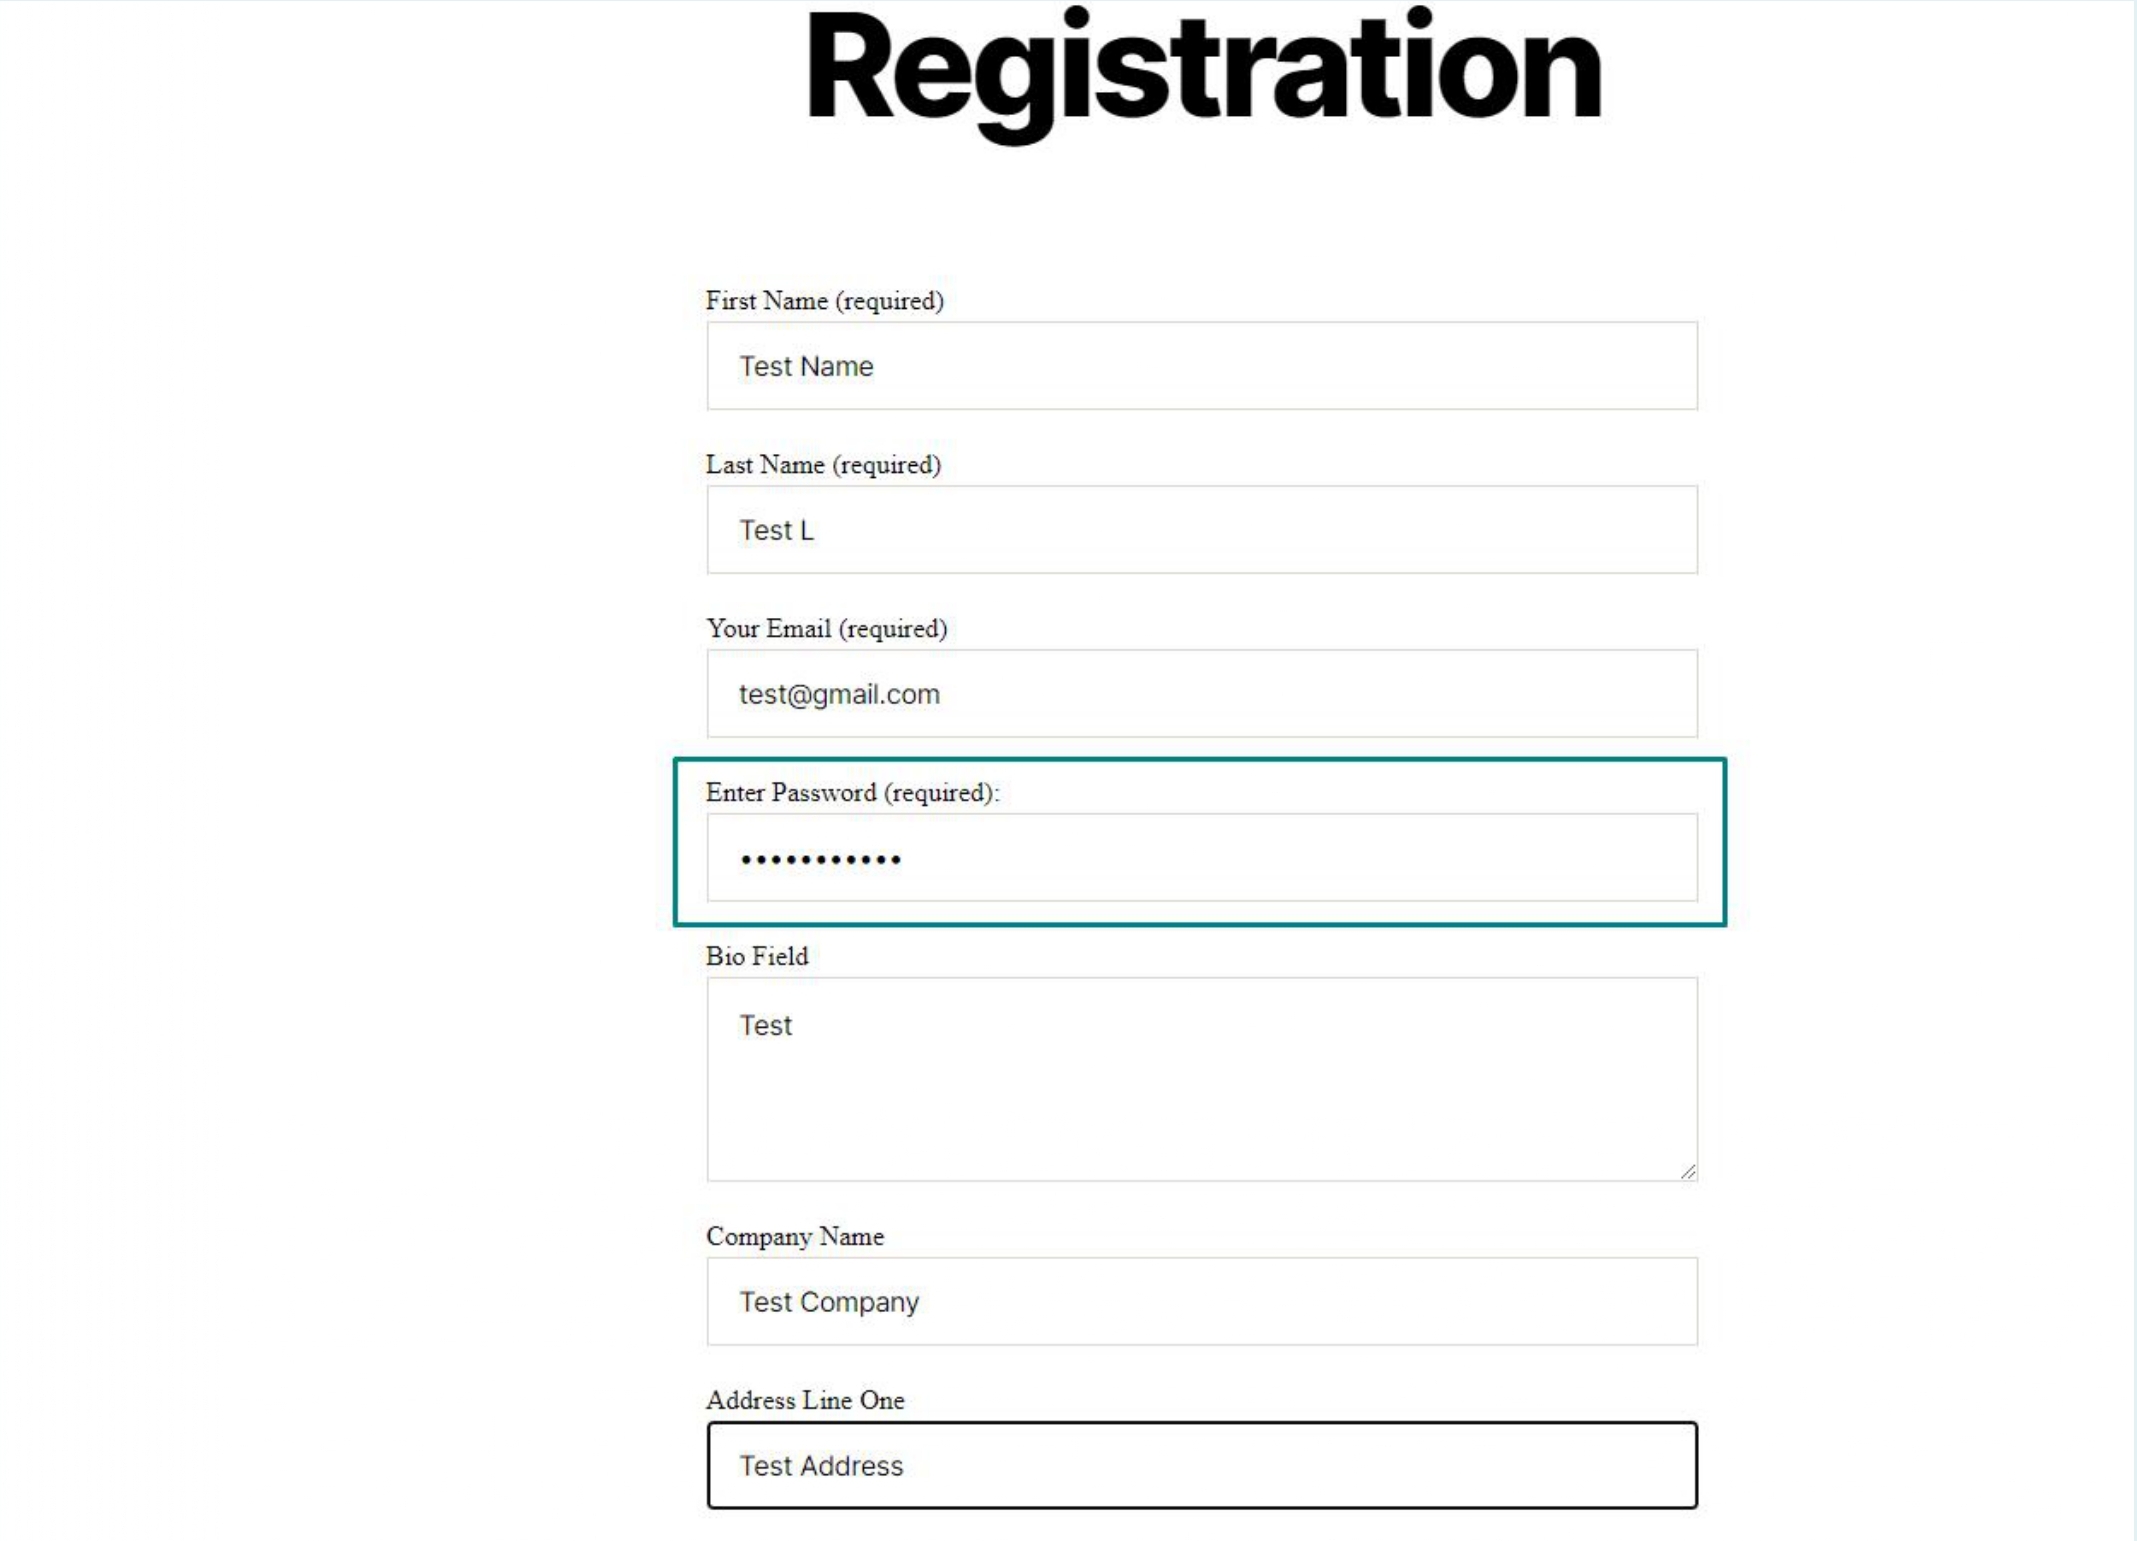
- "Password" is shown on the front side.
For Debug Log Setting

- Enable Debug Log: Find the option to Enable Log File and turn it on.
- View Debug Log: Once the log is enabled, the debug log file is located at:
/plugins/user-registration-cf7-pro/debug.log
- You can view the debug log by accessing this file through your file manager or an FTP client.
- Clear Log File: To clear the log file, look for the Clear Log File option in the plugin settings and click on it.
For User Profile Setting

- Access the User Profile Page:
- Navigate to the page or post where you want to display the user profile details.
- Insert the Shortcode:
- Use the following shortcode to display the user profile details:
[get_profile]
- Use the following shortcode to display the user profile details:
- Save and Publish:
- Save your changes and publish or update the page/post.
By adding the
[get_profile]
shortcode, the user's profile details will be displayed on that page or post.

Registered User Listing Page:

This page will show all the users who have been registered using the Contact Form 7 form. You can view the user's email. username. and user role, etc.
Registered User Detail Page:
Admin can view the registration details of a particular user here. You can also disable the user from the admin by selecting the User Status option.

Help and Suporrt

- Access helpful resources including documentation, FAQs, and support options in one place.
- Easily submit support tickets or explore guides to resolve issues quickly.
- Stay updated with the latest insights through blogs and newsletter subscriptions.
In this guide, we have detailed the process of integrating third-party services.
Firebase Authentication:
Here are the steps to create a Firebase account:
Step 1: Create a Google Account
If you don't already have a Google account, you'll need to create one. Firebase uses Google accounts for authentication.
- Go to Google Account Creation.
- Follow the instructions to create your account.
Step 2: Sign In to Firebase
- Go to the Firebase website.
- Click on the Get Started or Go to console button.
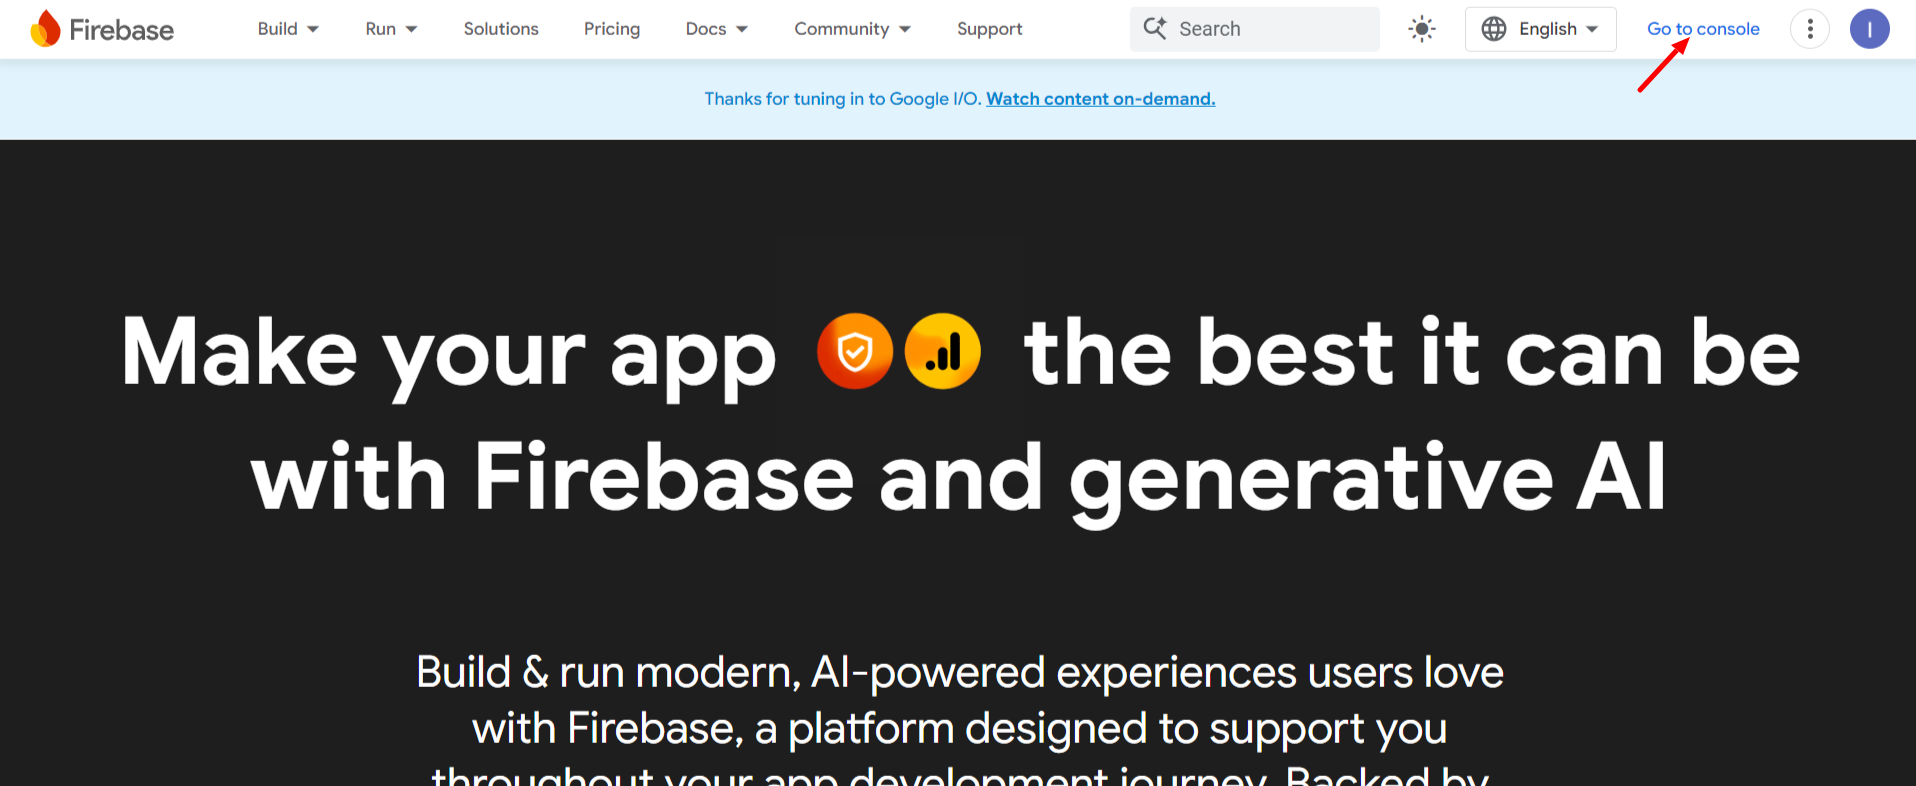
- Sign in with your Google account.
Step 3: Create a New Firebase Project
- In the Firebase console, click on Add project
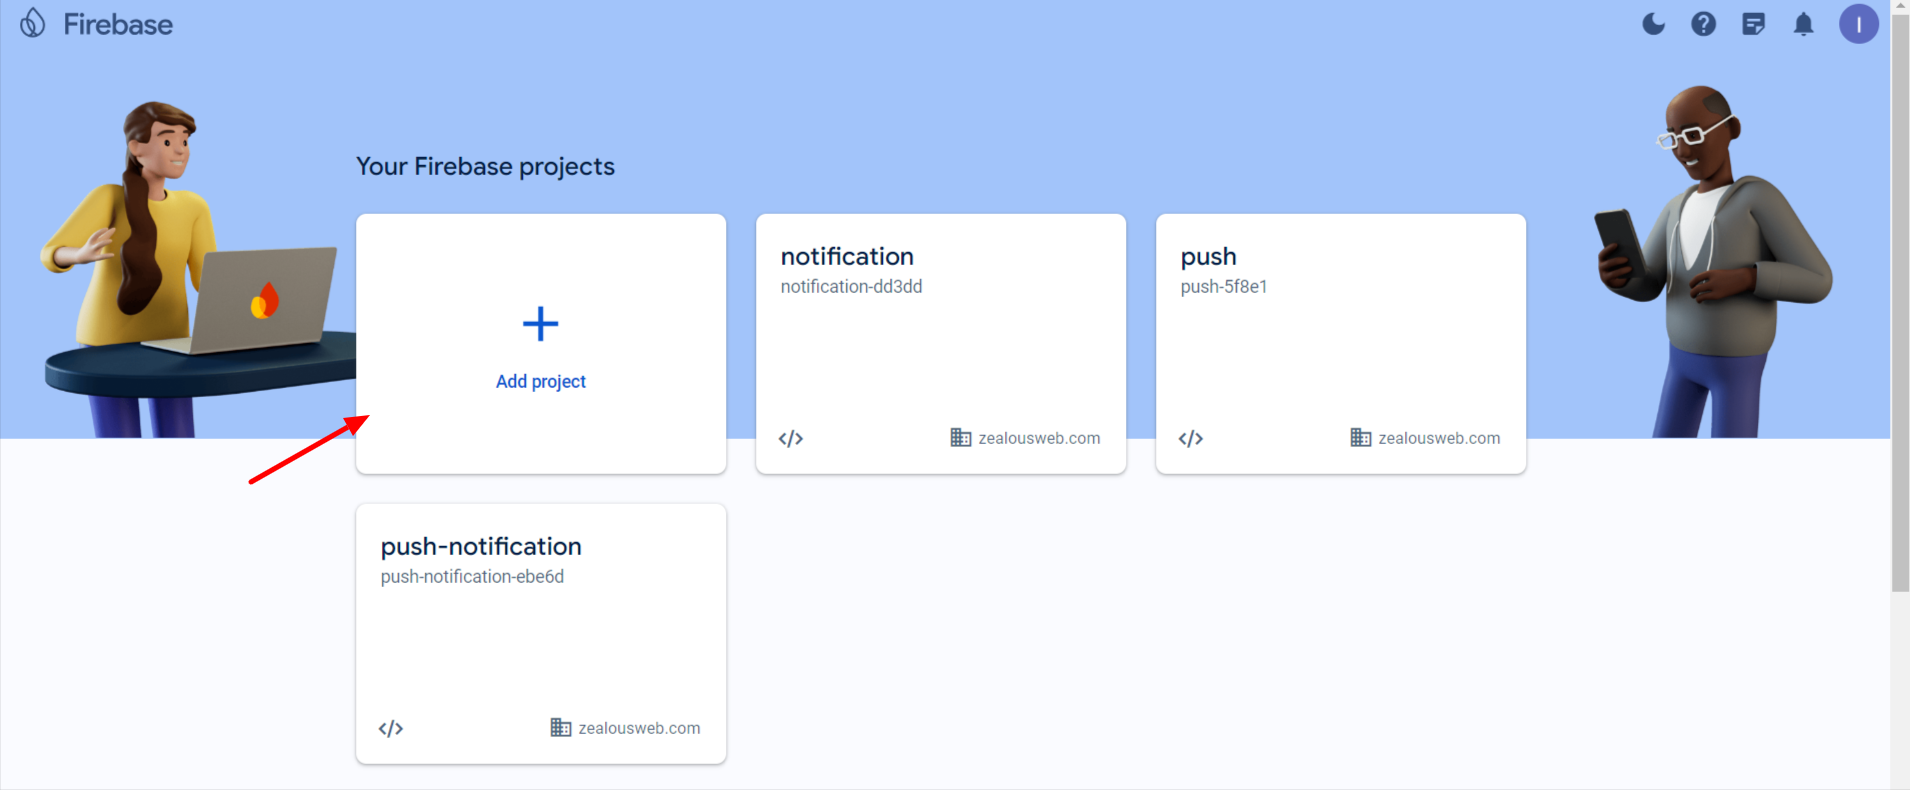
- Enter a project name and click Continue.
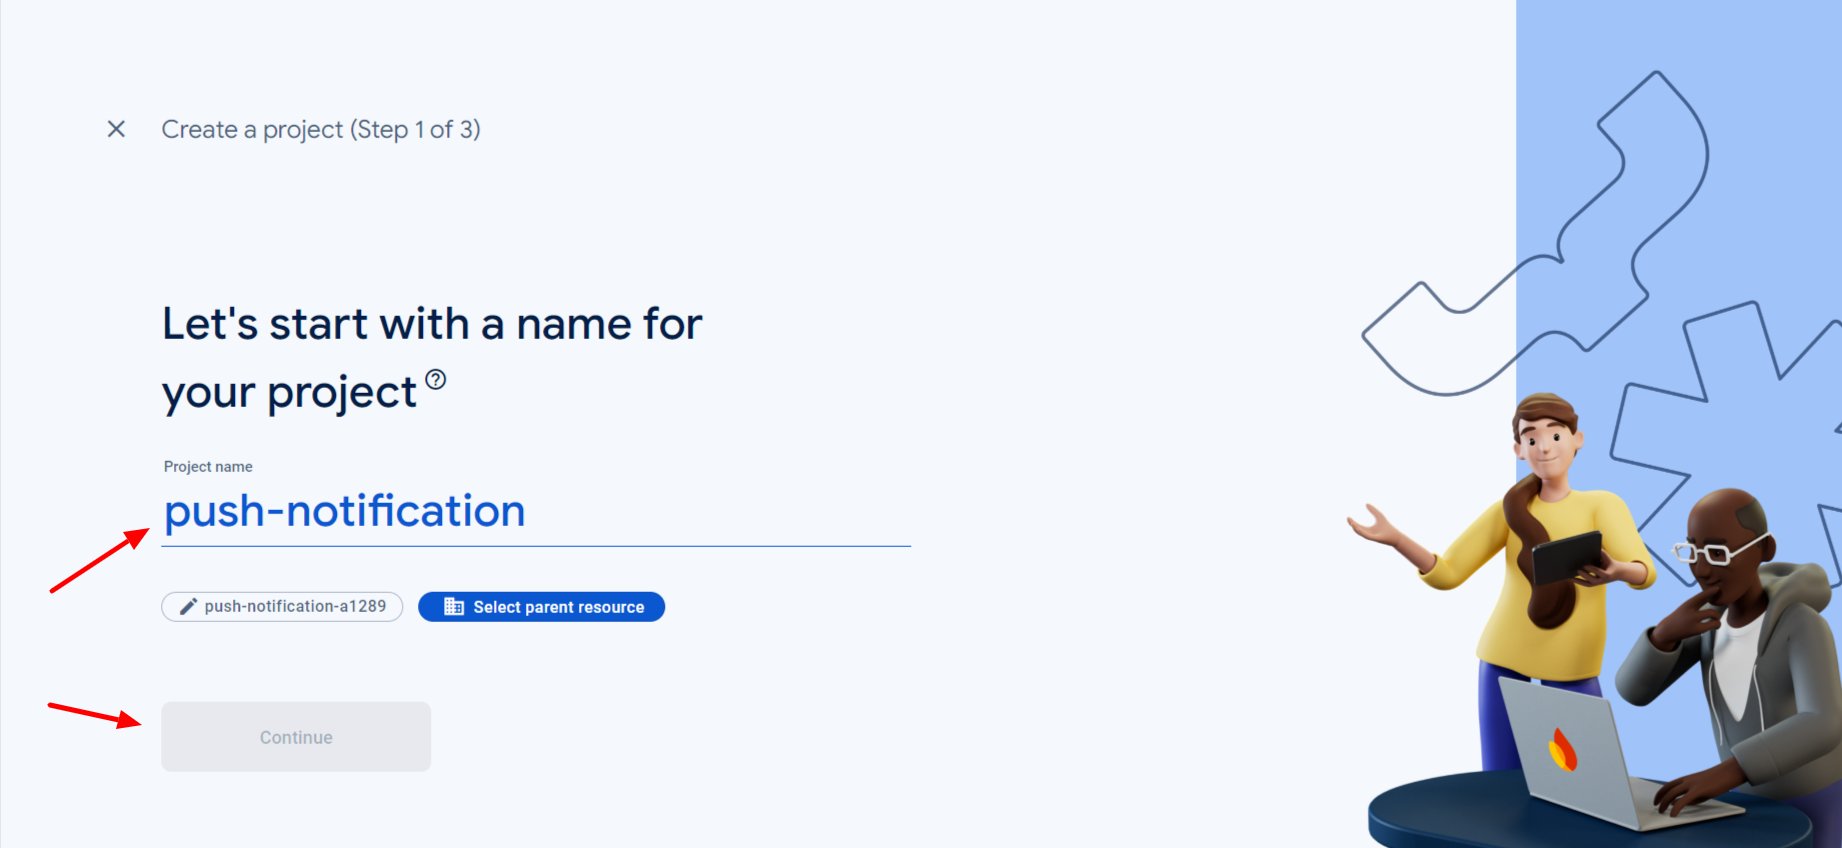
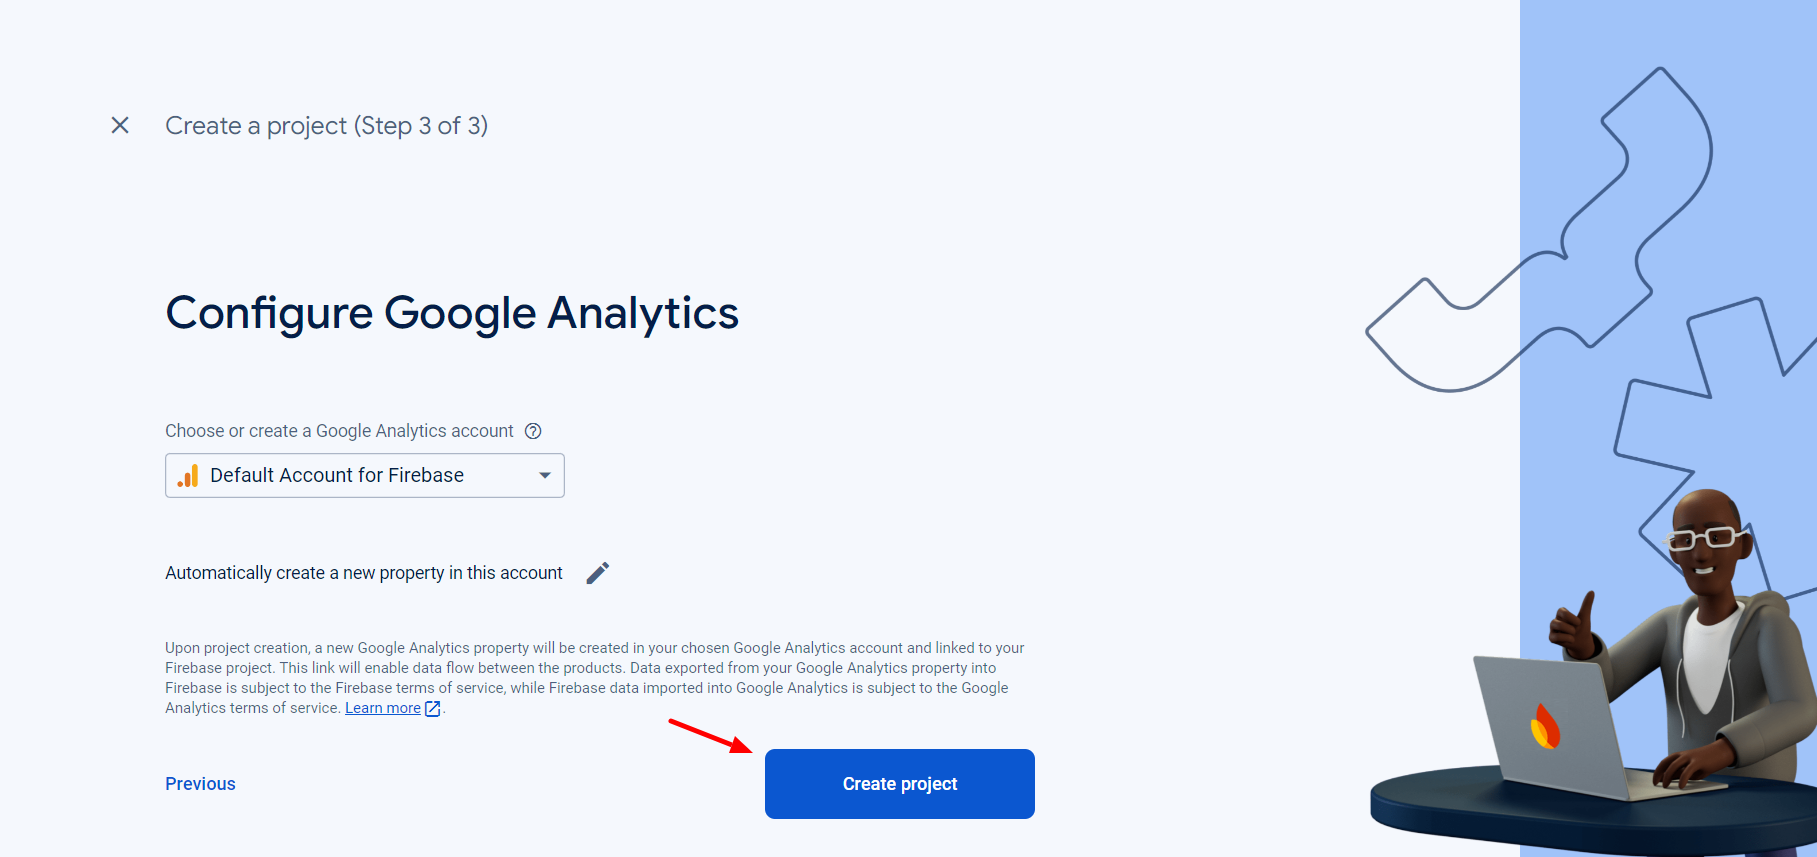
- (Optional) Set up Google Analytics for your project. If you choose to enable it, select or create an Analytics account and configure your Analytics settings. Click Create project
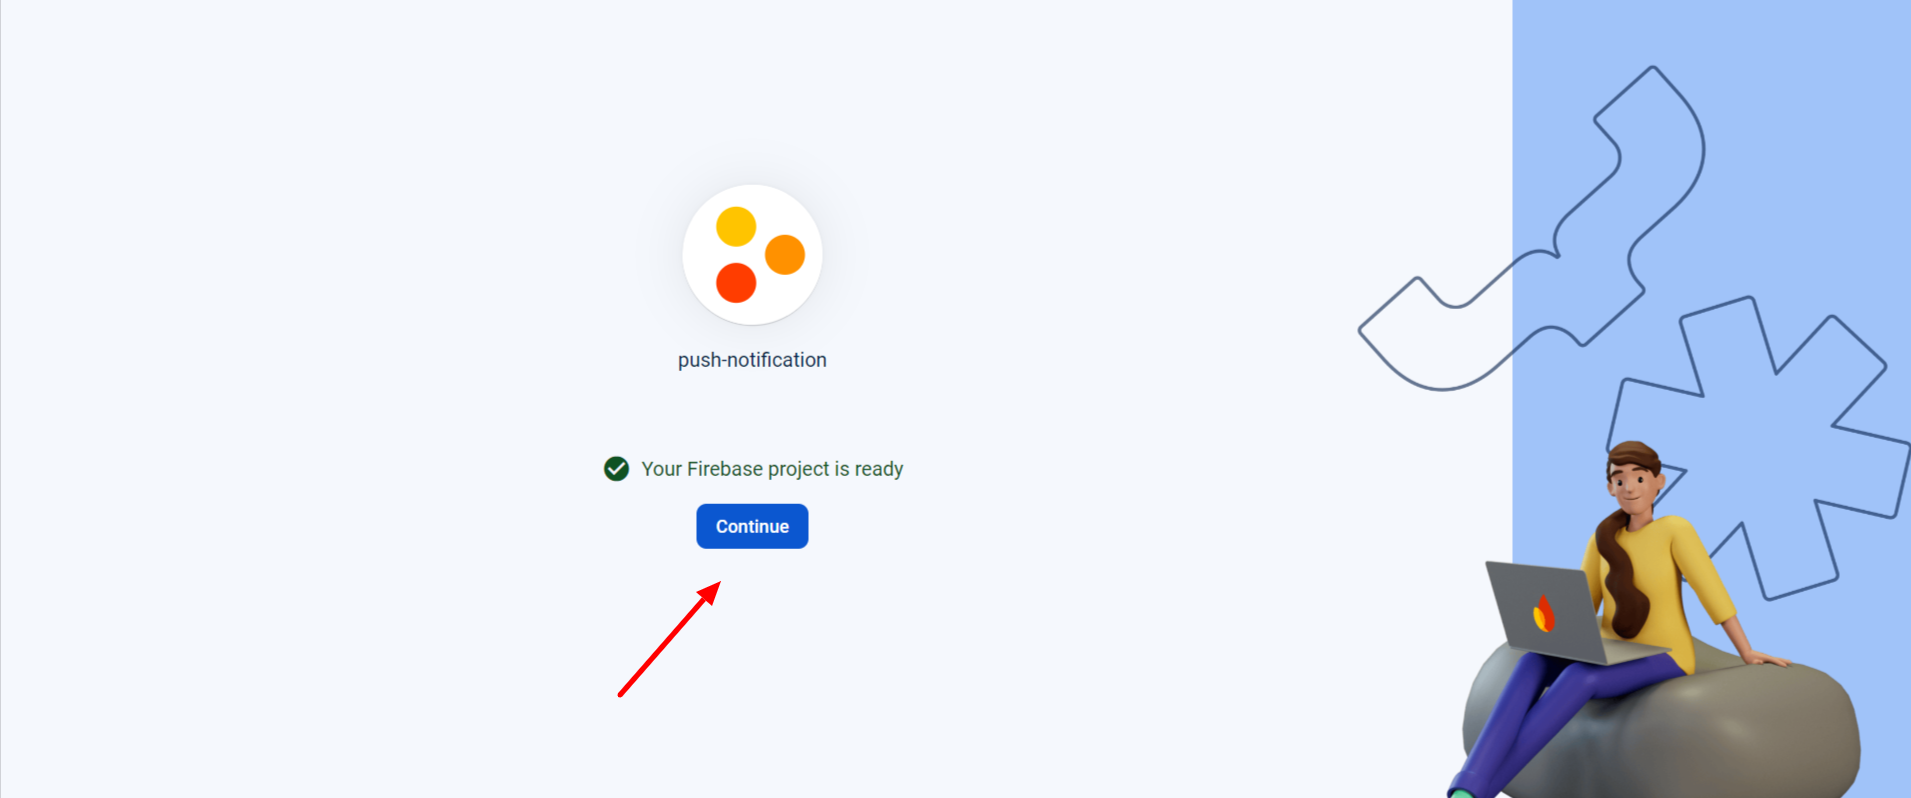
- Wait for the project setup to complete and click Continue.
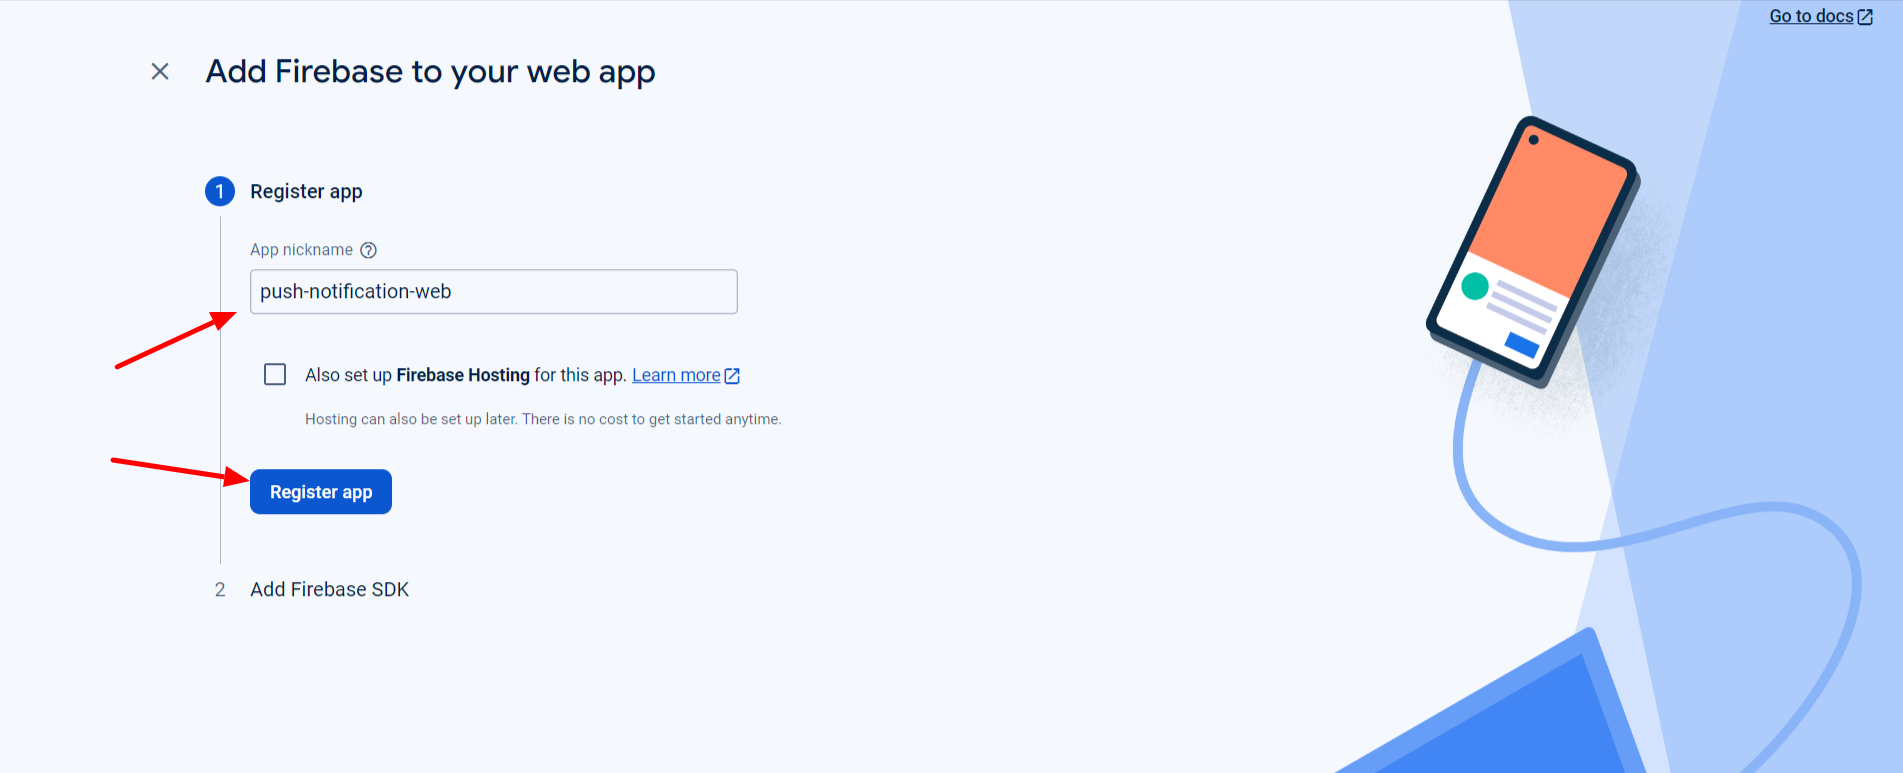
Step 4: Add Firebase to Your App
- In your Firebase project, you can add Firebase to your web, iOS, or Android app by clicking on the respective platform icon (iOS, Android, or Web).
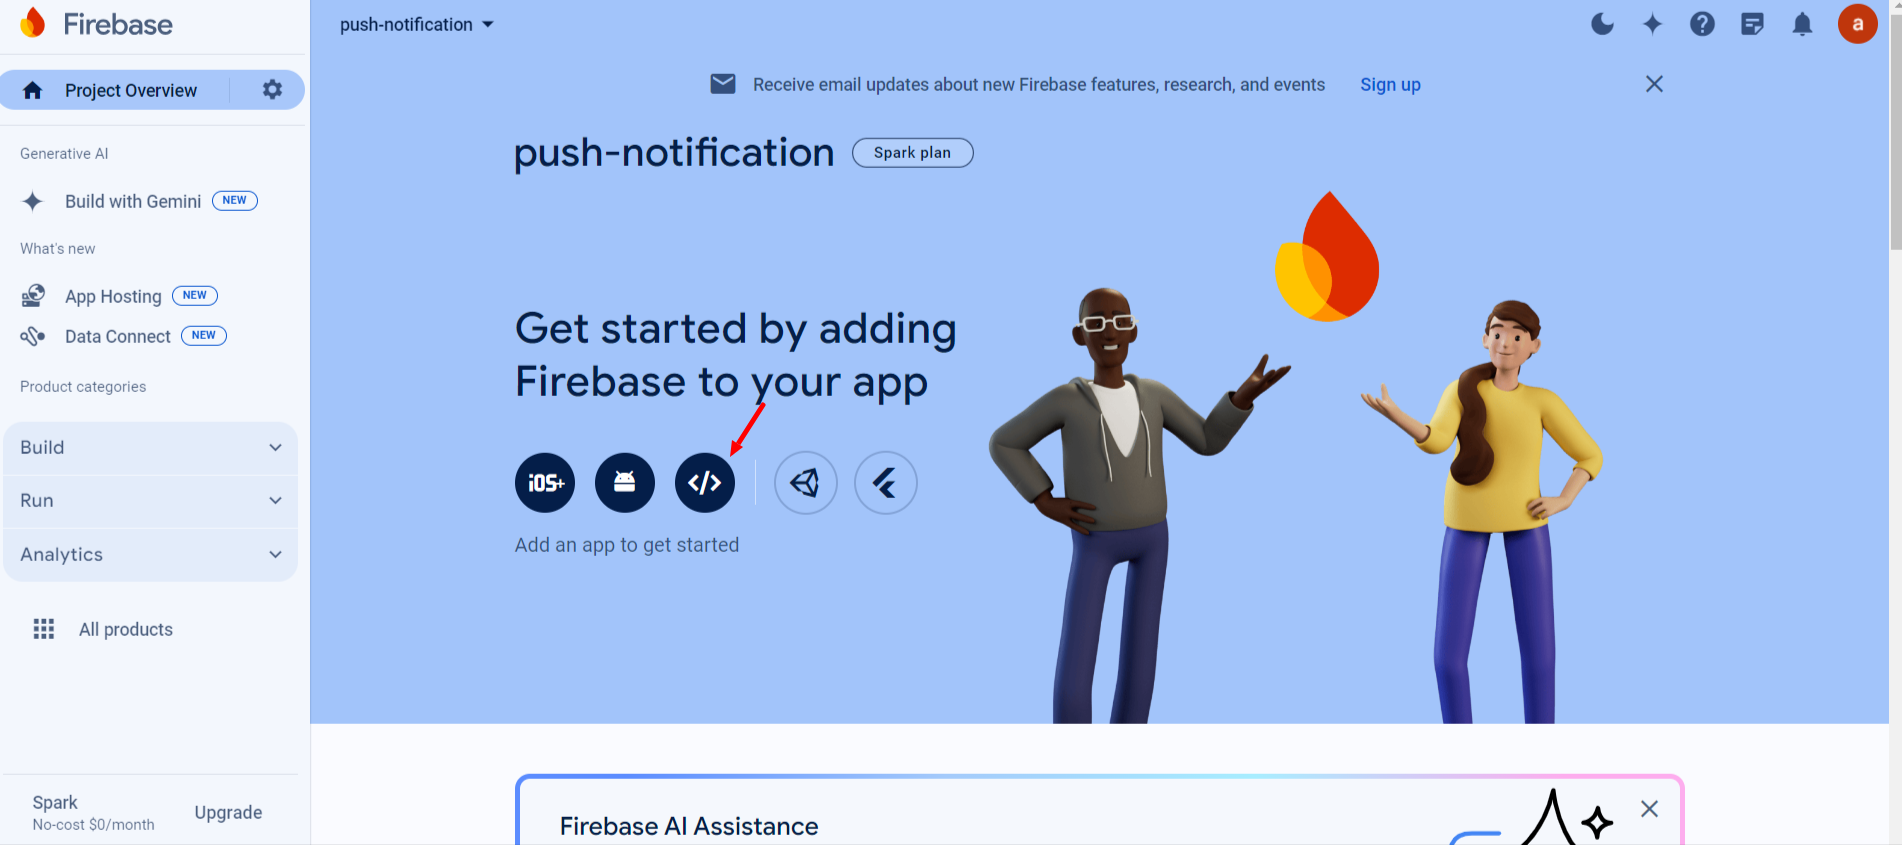
- Follow the instructions provided to integrate Firebase with your app. This usually involves downloading a configuration file (like google-services.json for Android or GoogleService-Info.plist for iOS) and adding it to your app.
Step 5: Configure Firebase Services
- Navigate to the Build section in the Firebase console to configure services such as Firestore, Realtime Database, Authentication, and more.
- Set up the services according to your app’s requirements by following the provided instructions.
Step 6: Implement Firebase SDK
- Follow the Firebase documentation to implement the necessary Firebase SDKs in your app code. You can find the documentation on the Firebase website under the Docs section.
Step 7: Deploy and Monitor
- Once your app is set up with Firebase, you can deploy your application.
- Use the Firebase console to monitor the performance, manage databases, authenticate users, and analyze app usage.
If you follow these steps, you should have a fully set up Firebase project ready to use with your application. If you encounter any specific issues or need further guidance, feel free to ask!
Google Authentication:
Here are the steps to create a Google account and set up a Google custom app with an SSL certificate:
Step 1: Create a Google Account
- Go to the Google Account Creation page.
- Follow the instructions to create your Google account.
Step 2: Visit Google Developers Console
- Go to the Google Developers Console.
- Sign in with your Google account.
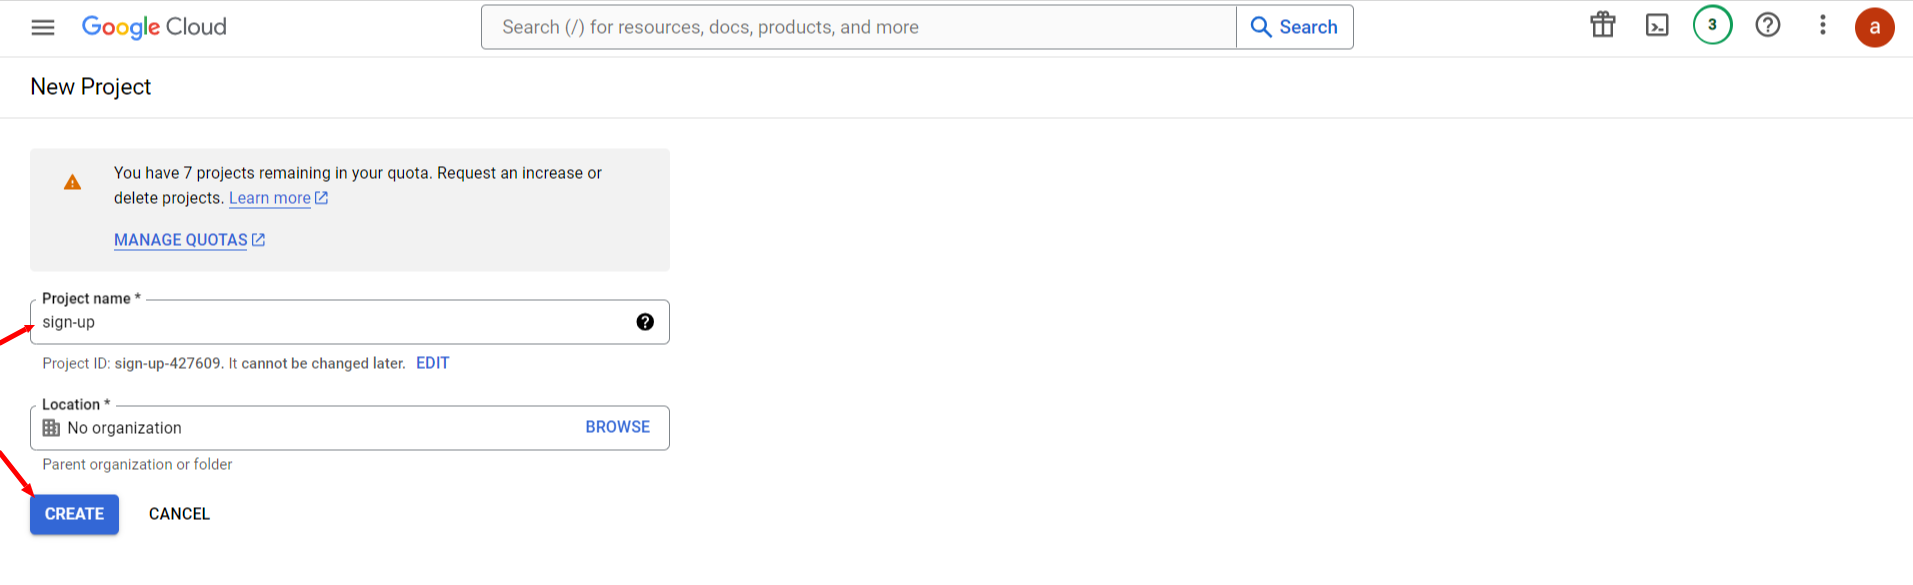
Step 3: Create a New Project
- Click on Create project

- Enter a name for your project.
- Optionally, edit the provided Project ID.
- Click Create.
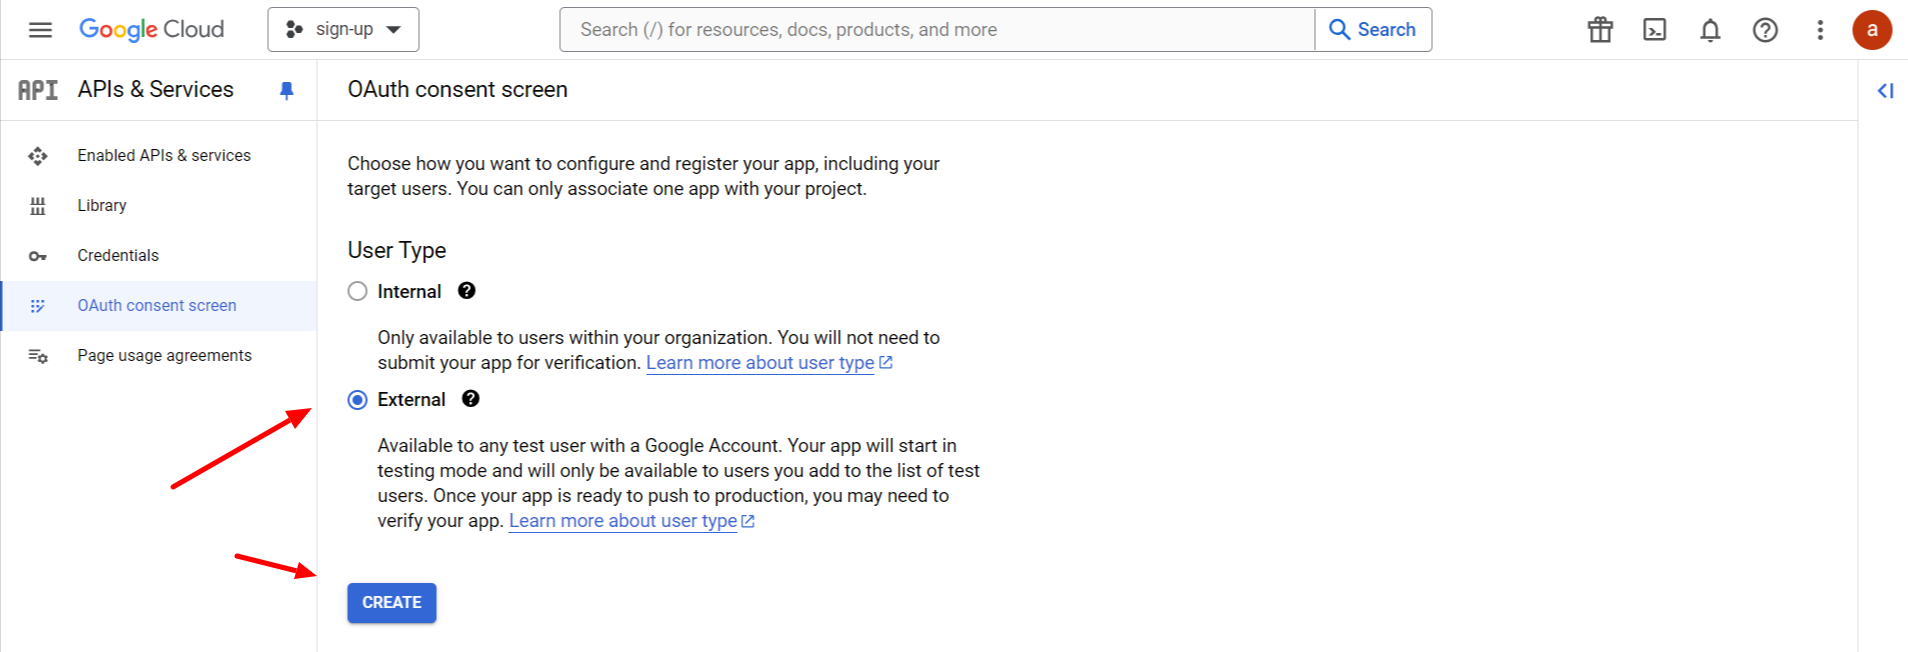
Step 4: Set Up OAuth Consent Screen
- Click on the left side menu.
- Go to APIs & Services -> OAuth consent screen.
- Click on Select a Project and choose the newly created project by clicking on its name.
- Select External as the user type.
- Click on Create.
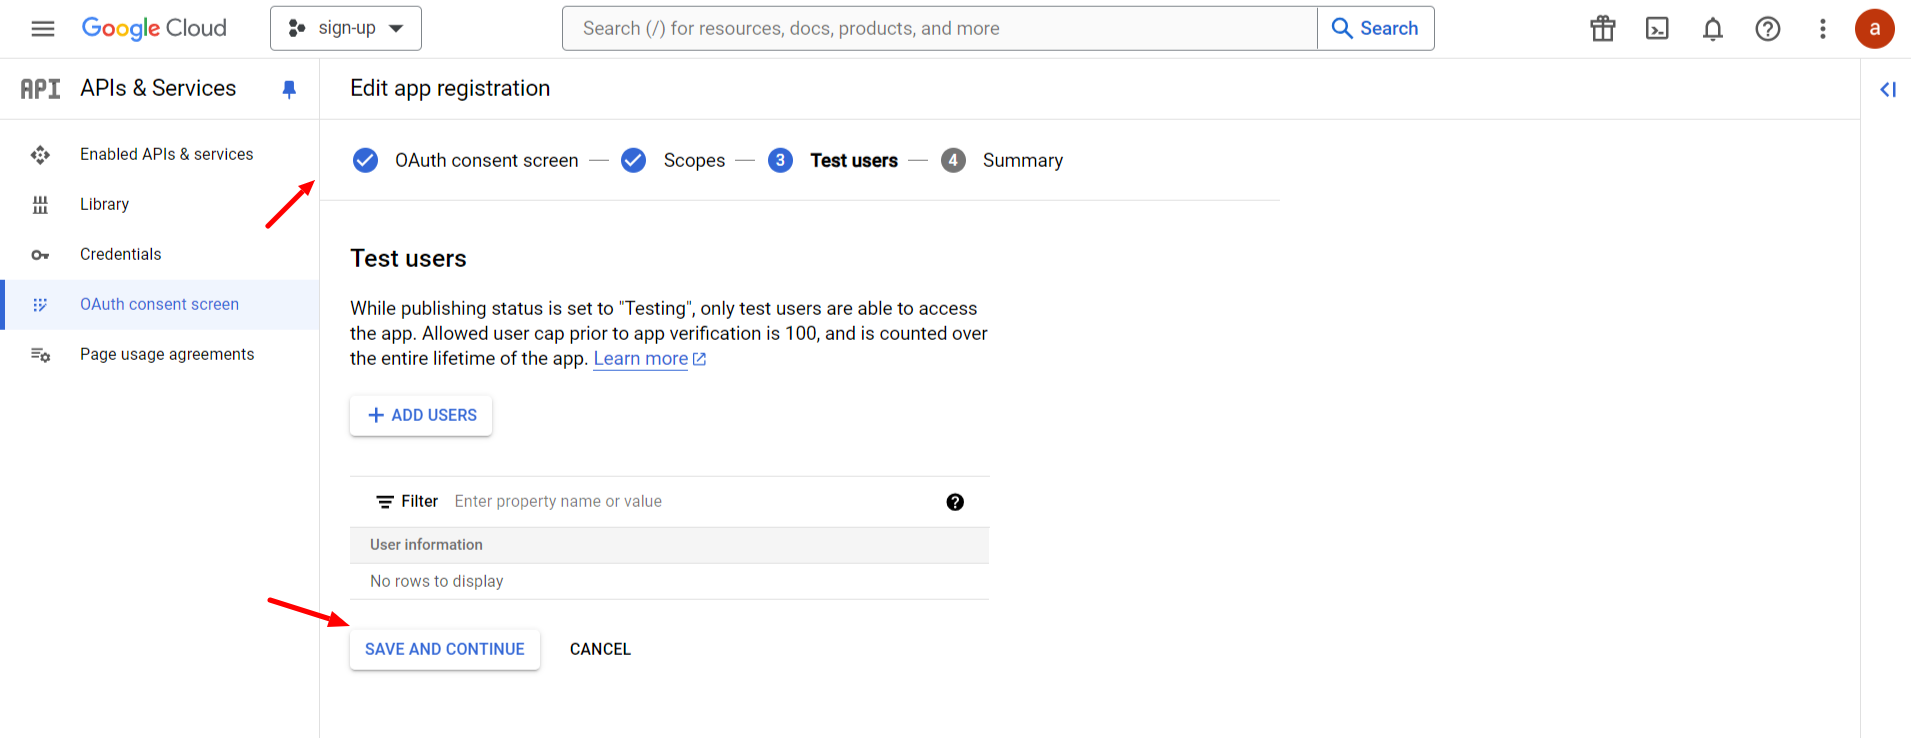
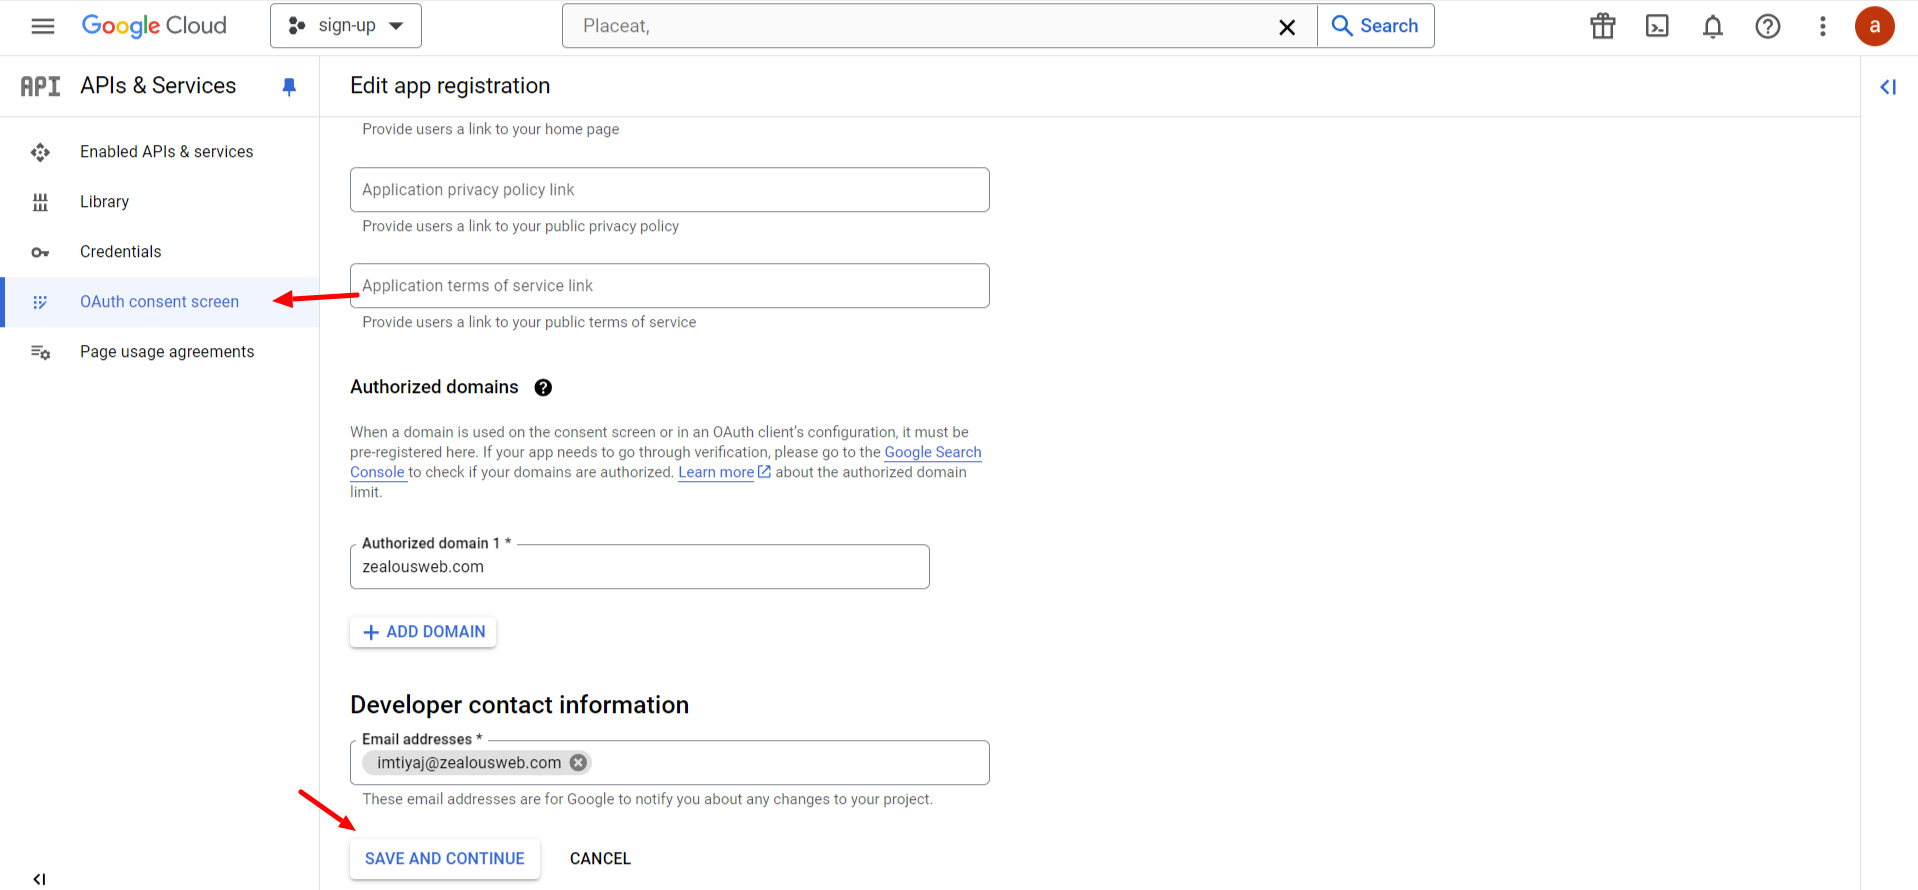
Step 5: Edit App Registration
- Enter all the required details (App Name and User support email).
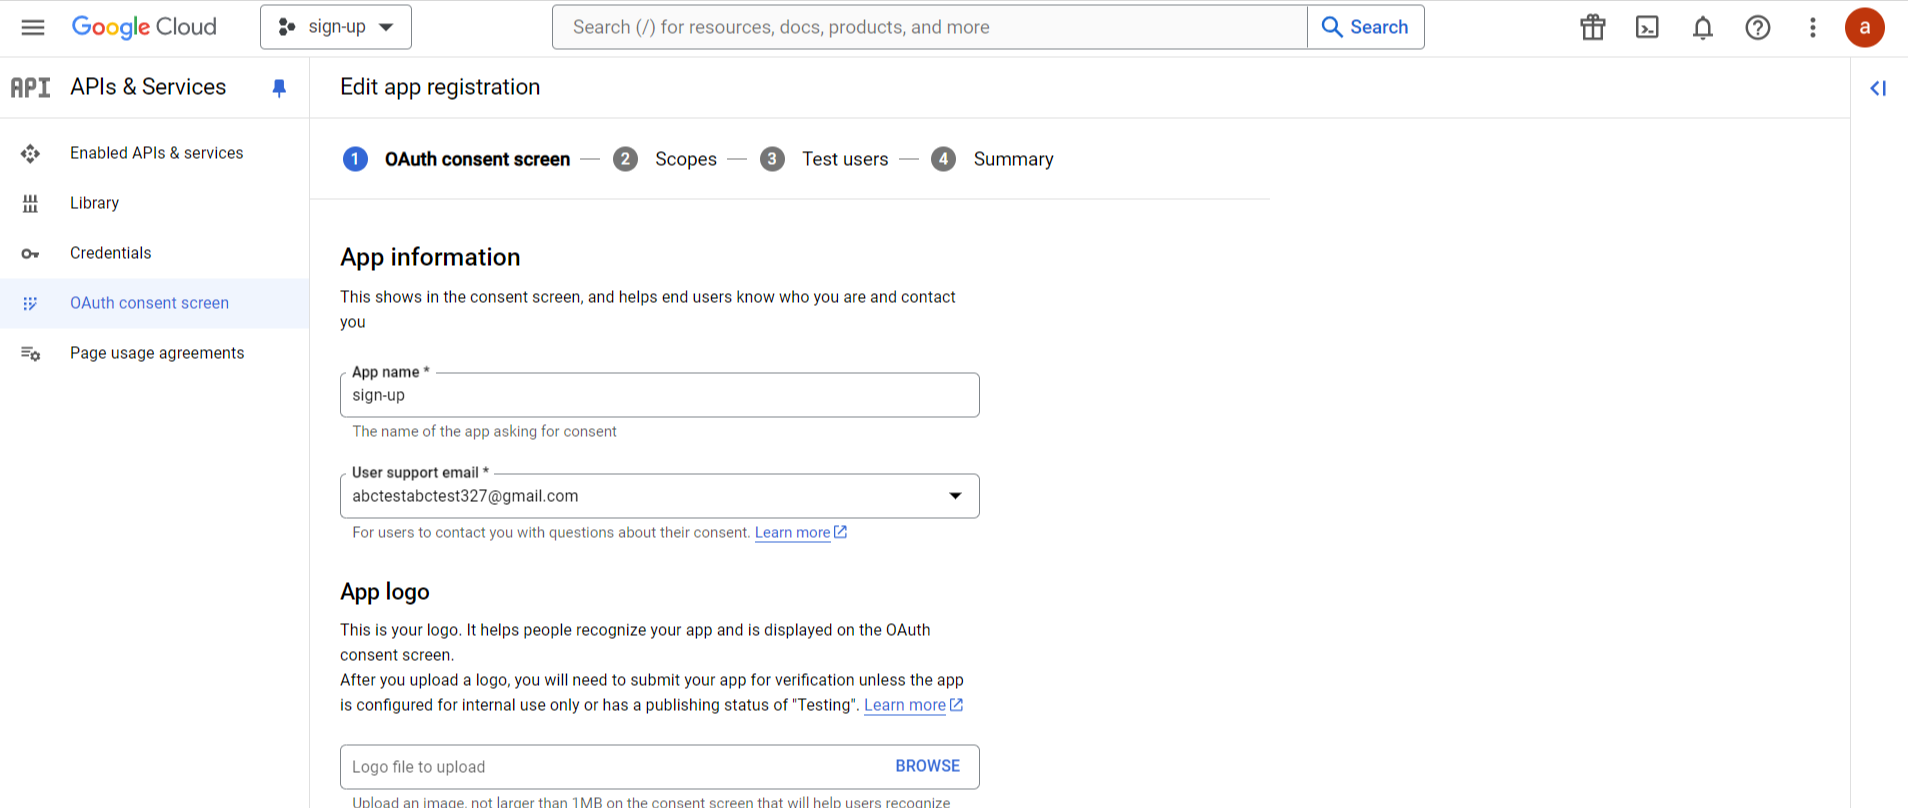
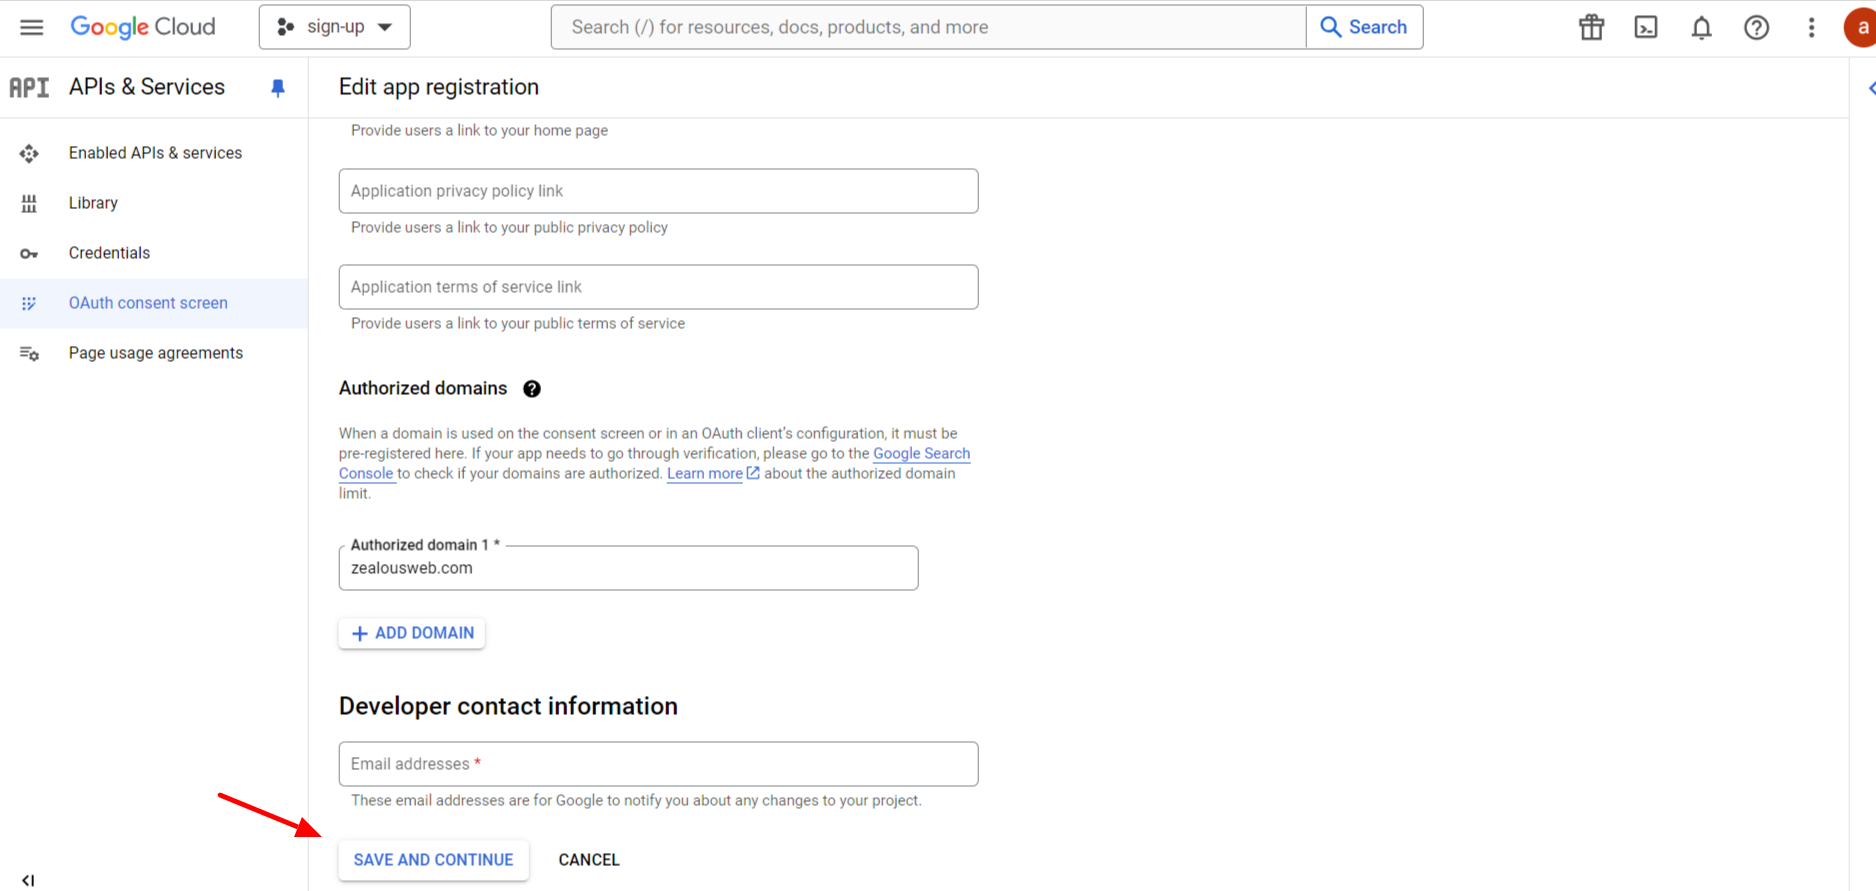
- Add Authorized domain as demo.zealousweb.com.
- On the Scopes screen, click on Add or Remove Scopes.
- Check the scopes for .../auth/userinfo.email and .../auth/userinfo.profile.
- Click on Update.
- Scroll down and click on Save and Continue.
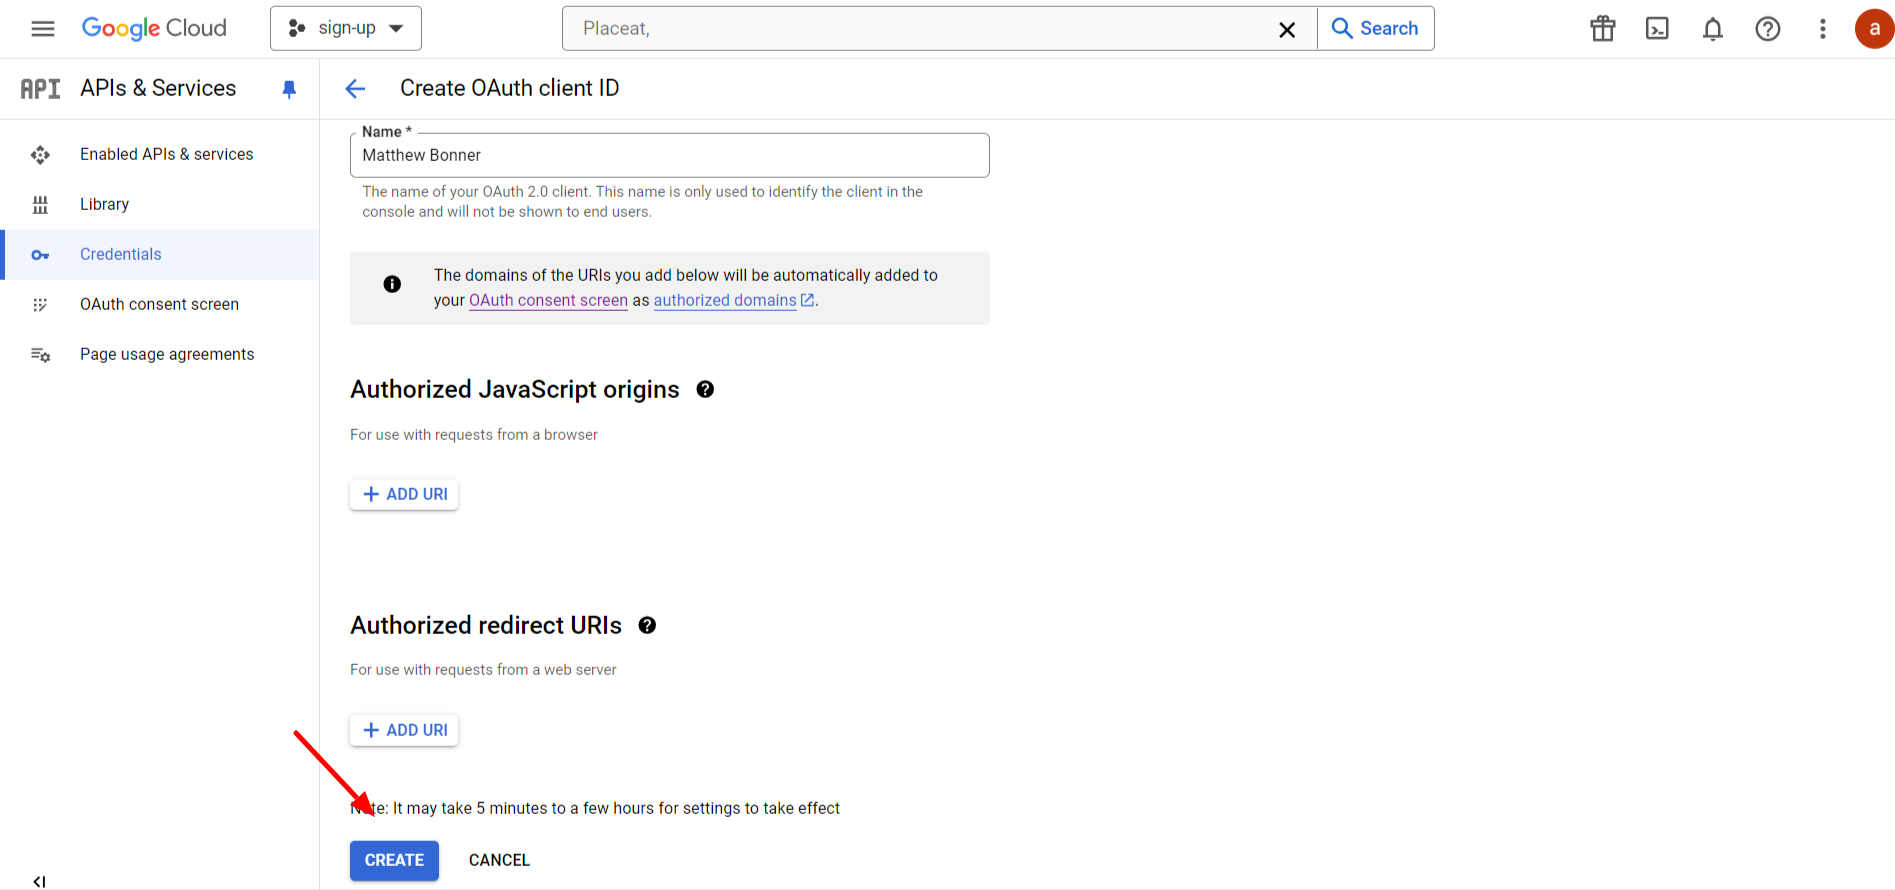
Step 6: Create OAuth Client ID
- From the left side menu, click on Credentials.
- Click on Create Credentials.
- From the dropdown, selectOAuth client ID.
- From the Application Type dropdown, select Web Application.
- Enter a client name.
- Add https://demo.zealousweb.com/wordpress-plugins/user-registration-using-contact-form-7-pro?socialsignup=google in the Authorized Redirect URI.
- Click on Create.
Step 7: Copy Client ID and Client Secret
- Copy the Client ID and Client Secret.

- Paste these values in the corresponding fields (App ID and App Secret) on your application configuration page.
- Click on Save & Test Configuration.
Step 8: Publish the App
- Click on the left side menu.
- Go to APIs & Services-> OAuth consent screen.
- Under Publishing Status, click on Publish App.
- Confirm the publishing action.
By following these steps, you will have successfully set up a Google custom app with the necessary OAuth credentials. If you need further assistance or encounter any issues, feel free to ask!
Facebook Authentication:
Here are the steps to create a Facebook account and set up Facebook Sign-Up settings using the Facebook Developers Console:
Step 1: Create a Facebook Account
If you don't already have a Facebook account, you'll need to create one.
- Go to Facebook.
- Follow the instructions to sign up for an account.
Step 2: Access Facebook Developers Console
- Go to the Facebook Developers Console.
- Sign in with your Facebook account.
Step 3: Create a New App
- Click on Create a New App or Create App.
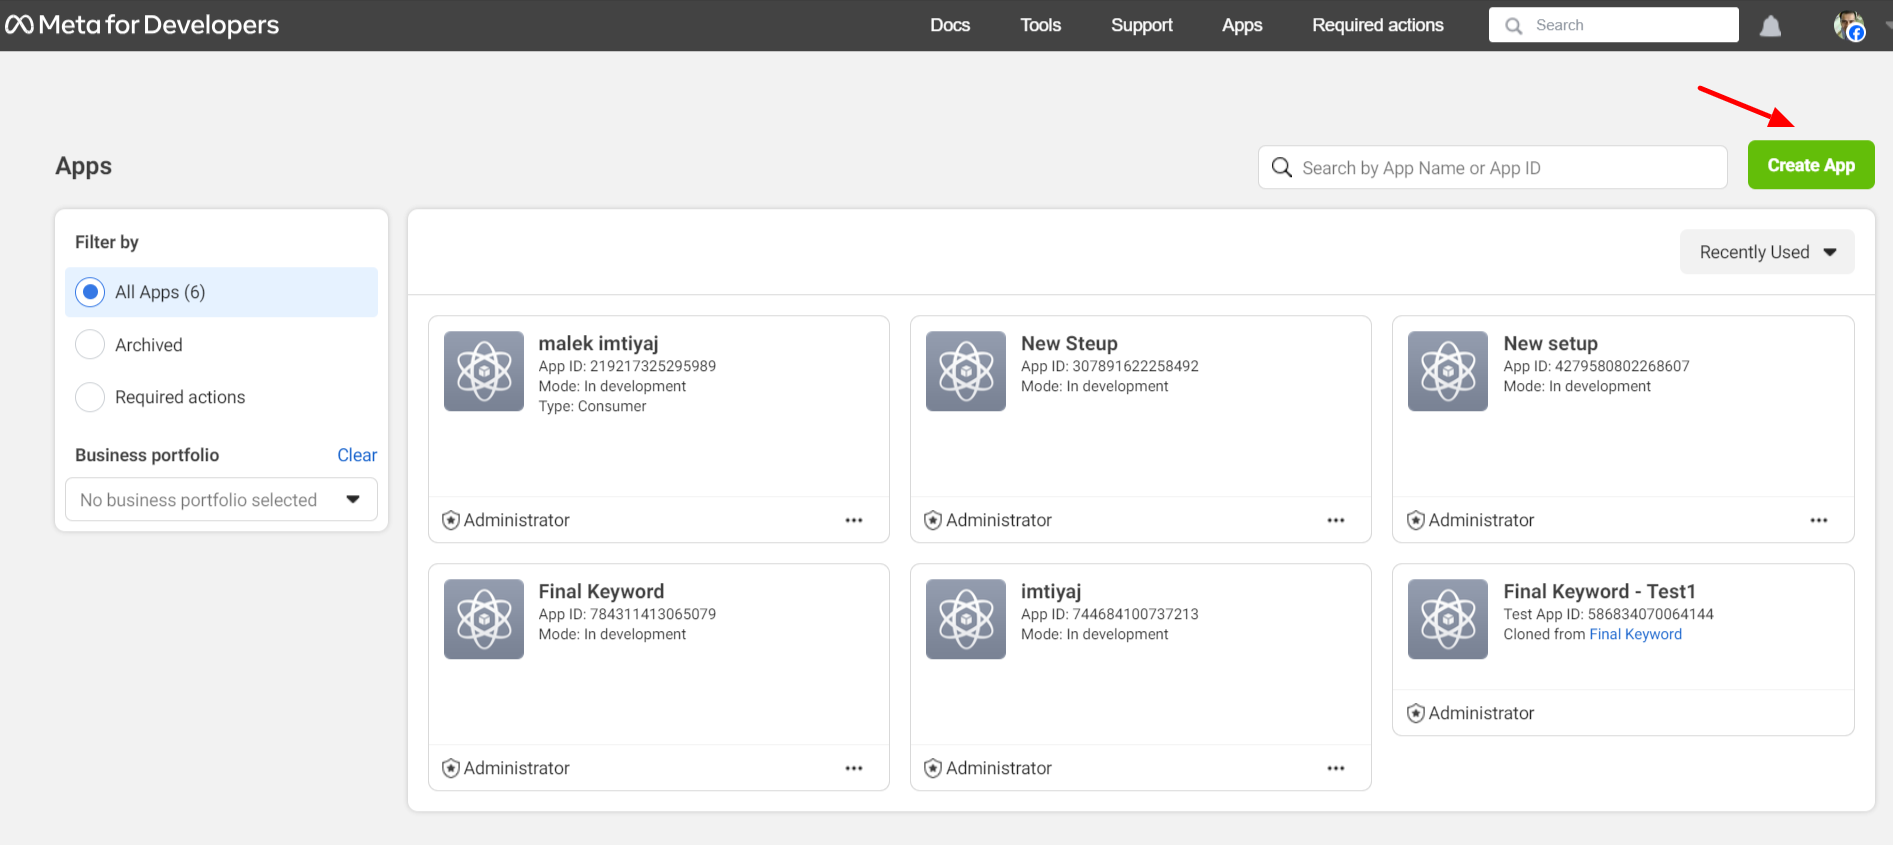
- Select Consumer on the Select App type pop-up.
- Click on Continue.
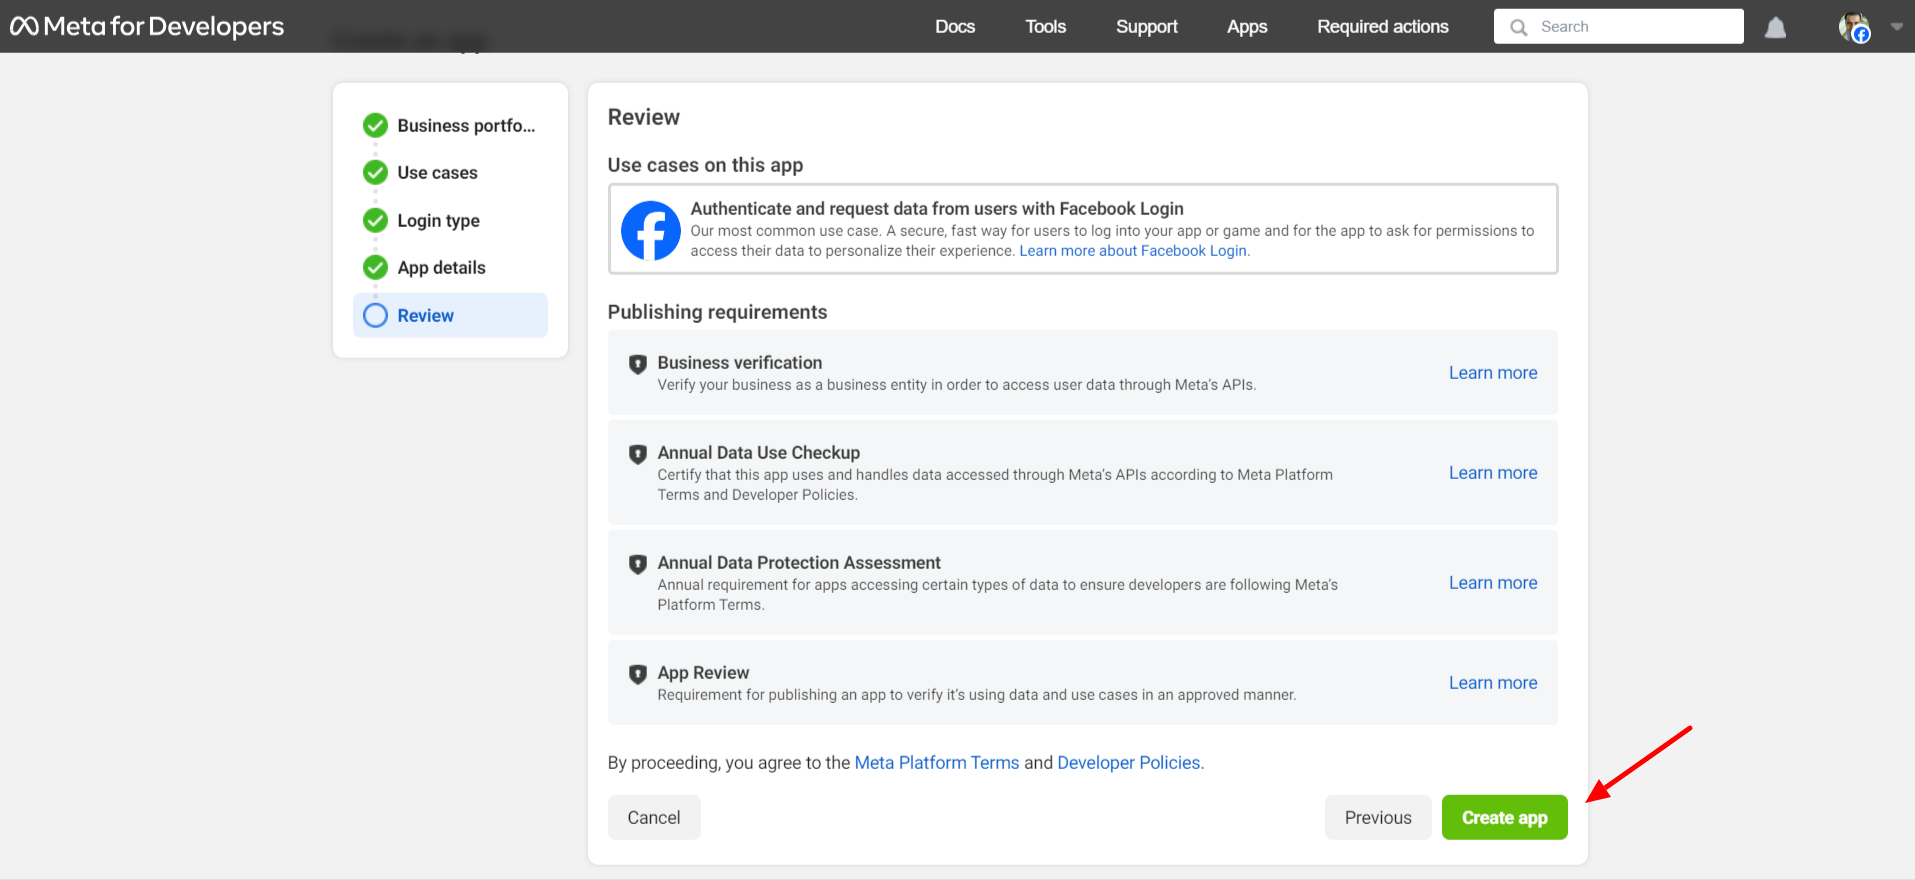
- Enter the App Display Name and App Contact Email.
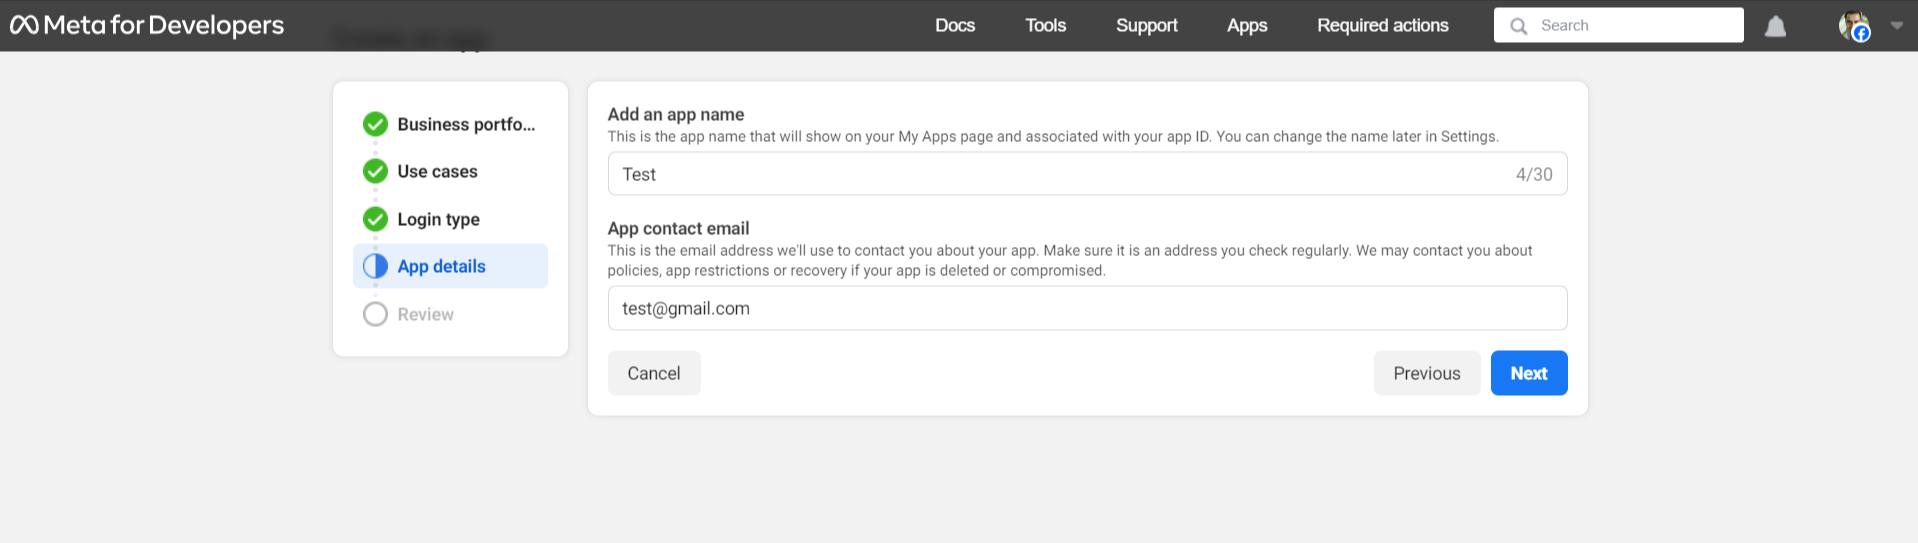
- Click on Create App and complete the security check.
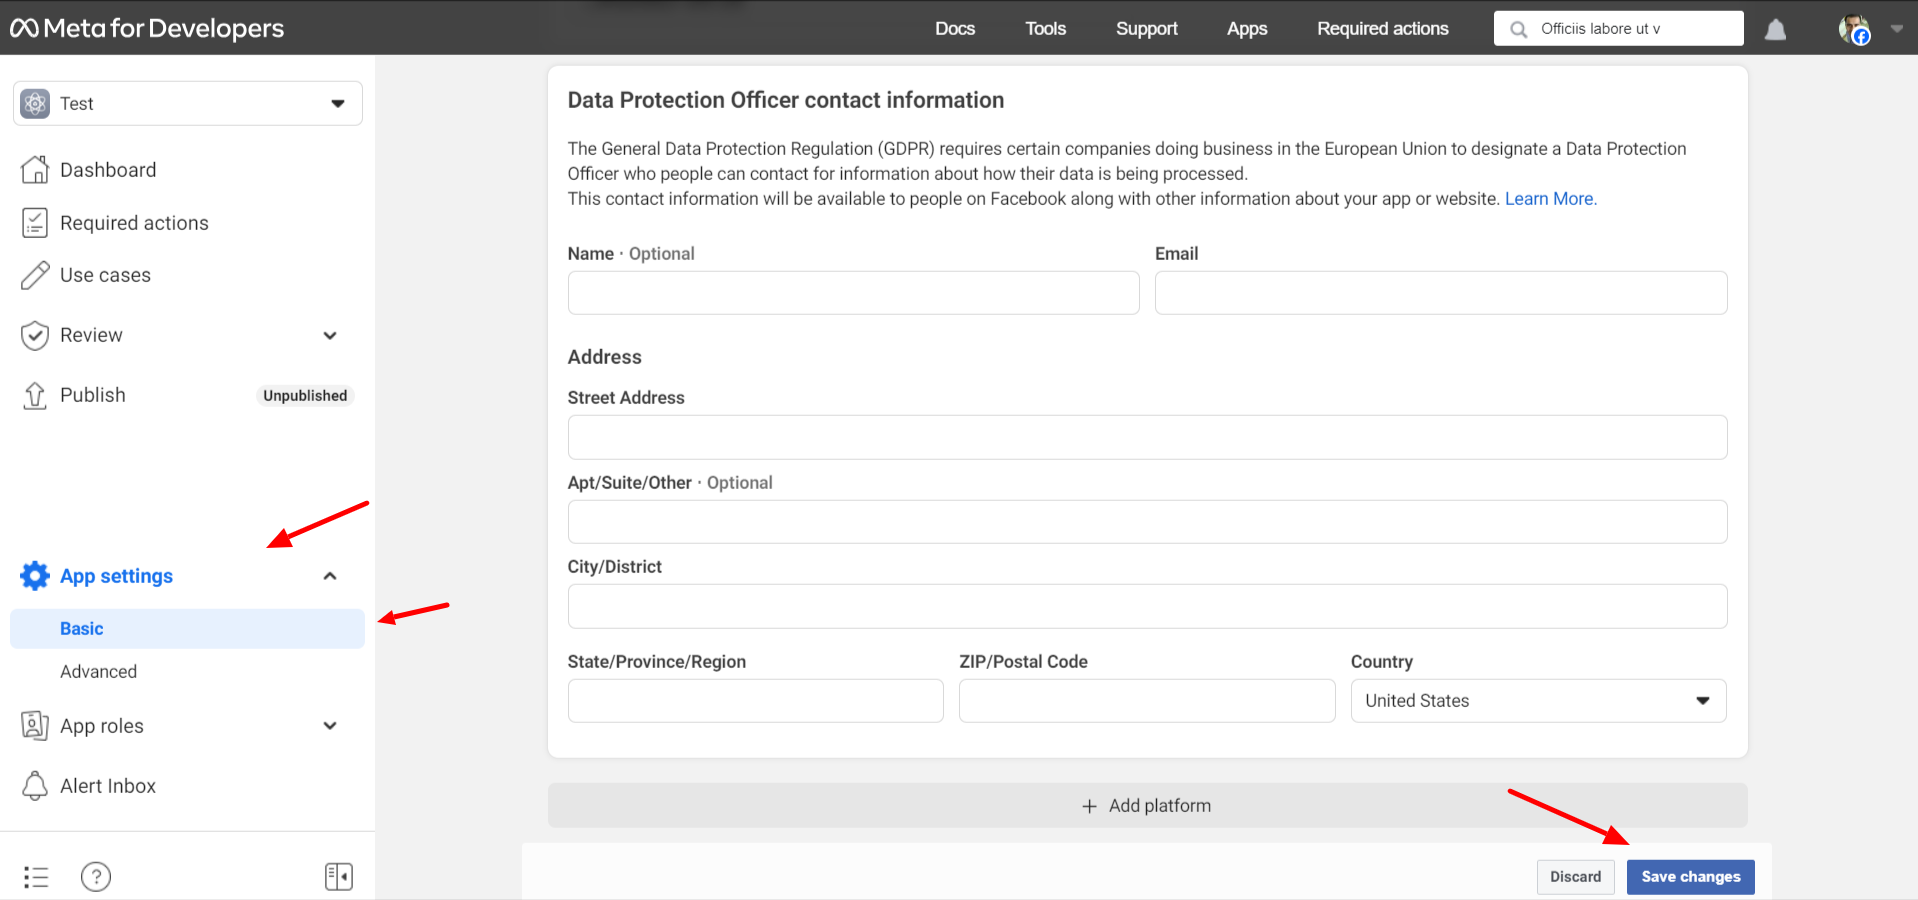
Step 4: Set Up Facebook Login
- On the "Add products to your app" page, click on the Set Up button under the Facebook Login option.
- Enter siteproofs.com in the App Domain.
- Enter your Privacy Policy URL.
- Under User Data Deletion, select Data Deletion Instruction URL from the dropdown and enter the URL of the page with instructions on how users can delete their accounts on your site.
- Select the Category of your website.
- Click on Save Changes.
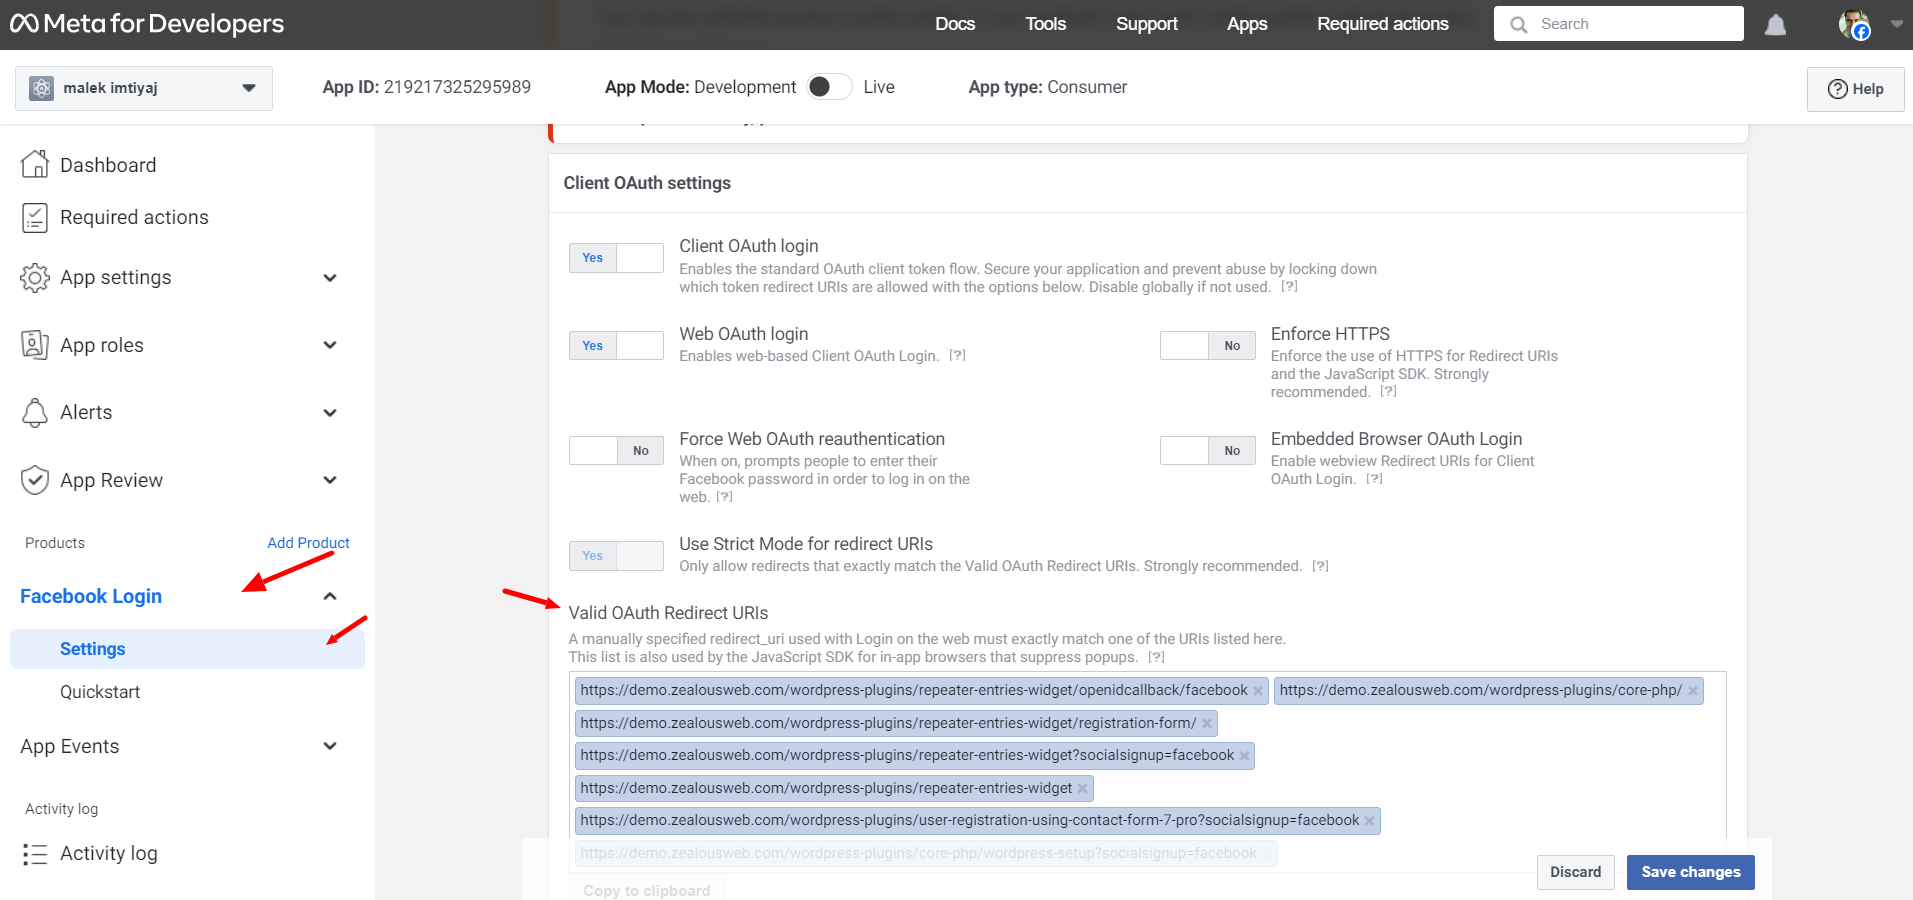
Step 5: Configure OAuth Redirect URIs
- On the left side panel, click on Facebook Login and select Settings.
- Scroll down and add the following URL to the Valid OAuth redirect URIs field: https://demo.zealousweb.com/wordpress-plugins/user-registration-using-contact-form-7-pro?socialsignup=facebook.
- Click on Save Changes.
Step 6: Request Permissions
- Click on the App Review tab from the left-hand side menu and click on Permissions and Features.
- Click on Request Advanced Access for public_profile and email.
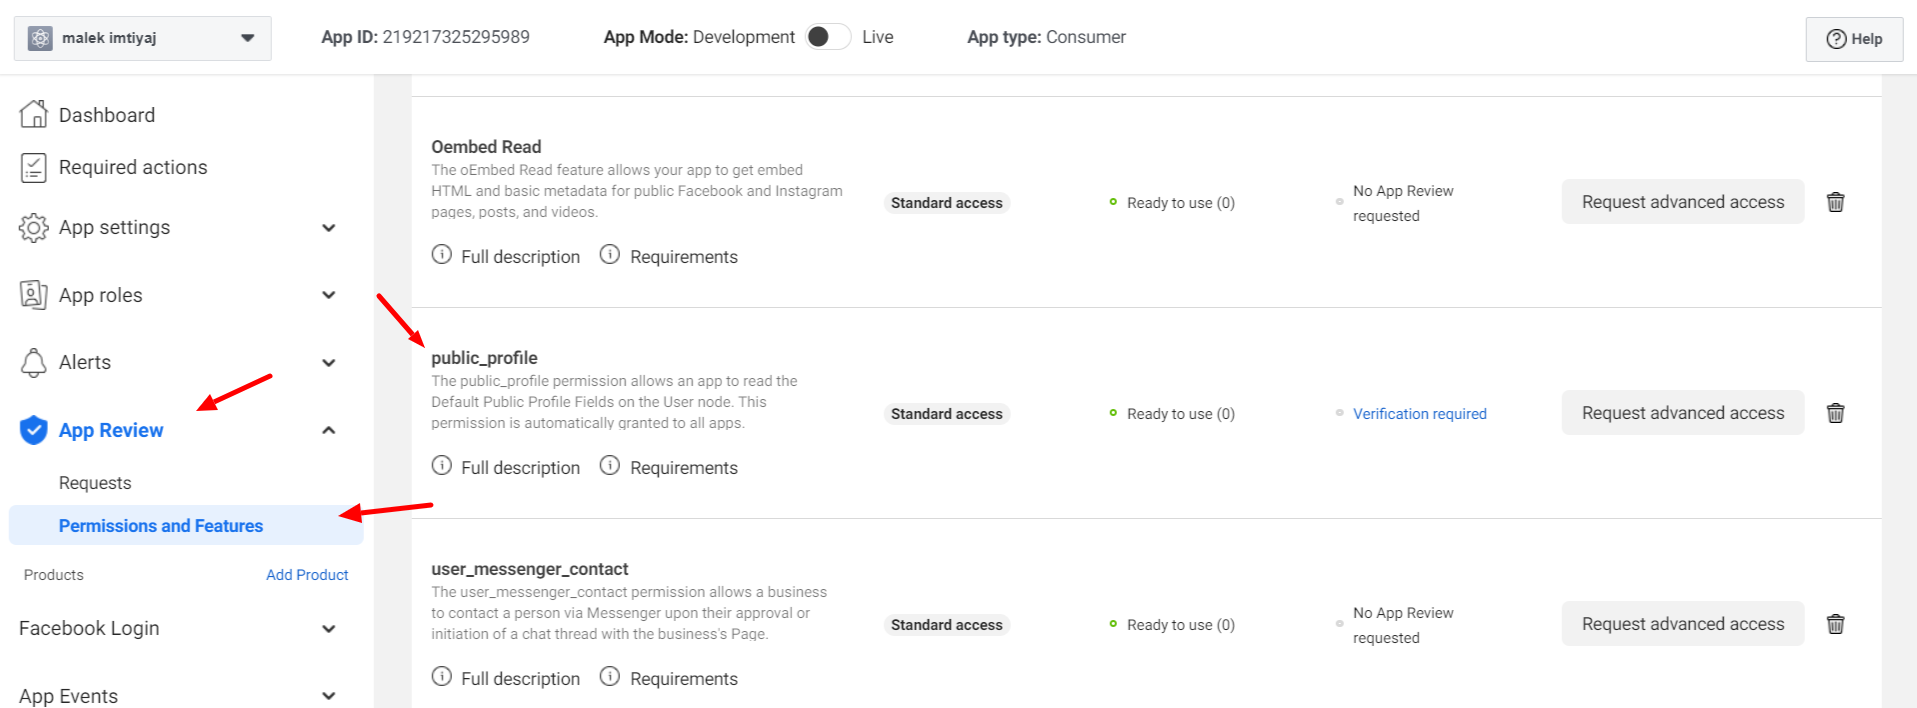
- If you need any extra data to be returned, request permission for those scopes.
Step 7: Make Your App Live
- In the toolbar, change your app status from In Development to Live by clicking on the toggle button.
- Click on Switch Mode to confirm.
Step 8: Retrieve App ID and App Secret
- Go to Settings > Basic.
- Copy your App ID and App Secret provided by Facebook.
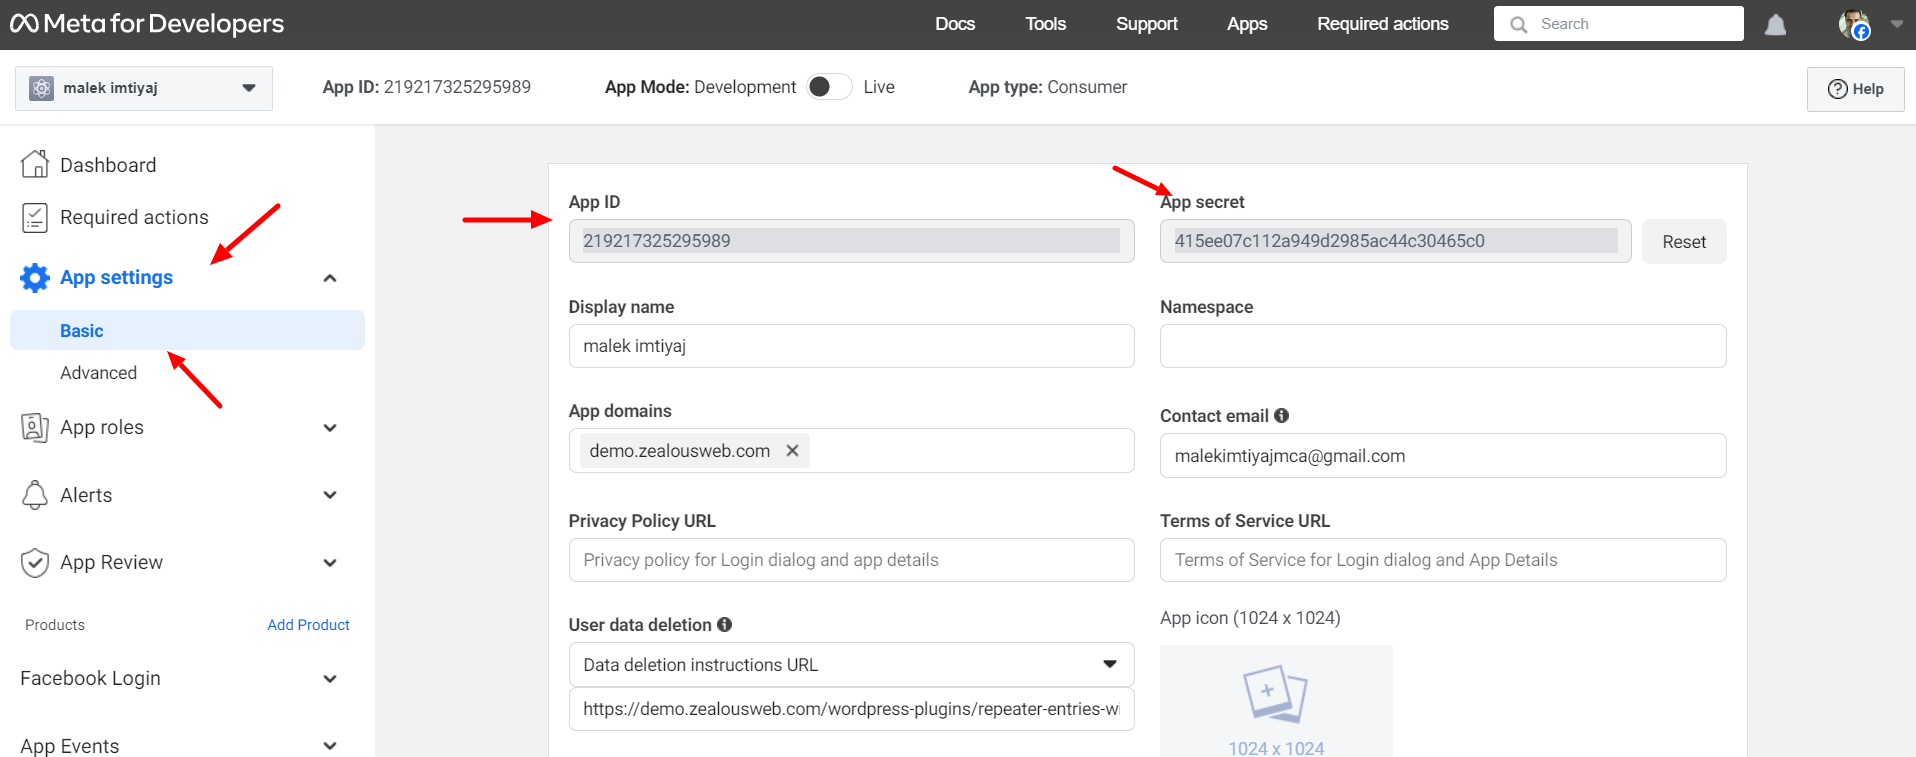
- Paste them into the corresponding fields in your application configuration.
Step 9: Input Scopes
- Input email, public_profile as the scope in your application configuration.
Step 10: Complete Data Use Checkup
- If asked, complete the Data Use Checkup.
- Click on the Start Checkup button.
- Certify Data Use for public_profile and email.
- Provide consent to the Facebook Developer’s Policy and click on Submit.
Step 11: Request Extra Attributes
- If you want to access user_birthday, user_hometown, or user_location, you need to send your app for review to Facebook.
- For submitting an app for review, follow the instructions here.
- After your app is reviewed, you can add the approved scopes to your application.
- If your app is not approved or is in the process of getting approved, use the scope email, public_profile.
By following these steps, you will have successfully set up Facebook Sign-Up settings for your application. If you encounter any issues or need further assistance, feel free to ask!
Apple Authentication:
Here are the steps to create an Apple account and set up Apple Sign-Up settings using the Apple Developers Console:
To create an Apple account, follow these steps:
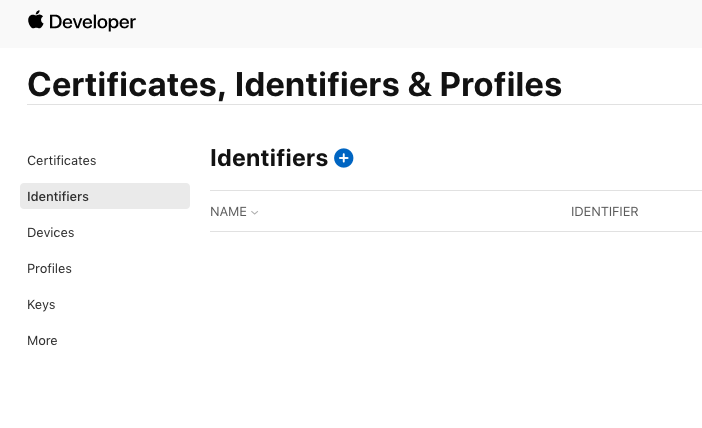
- Go to Apple Developer Console:
- Visit Apple Developer Console.
- Create a New App:
- Click on Create a New App or Create App.
- Select Consumer on the "Select App type" pop-up.
- Click on Continue.
- Edit App Registration:
- Enter all the required details such as App Name and User Support Email.
- Add the authorized domain as: demo.zealousweb.com.
- Add Valid OAuth Redirect URI:
- Scroll down to the Valid OAuth redirect URIs field.
Add the following URL:
https://demo.zealousweb.com/wordpress-plugins/user-registration-using-contact-form-7-pro/?socialsignup=apple - Click on the Save Changes button.
By following these steps, you can set up Apple Sign Up for your application.
Get Support
FAQs
Can I use multiple Contact Form 7 forms for registration or login with this plugin?
Unfortunately, the current version of the plugin does not support multiple Contact Form 7 forms for registration or login.
What happens to a user's data in the CPT when the user is deleted?
Deleting a user does not remove their data from the Custom Post Type (CPT) or any specific posts. We retain this information for our data records, ensuring that all content remains intact and accessible.
Change log
Version 4.1.1
- Access helpful resources including documentation, FAQs, and support options in one place.
- Easily submit support tickets or explore guides to resolve issues quickly.
- Stay updated with the latest insights through blogs and newsletter subscriptions.
Version 4.1.0
- Added Smart Field Validation(AI): Dynamically adjusts validation rules based on user input context (e.g., country-wise phone and email validation).
- Added AI Profile Completion Scoring: Displays a smart profile completeness score and suggests missing fields to improve user profiles.
- Added AI Content Personalization: Personalizes welcome messages, dashboards, and emails based on user profile data.
- Added CRM / Marketing Tool Sync: Automatically syncs newly registered users with Zoho CRM for streamlined marketing and customer management.
Version 4.0.0
- plugin submitted in compliance with standard WordPress Plugin Requirements:
- Meets PHP version compatibility guidelines
- Includes valid header comment structure
- Contains installation/uninstallation hooks
- Properly enqueues SCSS/JS instead of inline code
- Sanitizes and escapes all user input/output
- Includes localization (.pot/.po/.mo) for translations
- Follows WordPress coding standards
- Enable/Disable Webhook API toggle for each individual form.
- Real-time sending of dynamic user registration data to external systems/applications.
- Support for multiple forms with independent webhook configurations.
- Option to select any CF7 form and connect it with an external webhook endpoint.
- Webhook API integration for Contact Form 7 forms.
Version 3.0.0
- SCSS Framework Integration for streamlined and maintainable styling.
- Admin Dashboard Restructuring & UI Enhancements to improve user experience and visual consistency.
- Compatibility Support for Conditional Logic on Registration Fields.
- Bug Fixes: Resolved various reported issues to enhance plugin stability.
Version 2.3.5
- BuddyPress Profile Field Mapping: Mapping field This should include a dropdown list showing all BP profile fields. This mapping can be saved and reused across multiple forms.
- Custom Field Mapping for BuddyPress Profiles: Custom fields (text, textarea) are mapped in a dedicated section for advanced users.
- BuddyPress Activity Stream Integration: An option allows admins to enable or disable logging of user registration and profile updates to the BuddyPress activity stream.
Version 2.3.4
- The Front-end Bug has been Resolved.
Version 2.3.3
- Updated subscription API URL.
- Tested with WordPress 6.6.
Version 2.3.2
- New Features:
- Your Dashboard: A centralized hub for managing key information and account settings
- Edit Profile: Seamlessly update and customize profile information for accuracy
- Change Password: Conveniently enhance account security by changing passwords as needed
Version 2.3.1
- Addressed errors and warnings on the backend, ensuring optimal performance
Version 2.3
- Enhanced compatibility with WordPress VIP, catering to high-profile websites
Version 2.2
- Resolved backend bugs, ensuring smoother operation
Version 2.1
- Advanced Custom Field Mapping: Display only configured ACF fields, improving user experience
- Implemented fallback mechanism to send default mail when CF7 mail is skipped, supporting text/html content
- Added functionality to generate debug logs for easier troubleshooting
Version 2.0
- New Features:
- Social Sign Up & Login: Seamless authentication via Google, Facebook, and Apple accounts
- Push Notifications: Engage users with timely updates sent directly to their devices
- Compatibility with Multi-Step for Contact Form 7: Streamlined integration for intuitive multi-step forms
- BuddyPress Registration Compatibility: Enhanced user registration experience
- Customizable Email Templates for Contact Form 7: Personalize registration and login email notifications
- Multilingual Support: Enable users to interact with content in their preferred language
- Advanced Custom Field Mapping: Tailor user profiles with custom fields mapped to Contact Form 7
- WooCommerce Field Mapping: Streamlined integration with WooCommerce for enhanced user experience
Version 1.4
- Introduced localization support for static text, facilitating multilingual usage
- Fixed issues pertaining to active and update functionalitie
Version 1.3
- Release Date: December 13, 2022
- Eliminated unwanted messages on the login screen
- Implemented user-friendly radio button options for SMTP and PHP Mailer fields
Version 1.2
- Release Date: October 06, 2022
- Ensured compatibility with CF7 Latest version 5.6.2
- Enabled seamless integration with multi-network sites in WordPress
- Addressed minor bugs related to PHP 8, ensuring compatibility with the latest PHP version
Version 1.1
- Enhanced compatibility with the latest CF7 version
- Resolved login restrictions for disabled users in WordPress/WooCommerce
- Various minor bug fixes and optimizations for improved functionality
Version 1.0
- Initial Release